You’ve just landed on planet Waalaxy, and so far all you can see is stratospheric mist? That’s n.or.m.a.l!.☁️
Thanks to this article, you’ll be able to get to grips with Waalaxy easily & quickly, because it’s normal to wonder: but how to get started on Waalaxy?
Step 1: Find and import leads to get started on Waalaxy
Establish your Persona
Your Persona is your « » customer type: the person who is most likely to be your potential buyer.
To establish his Persona, you need to list certain characteristics and habits to fully understand who he is.
Once you’ve found your Persona , you’ll know who to prospect.
Find prospects on LinkedIn
LinkedIn is a goldmine for finding your customers. But there are so many people on this platform that you need to know how to find qualified leads.
To do this, you’ll need to use LinkedIn’s search filters, or for the luckiest among you, those of a Sales Navigator search.
Importing leads on Waalaxy
To do anything with Waalaxy, you need to have prospects, targets and customers in the tool.
We’ve told you about LinkedIn and Sales Navigator searches, but there are many more ways to import your leads, so it’s up to you to find the one that’s right for you 🤩.
Step 2: Create your first campaign
Choose your sequence
You’ve got your prospects in a prospect list. Now you need to start prospecting them. This will involve action campaigns from Waalaxy. Here are the LinkedIn actions you can take:
- Profile visits,
- Profile follow-ups,
- Connection requests,
- Messages.
Depending on your Waalaxy subscription, here are the other actions you can perform:
- Send emails,
- Email enrichment,
- CRM synchronization.
To launch your first campaign, you’ll need to choose between several sequences, which represent a sequence of actions. We’ve put together a guide to help you find the ideal Waalaxy sequence 😎.
Setting up your campaign
Add prospects to your campaign
There are two ways to do this: you can select your prospects list, or choose to populate your campaign automatically by defining a trigger event: this is called auto-import.
Define delays between actions
Between the « » connection and « » message stages of your campaign, you can define a delay between 0 and ♾️.
Do the same each time you set a delay in your campaign.
As a reminder, the delay starts from the moment the condition for moving on to the next step is met. We’ve written an article dedicated to understanding how Waalaxy campaigns work, so don’t hesitate to take a look 👀.
Fill in the fields
Depending on the sequence you’ve chosen, you’ll need to fill in various fields: connection notes, messages, emails.
The invitation note is optional, and I’d even say it’s reserved for LinkedIn Premium subscription holders, as LinkedIn has made the choice to limit free users to 5 invitation notes / month 🤑.
Each of the messages, emails… can be personalized by inserting the variables: {{firstName}}, {{lastName}} and {{company}}. Unfortunately, no other variables are currently available.

It is now possible to add attachments to LinkedIn messages . However, the ability to add attachments to emails is not yet available ⚠️.
If you see a difference between the number of leads added and the number of leads in the campaign
This means that the prospects you’ve added don’t meet the conditions for entering the campaign. There are several reasons for this:
- Invitation: sequences starting with this action are reserved for prospects who are not yet part of your network (status ”Not connected”),
- Message: this action is reserved for your 1ᵉʳ degree relations on LinkedIn (status Connected),
- Prospects who have already received a pending connection request (Status: Pending) can only be added to Orion sequences ,
- Email: prospects who do not have an email address entered in Waalaxy cannot be added to a simple email sequence, without an enrichment step (for example),
- Prospects already in a campaign, even if it is paused, cannot be added to a new campaign.
Step 3: Track your Waalaxy campaign
Once all these steps have been completed, you can launch the campaign by clicking on « Start campaign ».
The actions will be added in the queue.
You can follow the progress of your campaign from the « Campaign tab », by clicking on your campaign.
To see exactly where your leads are in the campaign, on the right-hand side you can see the « Overview » and the « Details », which will give you the number of leads at each stage:
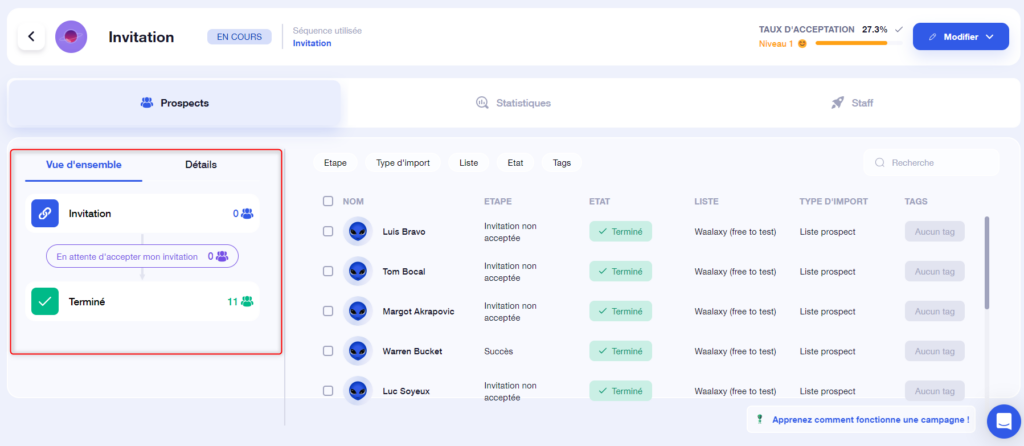
By using the stage and status filters, you’ll get a list of leads that are in progress or have finished, and if they’re in progress, you’ll know exactly who’s at what stage 😎
Congratulations, you’ve successfully imported your leads and launched your first campaign. 🥳 Now you know how to get started on Waalaxy!
Step 4: What do I do when my campaign is finished?
A finished campaign appears with a red dot. This means that all prospects have exited the campaign and received all the actions they were supposed to receive.
To find out what to do after your first campaign, you can follow this guide. 🎆
Frequently asked questions
Why haven’t all my prospects been imported?
There are several reasons for the difference between the number of leads you need to import and the number of leads you will find in your list:
- Duplicates: these prospects were already in your lists (or those of a colleague on your team), and our anti-duplication control was activated to prevent them from being imported twice.
- False positives: the job title of the prospects does not match your search keyword (false positive sorting can be deactivated).
- Off-net: you see “LinkedIn user” in your search, meaning that the prospect is beyond the 3ᵉ relationship level. You have no access to his profile (LinkedIn limit), nor can Waalaxy access it for import.
- Your search has more than 1,000 results: LinkedIn only shows 100 pages of 10 results, so you can’t import more than 1,000 prospects per single search (2,500 for Sales Navigator).
What is a quota?
Quotas represent the maximum number of actions you can send each day. They are set by Waalaxy as a means of differentiation between subscriptions and to protect your account from LinkedIn’s anti-spam detections.
They are independent for each type of action, and also within a Team (each member has his or her own quota).
Do my campaigns run when my computer is off?
If you have a paid plan, your Cloud must be activated for Waalaxy to work, it’s mandatory, and the big advantage is that your campaigns continue to run in your absence (computer off).
If you’re on the Freemium plan, you’ll need to keep the computer on and a LinkedIn tab open for the actions to run 👌.
Can I schedule the start of a campaign?
You cannot schedule the start of a campaign. However, you can set the days and times when Waalaxy will send actions, from Settings > Account activity :

What does the colored circle next to my campaign name mean?
It tells you the status of your campaigns:
- If the circle is green, you have leads in progress, and actions in the queue,
- If the circle is orange, you have prospects in the campaign, but no actions in the queue, because your prospects are waiting for validation of a condition, or in a delay stage before moving on to the next action,
- If the circle is red, you no longer have any active prospects in the campaign.
In the last two cases, don’t hesitate to add more prospects to maximize your quotas 🚀.
Can I add leads to a current campaign?
Yes, at any time, in just a few clicks:

Conclusion
So, now that you know how to get started on Waalaxy, you can transfer your data from ProspectIn, import leads, launch campaigns at will, interpret your results, retrieve your hot leads, prospect new targets, and lots more!
Until next time! ✌️


