- What exactly is Pipedrive?
- Why should I synchronize Waalaxy with Pipedrive?
- How do I synchronize Waalaxy with Pipedrive?
- How is data sent?
- Data synchronization without a campaign
- Where are the data sent?
- How do I select which data to send?
- Frequently asked questions – Synchronize Waalaxy with Pipedrive
- Conclusion – Synchronizing Waalaxy with Pipedrive
It’s about time we brought you a tutorial on how to synchronize Waalaxy with Pipedrive, the famous tool that lets you easily track and relaunch your deals as part of your prospecting strategy.
This guide is designed to enable you to automatically populate your Pipedrive with data retrieved 🪝 from your Waalaxy prospecting campaigns.
What exactly is Pipedrive?
Pipedrive is a platform dedicated to sales reps and designed by sales reps ❤️🔥. Their mission is simple: to develop a customer relationship management tool that would help users visualize their sales process, and increase their productivity.
Why should I synchronize Waalaxy with Pipedrive?
The two tools are complementary. With Waalaxy, you find prospects and establish initial contact with them. With Pipedrive, you manage your sales process. It goes without saying that it’s absolutely essential to link your prospecting efforts to your sales efforts 🤑. No more need to update manually, it’s all done automatically. 🤩
How do I synchronize Waalaxy with Pipedrive?
You can synchronize Waalaxy with Pipedrive in just a few clicks: no more need for a webhook! 🚀
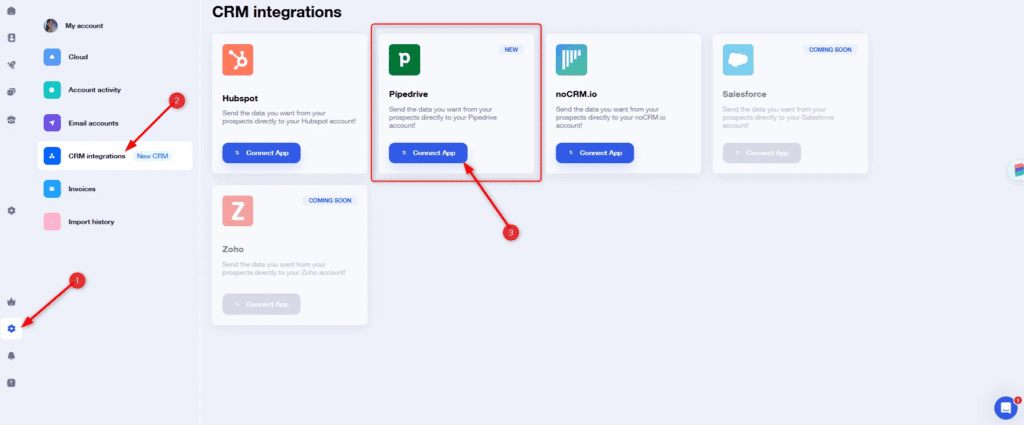
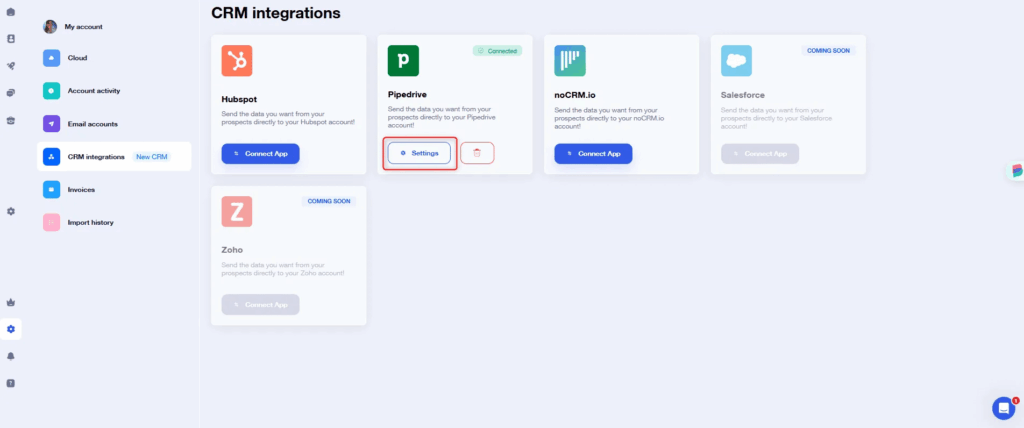
It happens in Settings > CRM Sync > Pipedrive > Connect application:
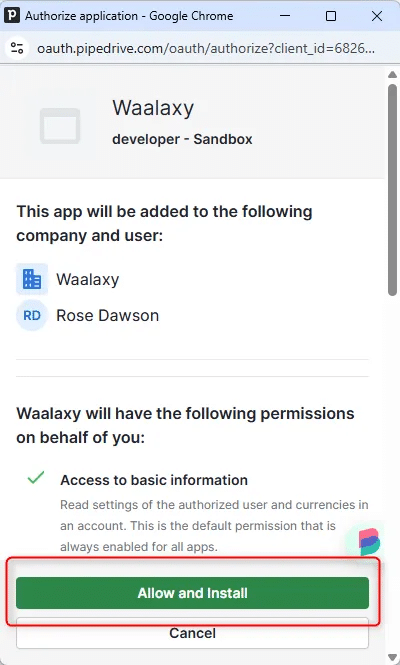
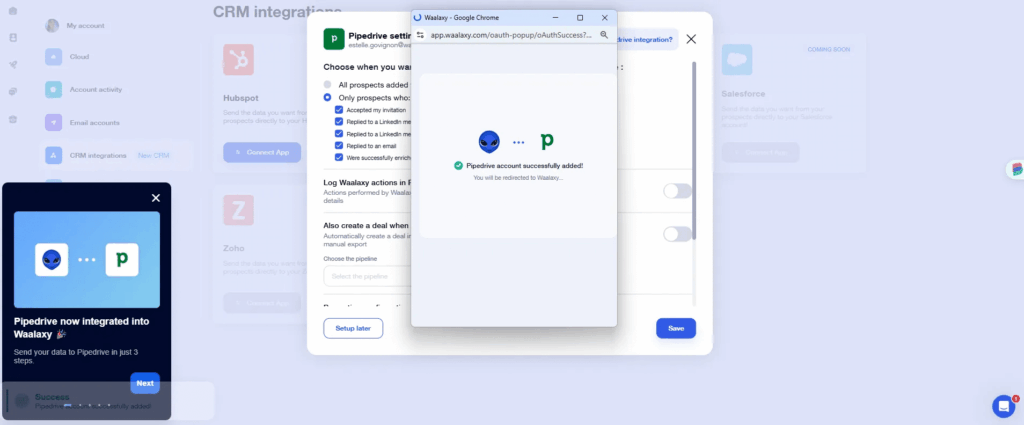
A window will then open: you’ll need to enter your Pipedrive credentials. If you’re already connected to Pipedrive in the browser, simply click on “Authorize and Install”:
And that’s it! In just a few seconds, you’ll know how to synchronize Waalaxy with Pipedrive:
Once your account is logged in, you can access the CRM synchronization settings.

How is data sent?
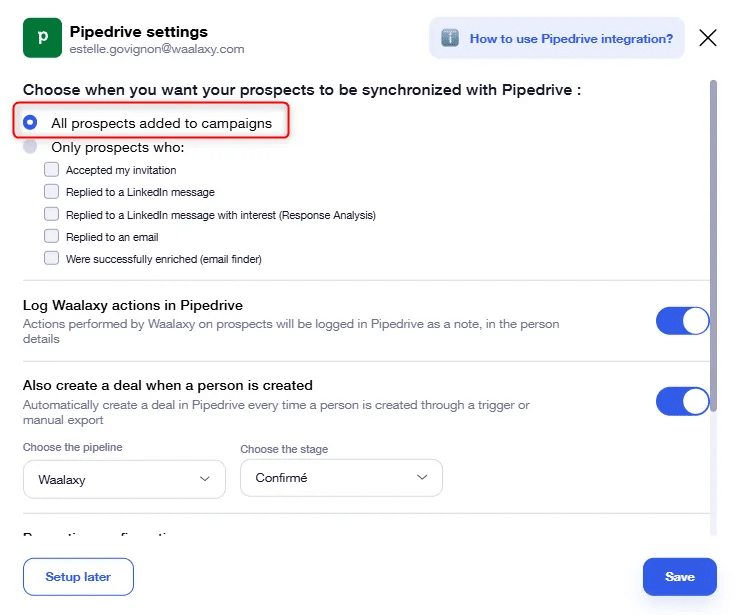
Your prospects’ data can be sent to Pipedrive according to the criteria you choose.
Synchronization of leads as soon as they are added to a campaign
You add prospects to a campaign, and no matter what the sequence, they’re synchronized. Simple, basic.
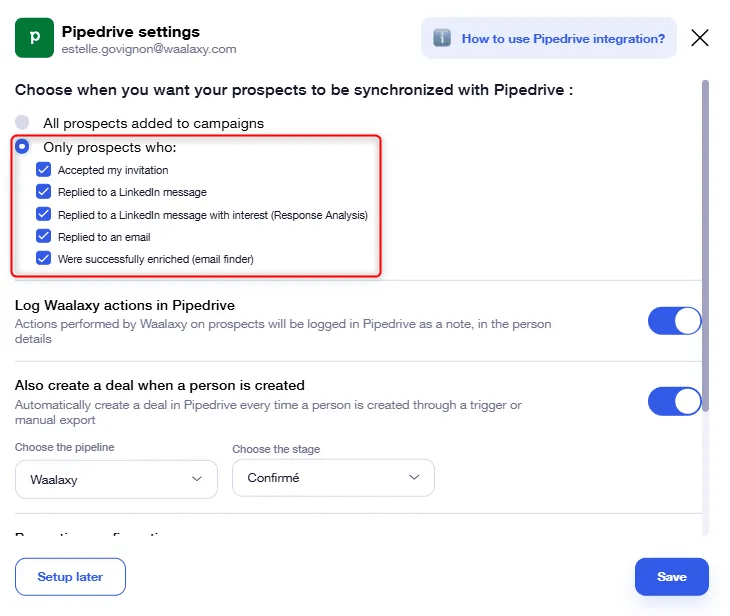
Trigger-based lead synchronization
Here, leads are synchronized in Pipedrive as soon as they perform one of the specified actions. Among the triggers you can choose:
- Accepted my invitation
- Responded to a LinkedIn message
- Responded to a LinkedIn message and is interested (our AI analyzes the response)
- Responded to an email
- Successfully enriched (Email Finder): a pro email address was found.
You can choose just one, or several:
Data synchronization without a campaign
Would you like to send data to Pipedrive without running a campaign? You’re probably wondering what’s the point in doing so. CRM synchronization is not retroactive. So prospects who have already completed a trigger (e.g. accepted my invitation) will not be synchronized.
Here’s how to add them to Pipedrive, in just a few clicks:

💡This can also be done from within a campaign.
Where are the data sent?
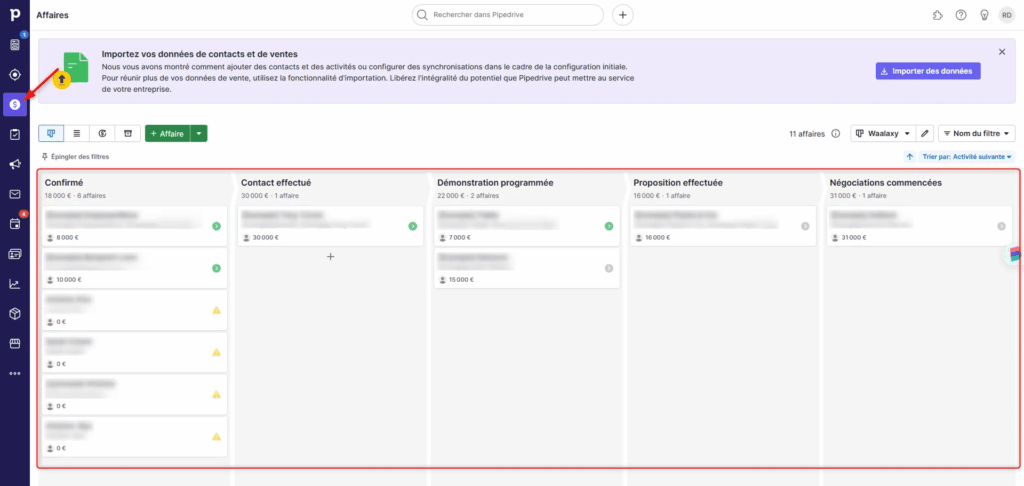
From the settings, you also have the option of indicating whether you want to send leads to a pipeline and create a deal.
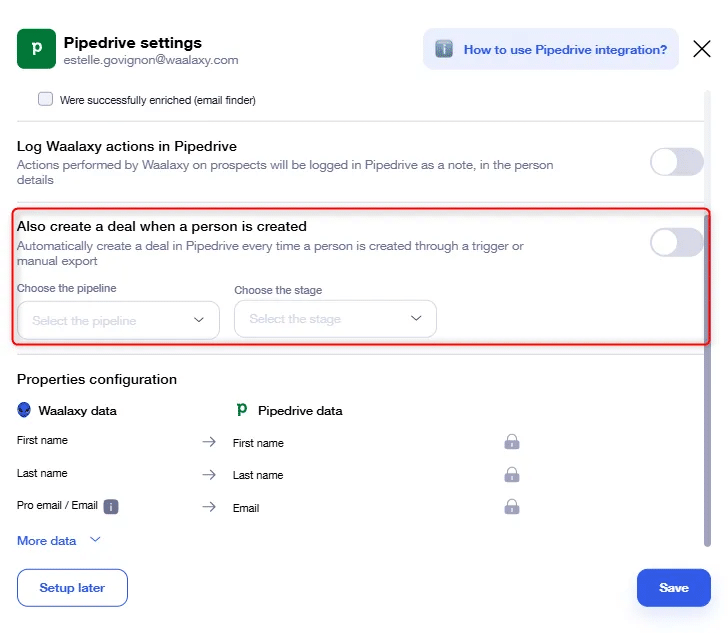
By selecting this option, leads will be displayed in the “Business tab” as a deal in your pipeline:
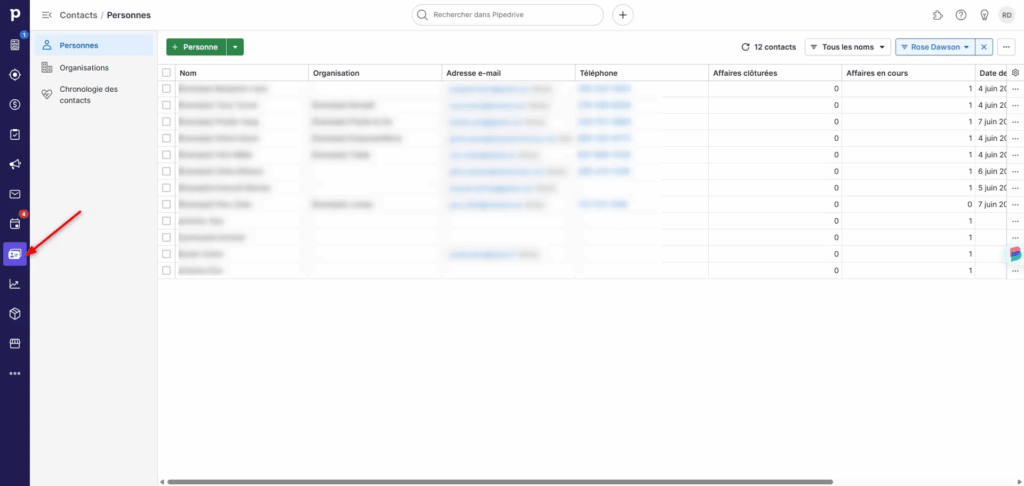
If you do not select this option, leads will only appear in the “Contacts” tab:
How do I select which data to send?
Still in the settings, you can decide which Waalaxy data you wish to send to Pipedrive:
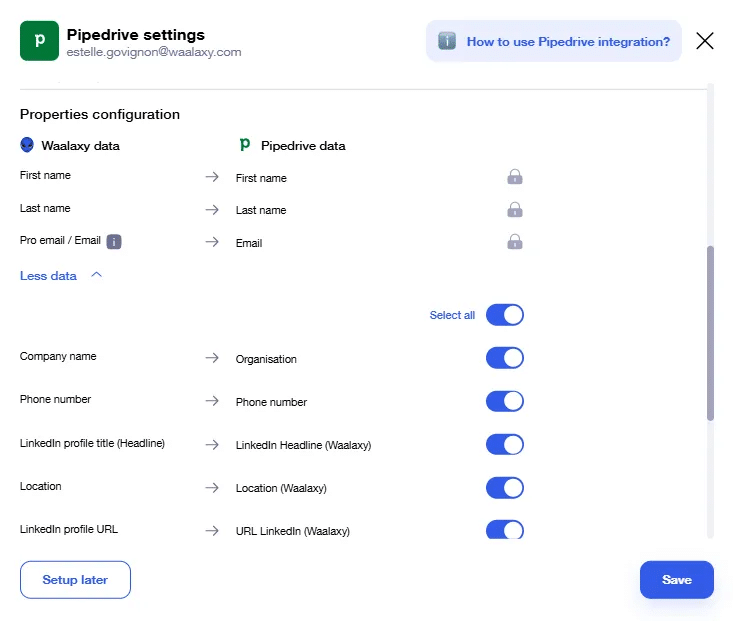
The first name, last name and email fields are mandatory. You can then choose to add others (or not) 👌.
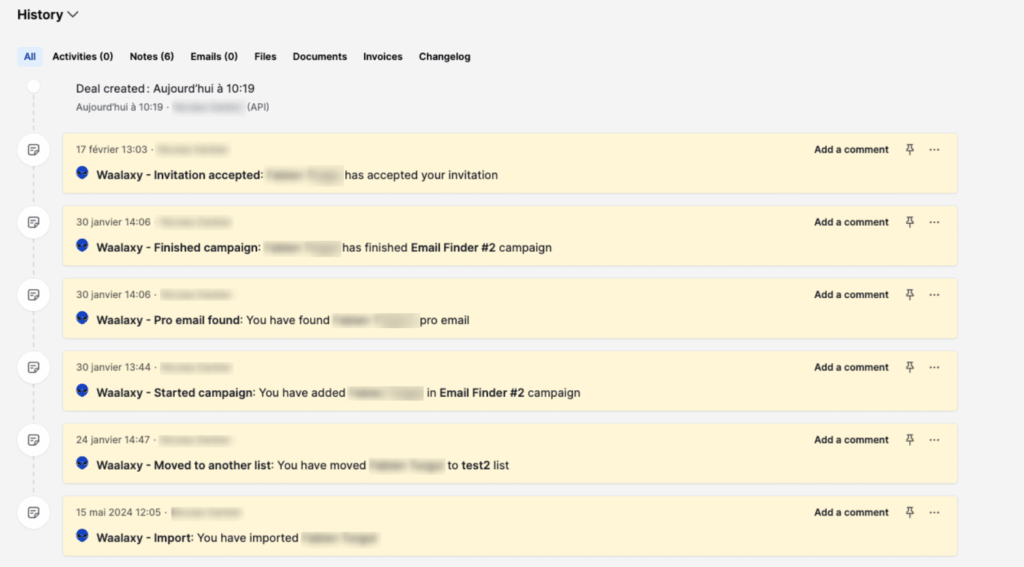
You also have the option of enabling Waalaxy activity synchronization:
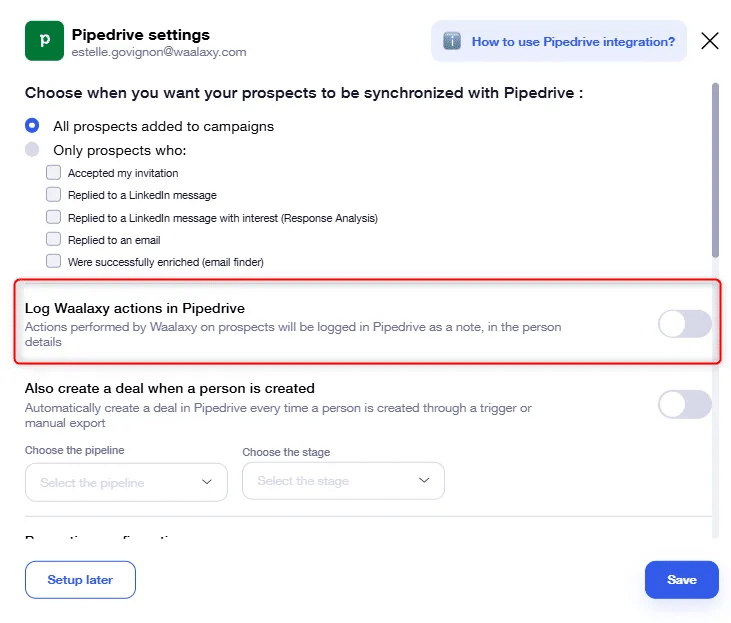
Specifically, if Waalaxy sends an invitation to the prospect, this will be added as a note in Pipedrive, in the prospect’s details :
Frequently asked questions – Synchronize Waalaxy with Pipedrive
What subscription do I need to synchronize Waalaxy with Pipedrive?
The CRM synchronization feature requires a Waalaxy Pro, Advanced or Business subscription.
Do I have to use a CRM Sync campaign to synchronize Waalaxy with Pipedrive?
No. In fact, there’s no point. Your prospects will be defined according to the criteria selected in the global parameters.
Where are prospects sent?
If you choose to create a deal in the pipeline, you’ll find them in the selected pipeline. Otherwise, they will be in the “Contacts tab”.
What data can I send to Pipedrive?
Here’s a list of all the data you can synchronize 👇
Prospect information :
- LinkedIn Email / Pro Email
- First name, Last name
- Last name,
- Company name,
- Company website,
- Phone number,
- LinkedIn profile URL,
- Position,
- Region,
- Prospect status,
Prospect information linked to Waalaxy :
- Prospect tags on Waalaxy,
- List of prospects (Waalaxy) the prospect is in.
Can I see exactly which message my prospect has replied to?
No! You’ll only be able to see whether or not the prospect has replied to a message sent, but not which one.
Is there a risk of having duplicate leads in Pipedrive?
No. Waalaxy uses different prospect data to check whether the prospect is already in your CRM. If this is the case, the data already present will be updated 👌.
Can I send prospect data from Pipedrive to Waalaxy?
No, it is not possible to send data from third-party software to Waalaxy. We have written an article listing all the ways toimport leads into Waalaxy.
Conclusion – Synchronizing Waalaxy with Pipedrive
That’s it! You now know how to synchronize Waalaxy with Pipedrive to retrieve your prospecting data. The native integration no longer requires the use of webhooks, making the maneuver much quicker and easier to set up 😎. That’s all for today!