
Learn how to set up cold emailing for Waalaxy with Google Domains!
In the world of Cold Emailing, there are 3 fundamental pillars that will allow you to have convincing results:
- Segmentation and targeting,
- Copywriting,
- Deliverability.
The first two points are also essential in LinkedIn prospecting, so a number of you master these two aspects.
Unfortunately, cold emailing includes a new, more technical component: deliverability.
This is what we will see today.
Deliverability, what is this?
Deliverability is the ability of your to land in the inbox of your target.
Unless you are a seasoned cold emailer, we advise you to start with a new and virgin base.
Discover the basics of Cold Emailing.
I – Use a new domain with Google Domains
In order to secure your official domain, we recommend you use a secondary domain dedicated to cold emailing.
Choose a domain from the predetermined list of official Google domains.
In our case, we had chosen “waalaxy.co.uk” (our official domain name is waalaxy.com), but at the moment it’s no longer possible to personalize your domain anymore.
1/ Create yourself a Gmail account (if you don’t already have one)
Via this link.
2/ Start by choosing your domain name on Google Domains
Via this link.
Go to your shopping cart and pay (you’ll need a “Google Workspace”, you can check this there already. The Business Starter offer is enough).
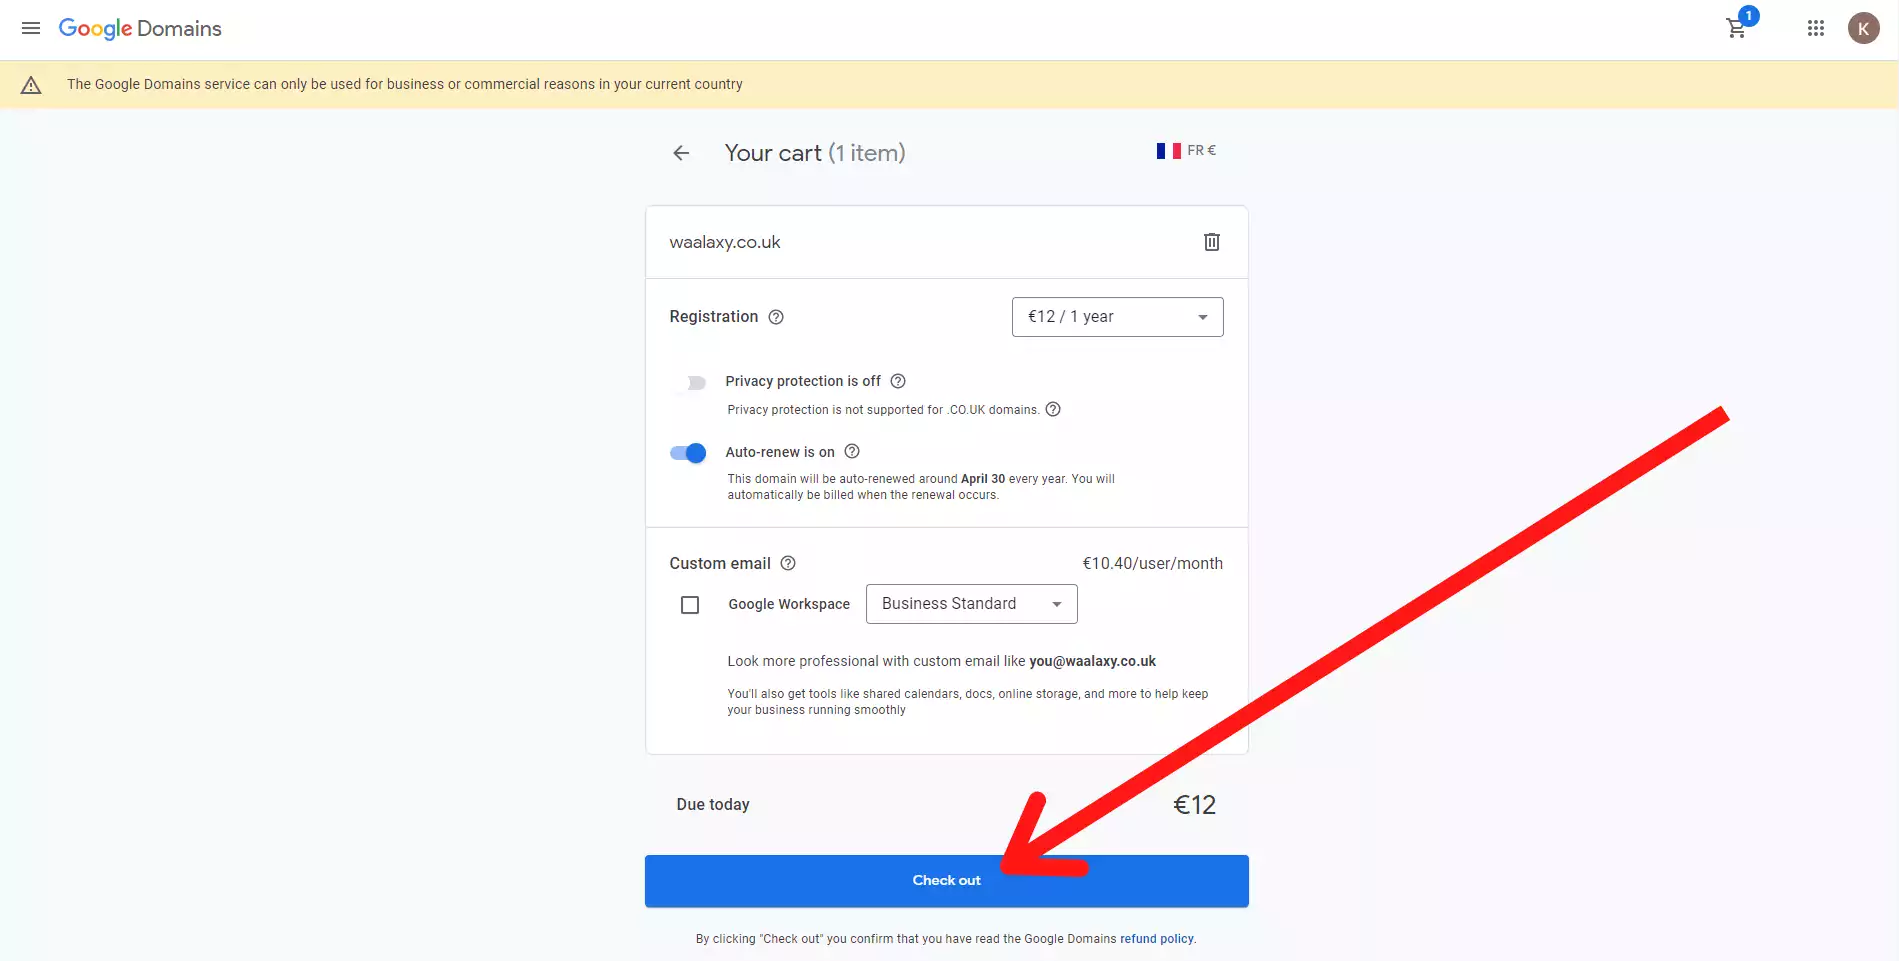
Enter your information then proceed to checkout.
You will then use Outlook/Microsoft 365 to send your cold emails.
While GSuite (the business equivalent of Gmail) is commonly recognized as the basic cold email solution, our experience shows that Outlook is by far the most robust and effective option for optimal deliverability.
The explanation is simple: while the former is used by a vast majority of small businesses and marketers with sometimes dubious uses, the latter is mainly adopted by much larger companies, with much more regulatory uses.
The abuses are therefore less numerous, and the distrust of algorithms and servers is, in fact, much less.
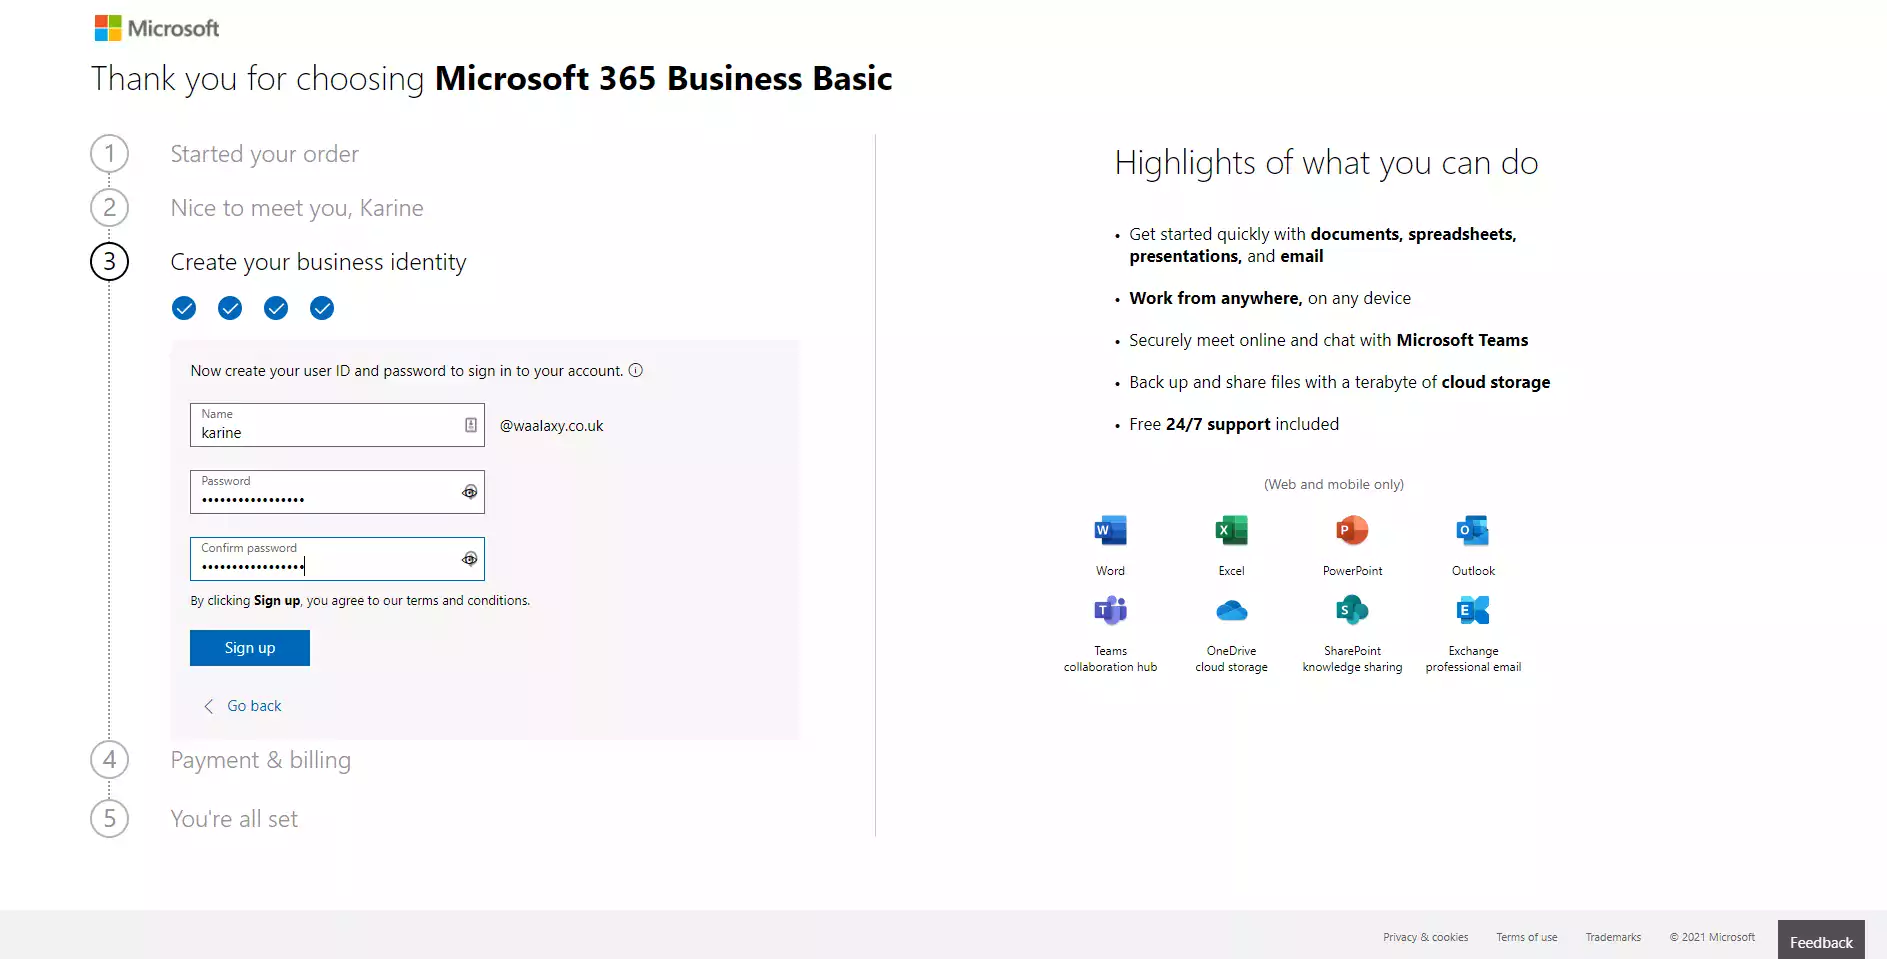
3/ Buy an MS365 license (the basic offer will be more than enough)
Via this page.
After filling in your information, choose your domain name on Google Domains 😜.
Enter your domain name, from the proposed list in “Get a Microsoft domain for now”, the one you just bought.
Verify your domain by creating a TXT record, to do this, enter the information below in your Google Domains page.
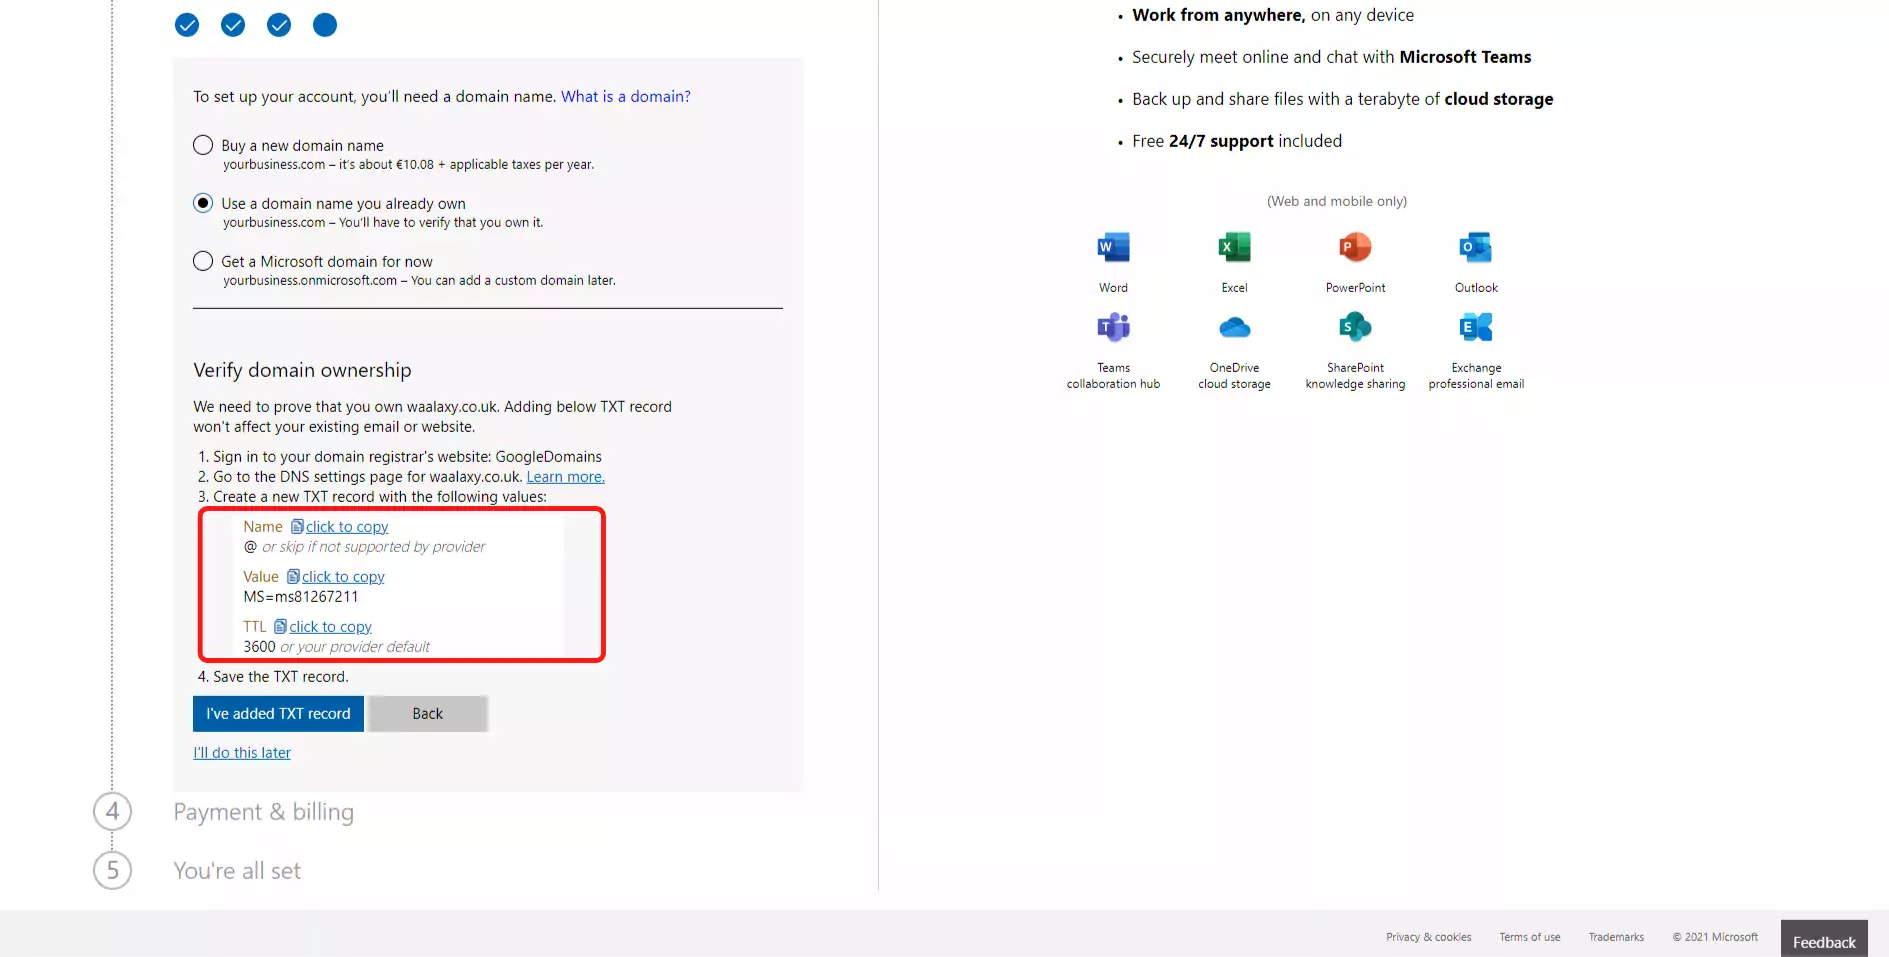
From your Google Domains page, click on the “DNS” tab, scroll all the way down to “Custom resource records” and enter the fields:
- “@” in “Name”.
- “TXT” in “Type”.
- 3600 in “TTL”.
- Then the “Value” indicated on the Microsoft365 page in the “Data” field (a value in the format “MS=ms90210090”).
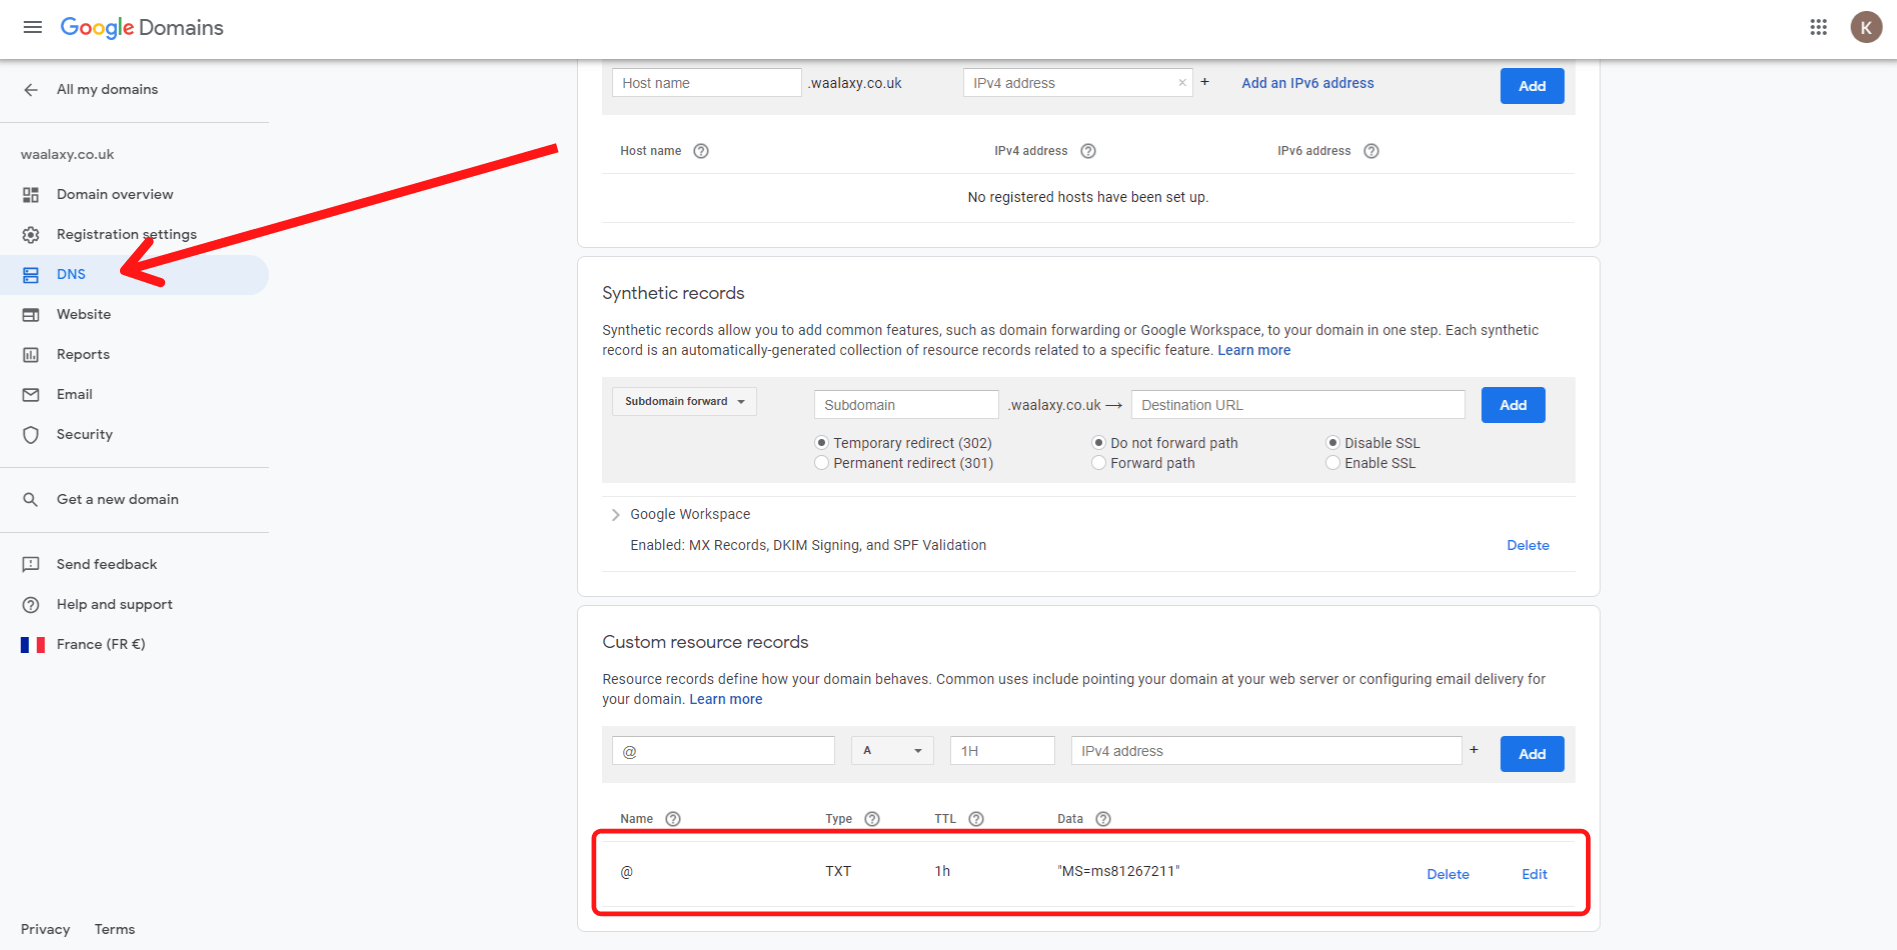
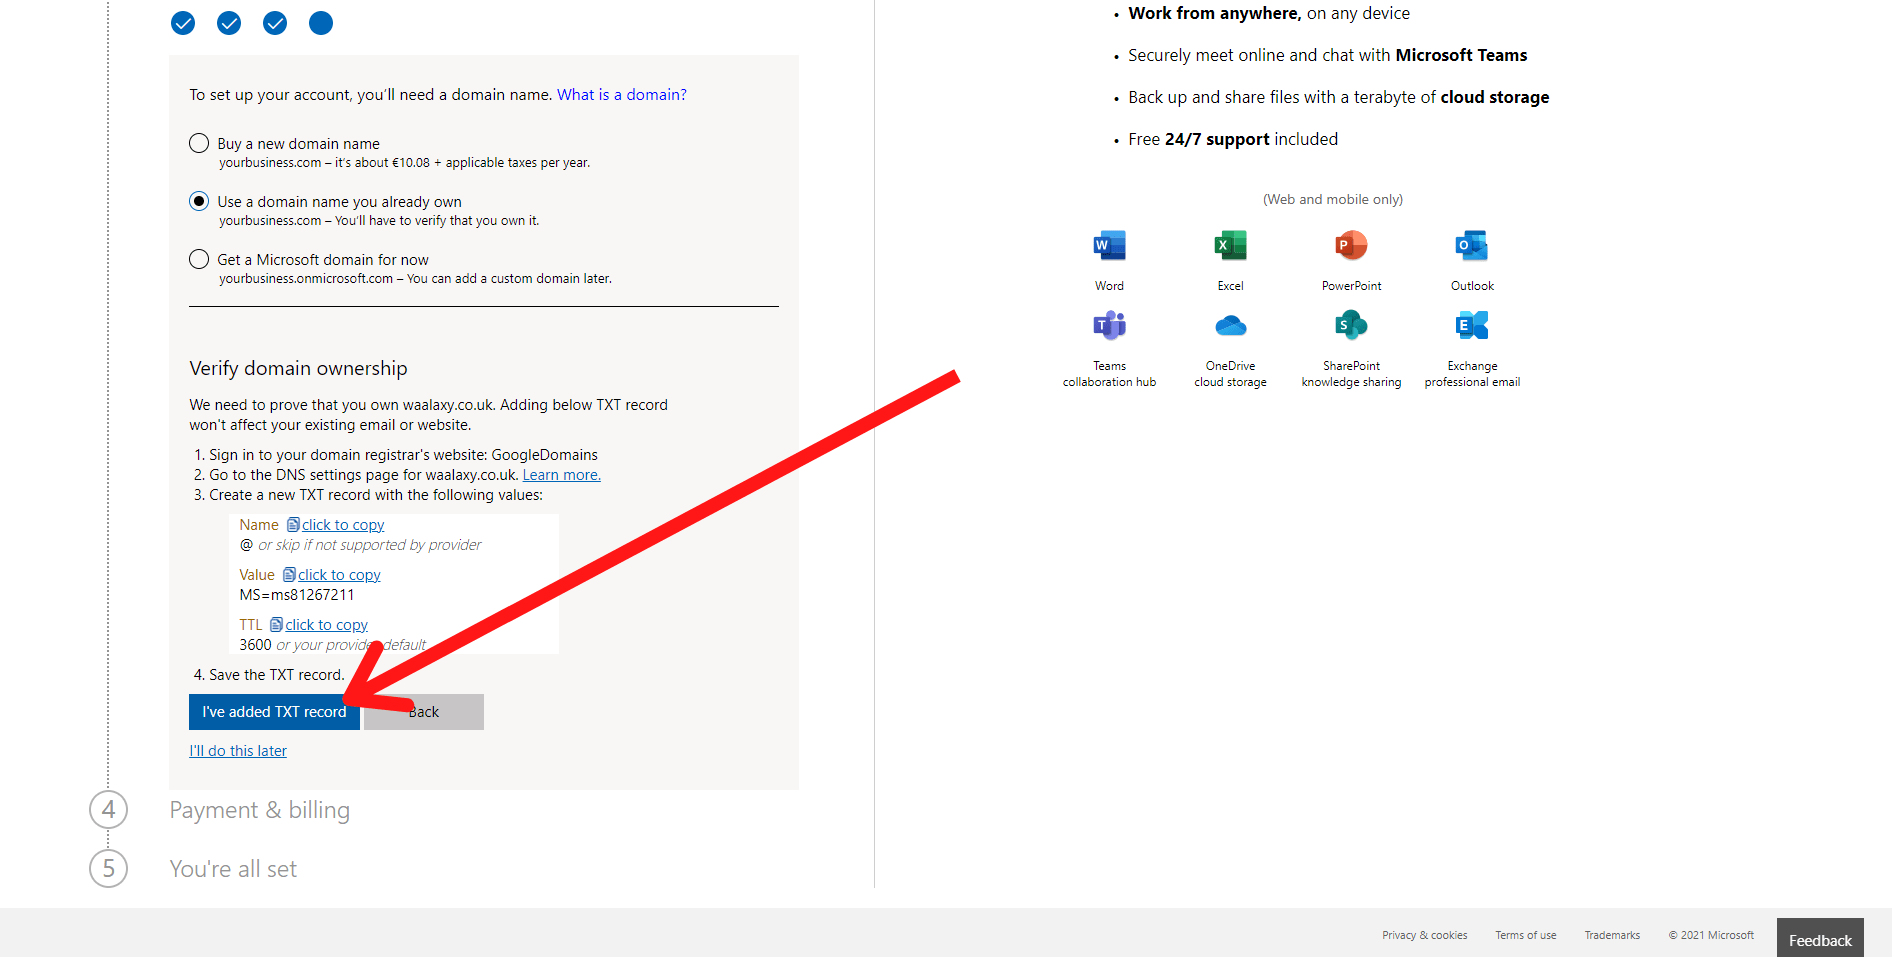
Click on “Add” to add the TXT record. Wait about ten minutes for the change to take effect and then click on “I’ve added TXT record” on the Microsoft365 page.
Finally, create your identity and proceed to payment.
II – Performing the DNS programming
1/ To get started, go to the Google email authenticator page
Go to this link.
If it requests you to connect, use your new email address which owns the workspace.
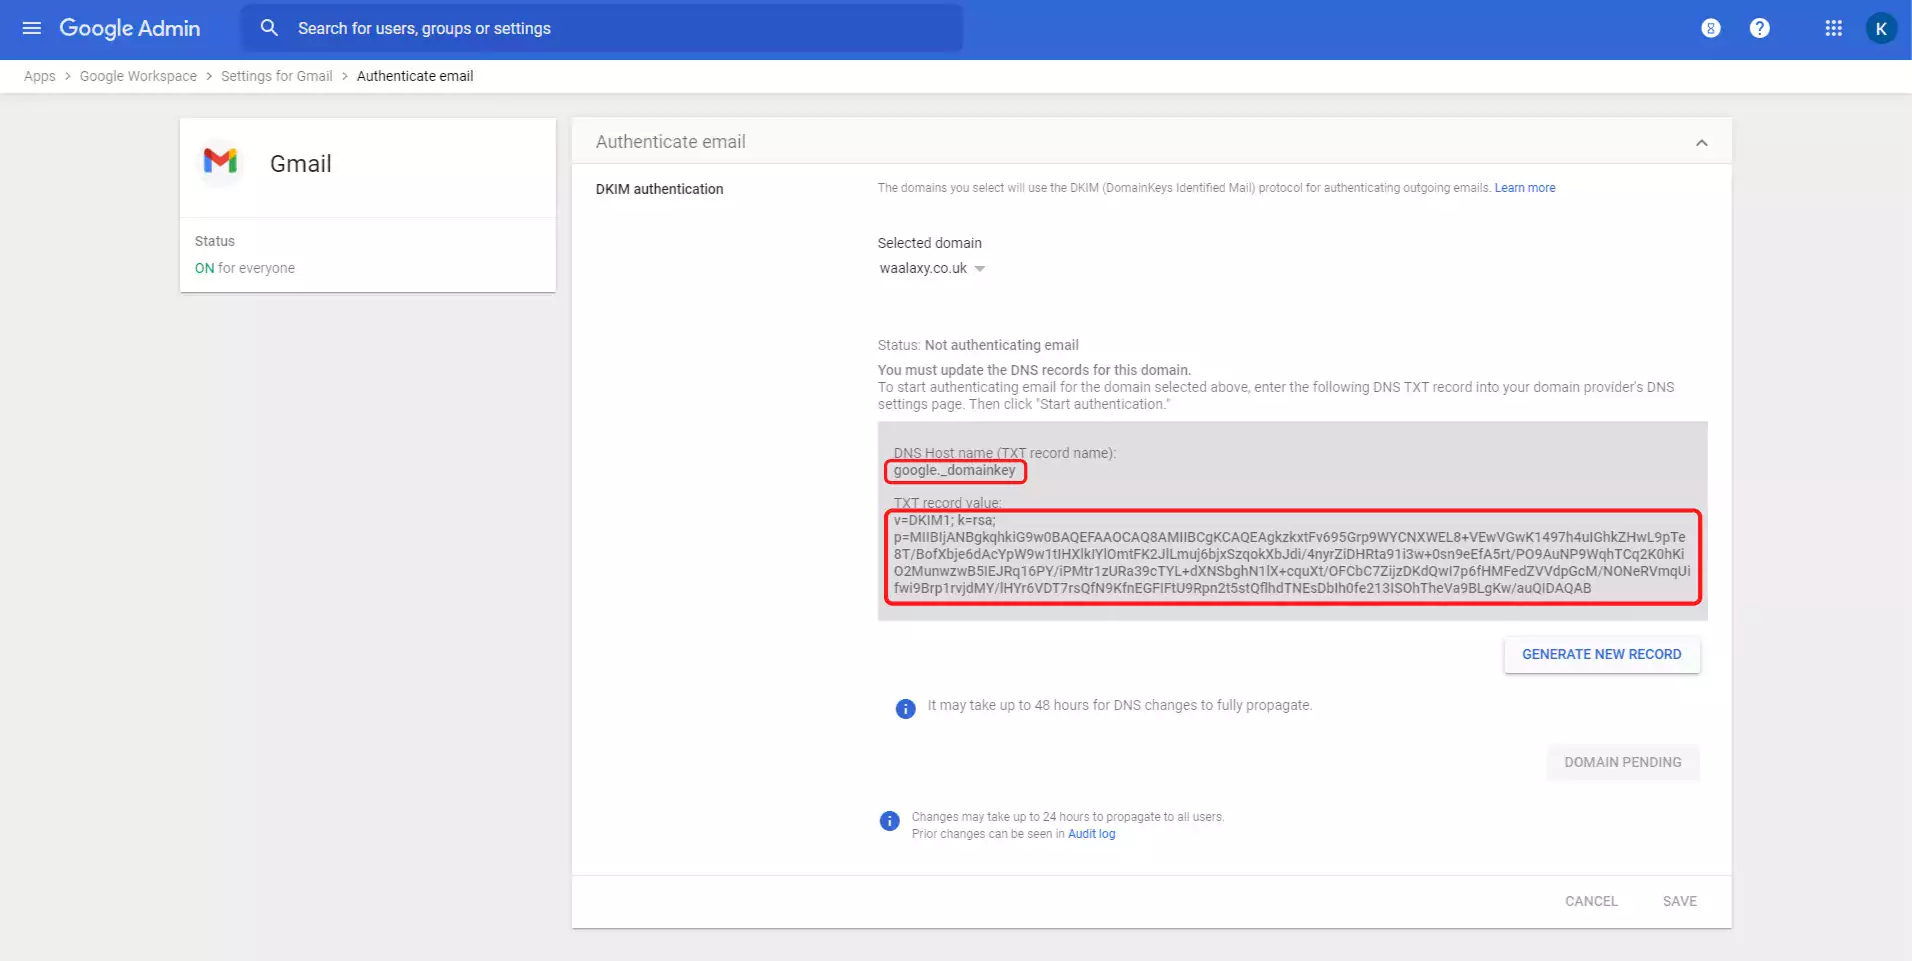
Create a new line in the DNS settings of Google Domains by copying the “DNS Host name” in the “Name” field and the “TXT record value” in the text field.
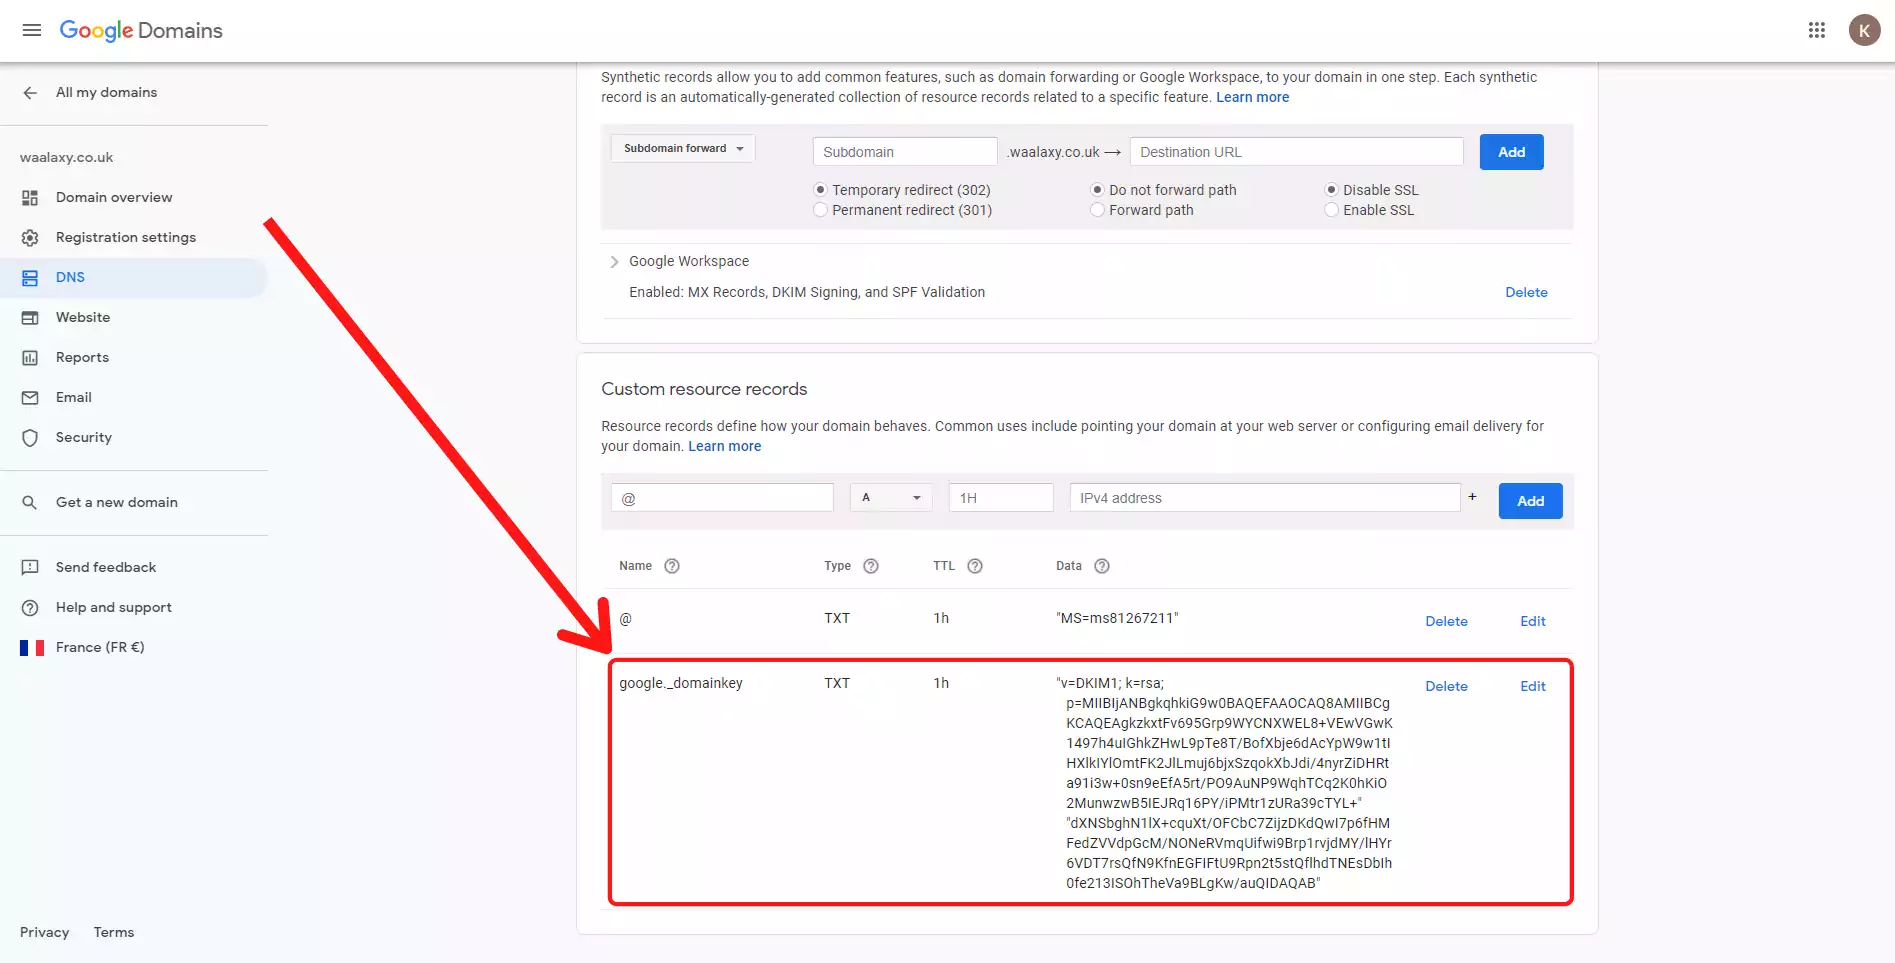
Then refresh the Google Admin page, it started authenticating automatically for me. If you have another interface, you can click on “Start Authentication” on Google Admin.
2/ Setup the Google domains in MS365
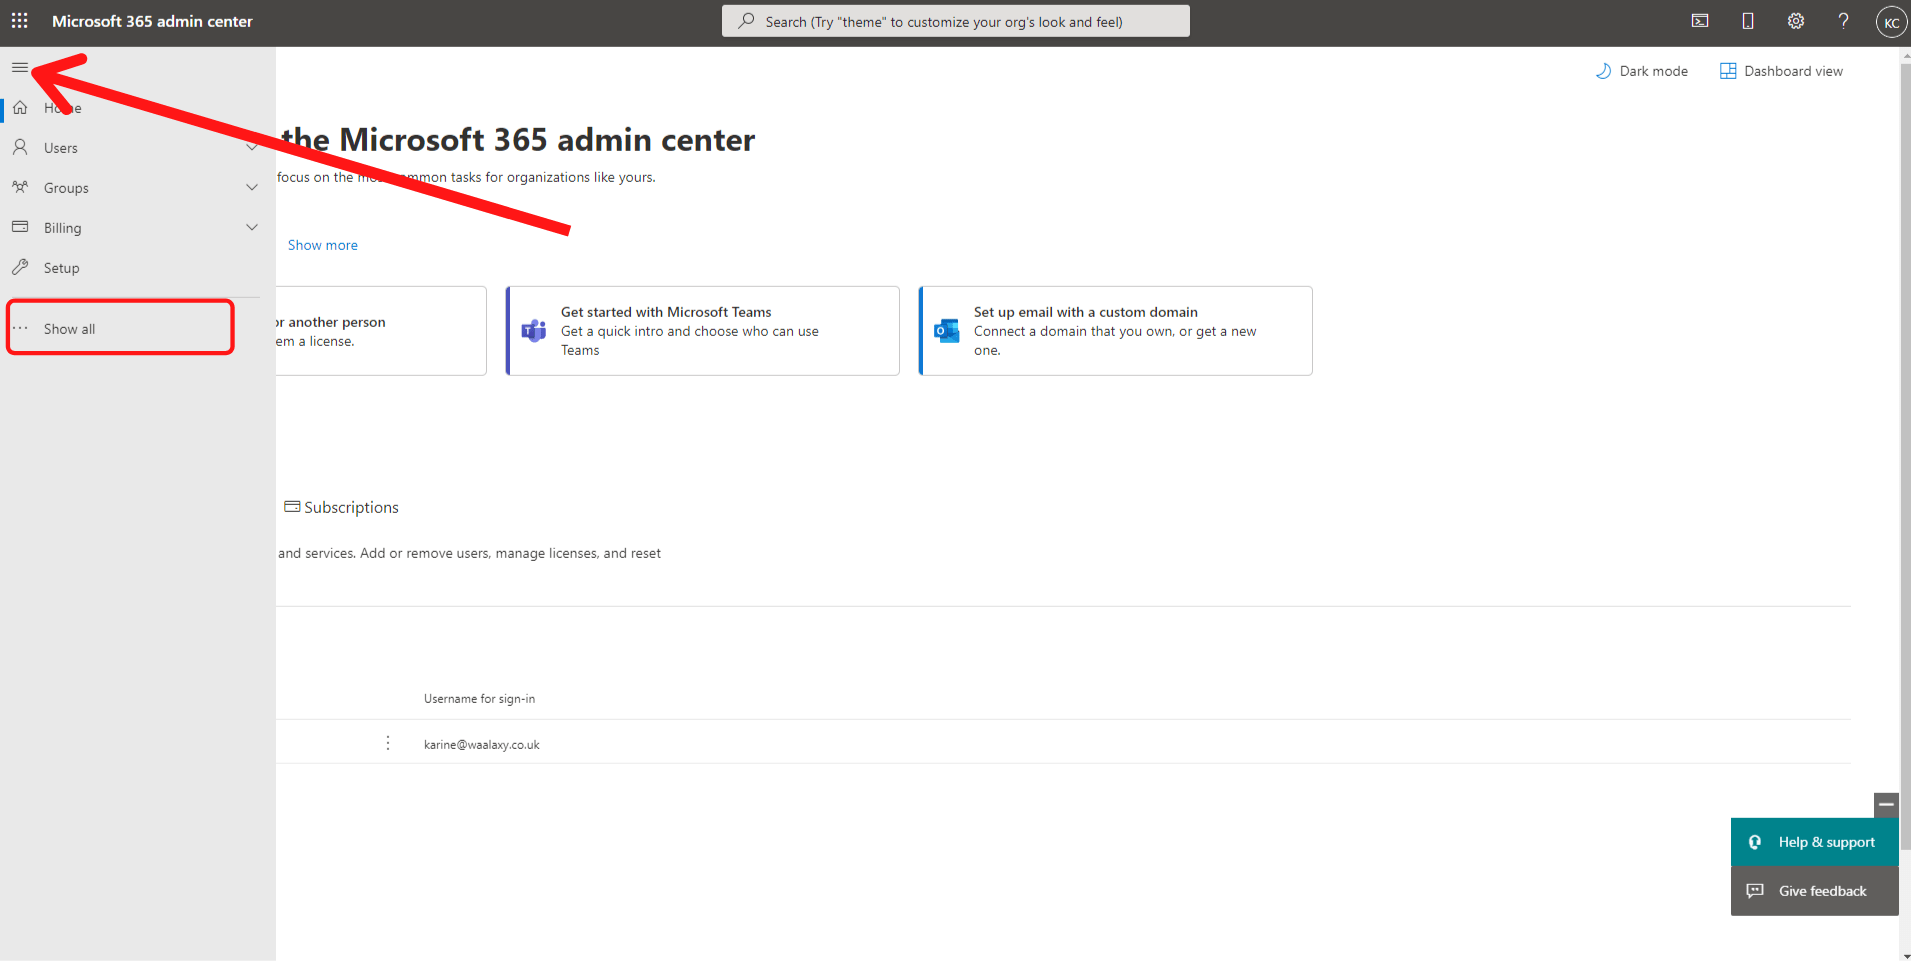
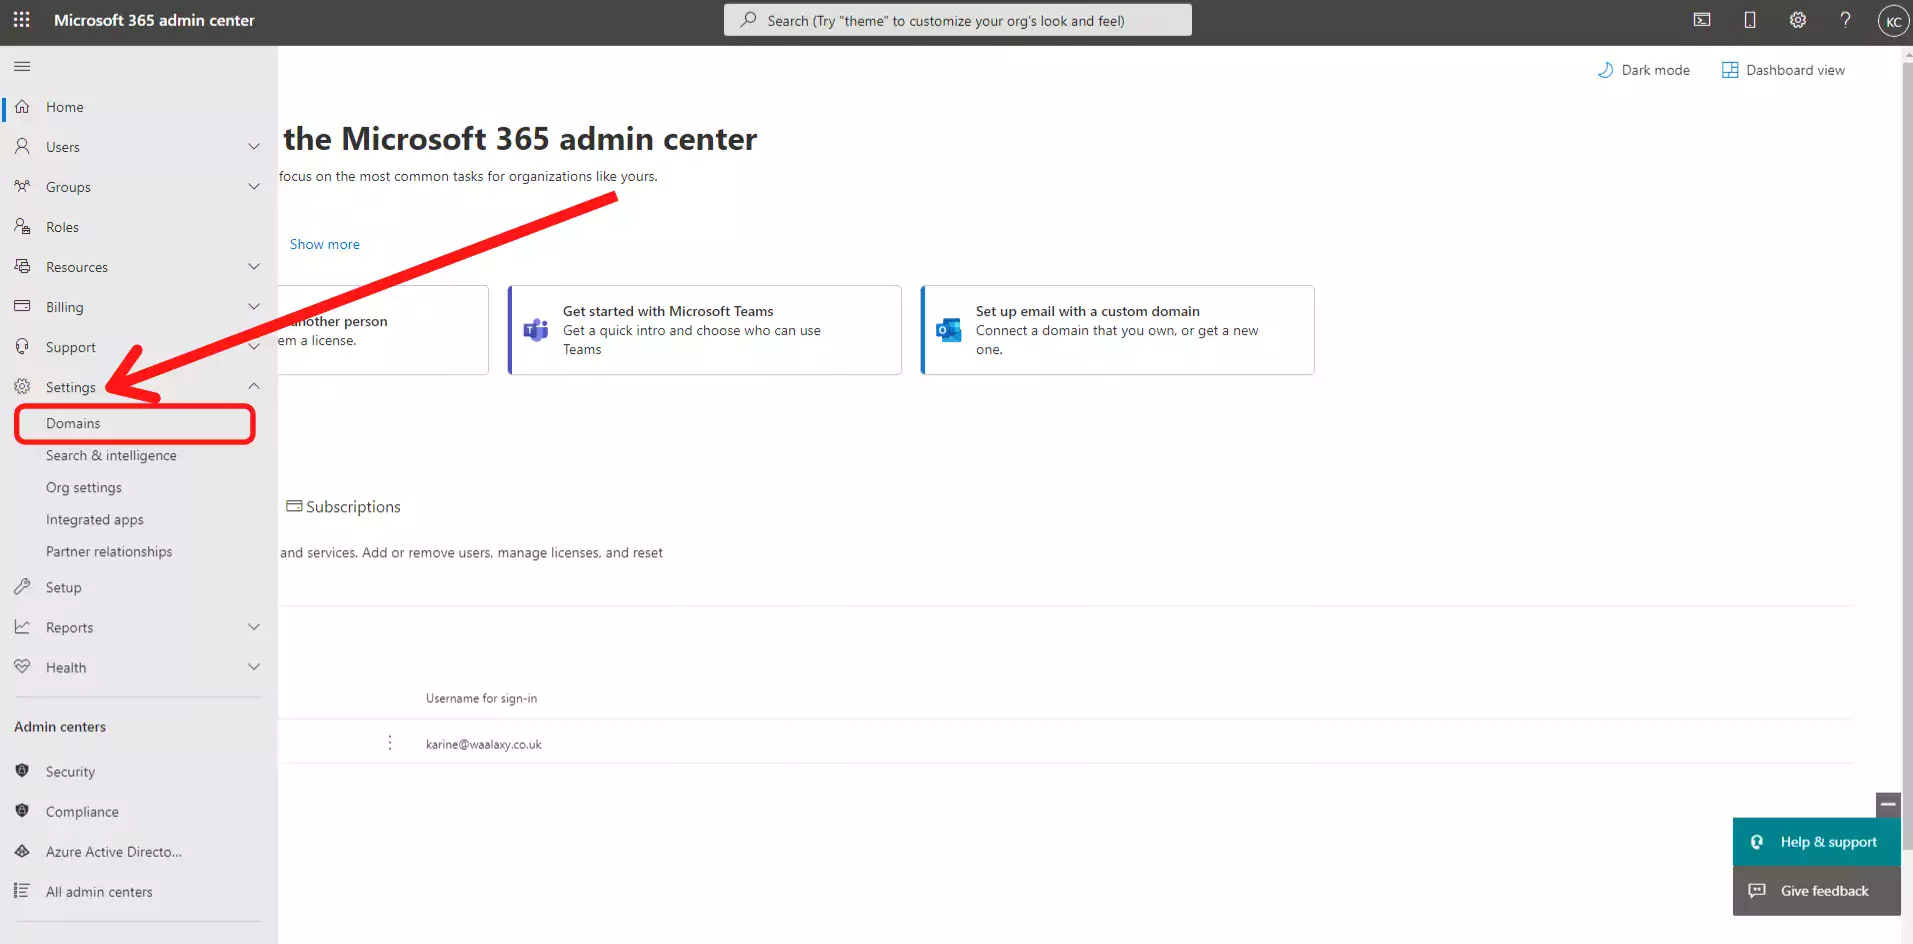
Now that you have an MS365 license, you need to finish the setup of your domain. From this page, click on “Show all” > “Settings” > “Domain”.
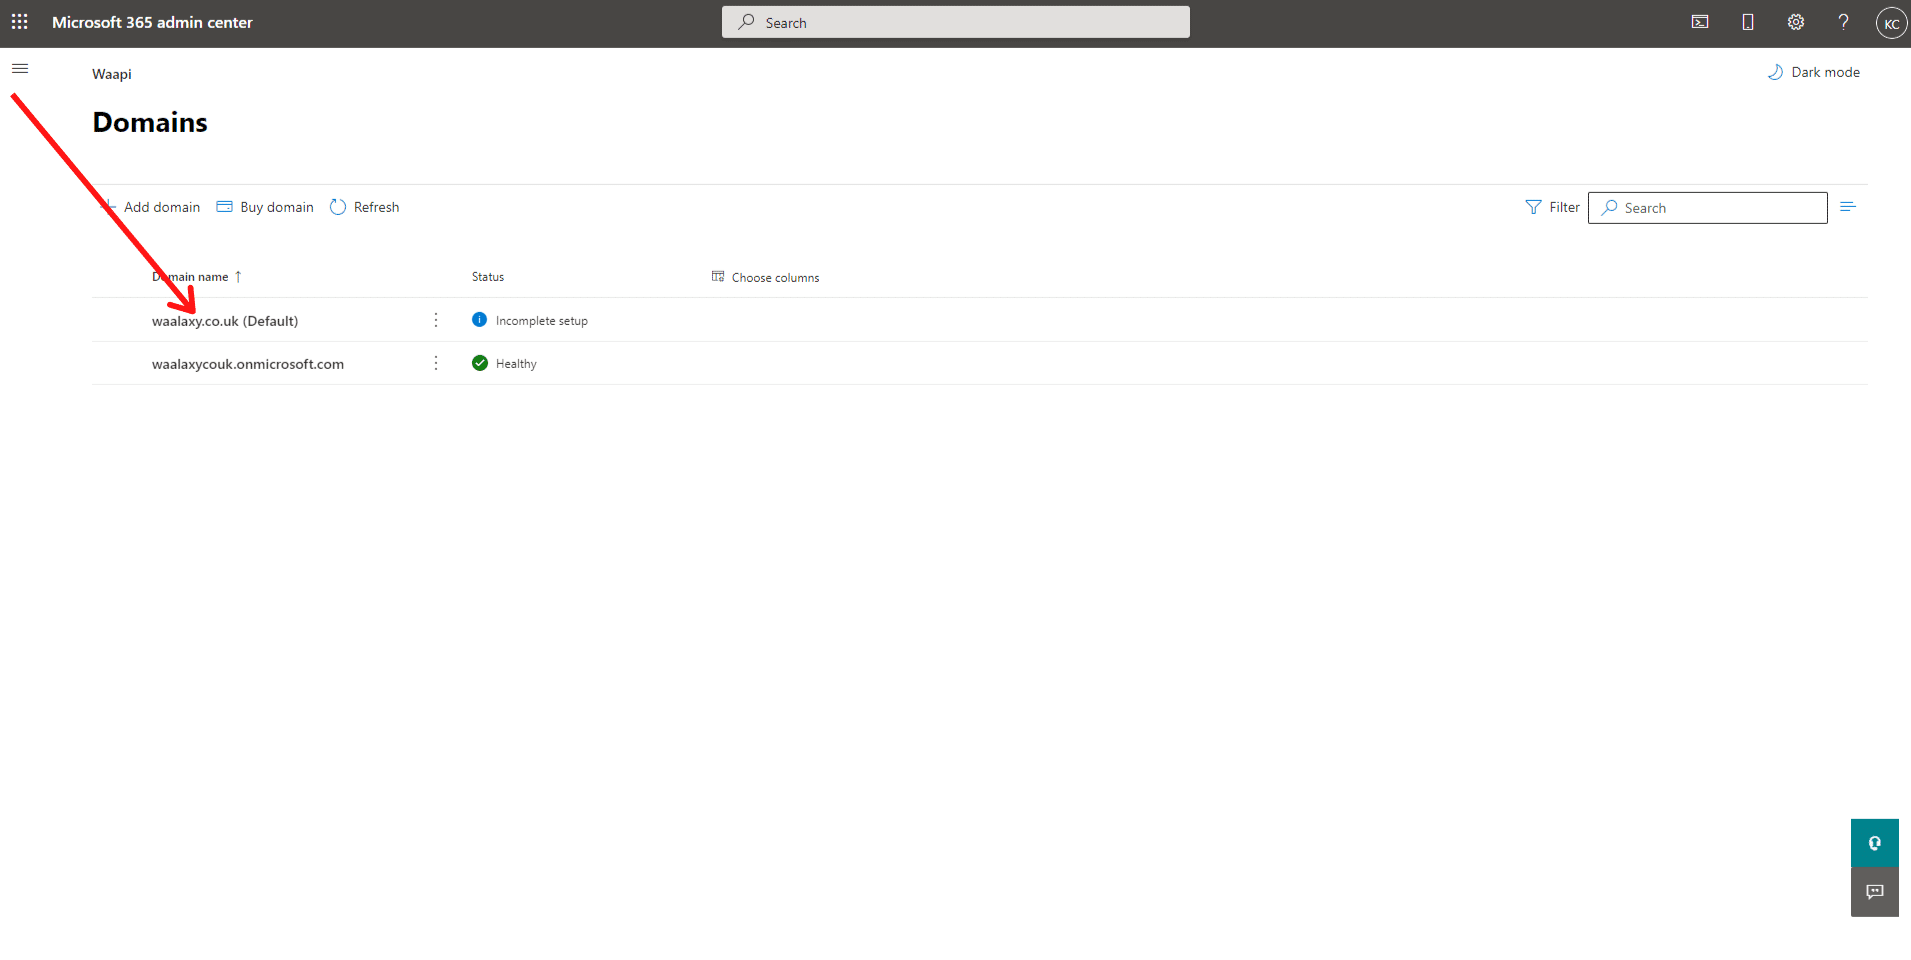
- Click on your domain’s name, then “Continue setup”
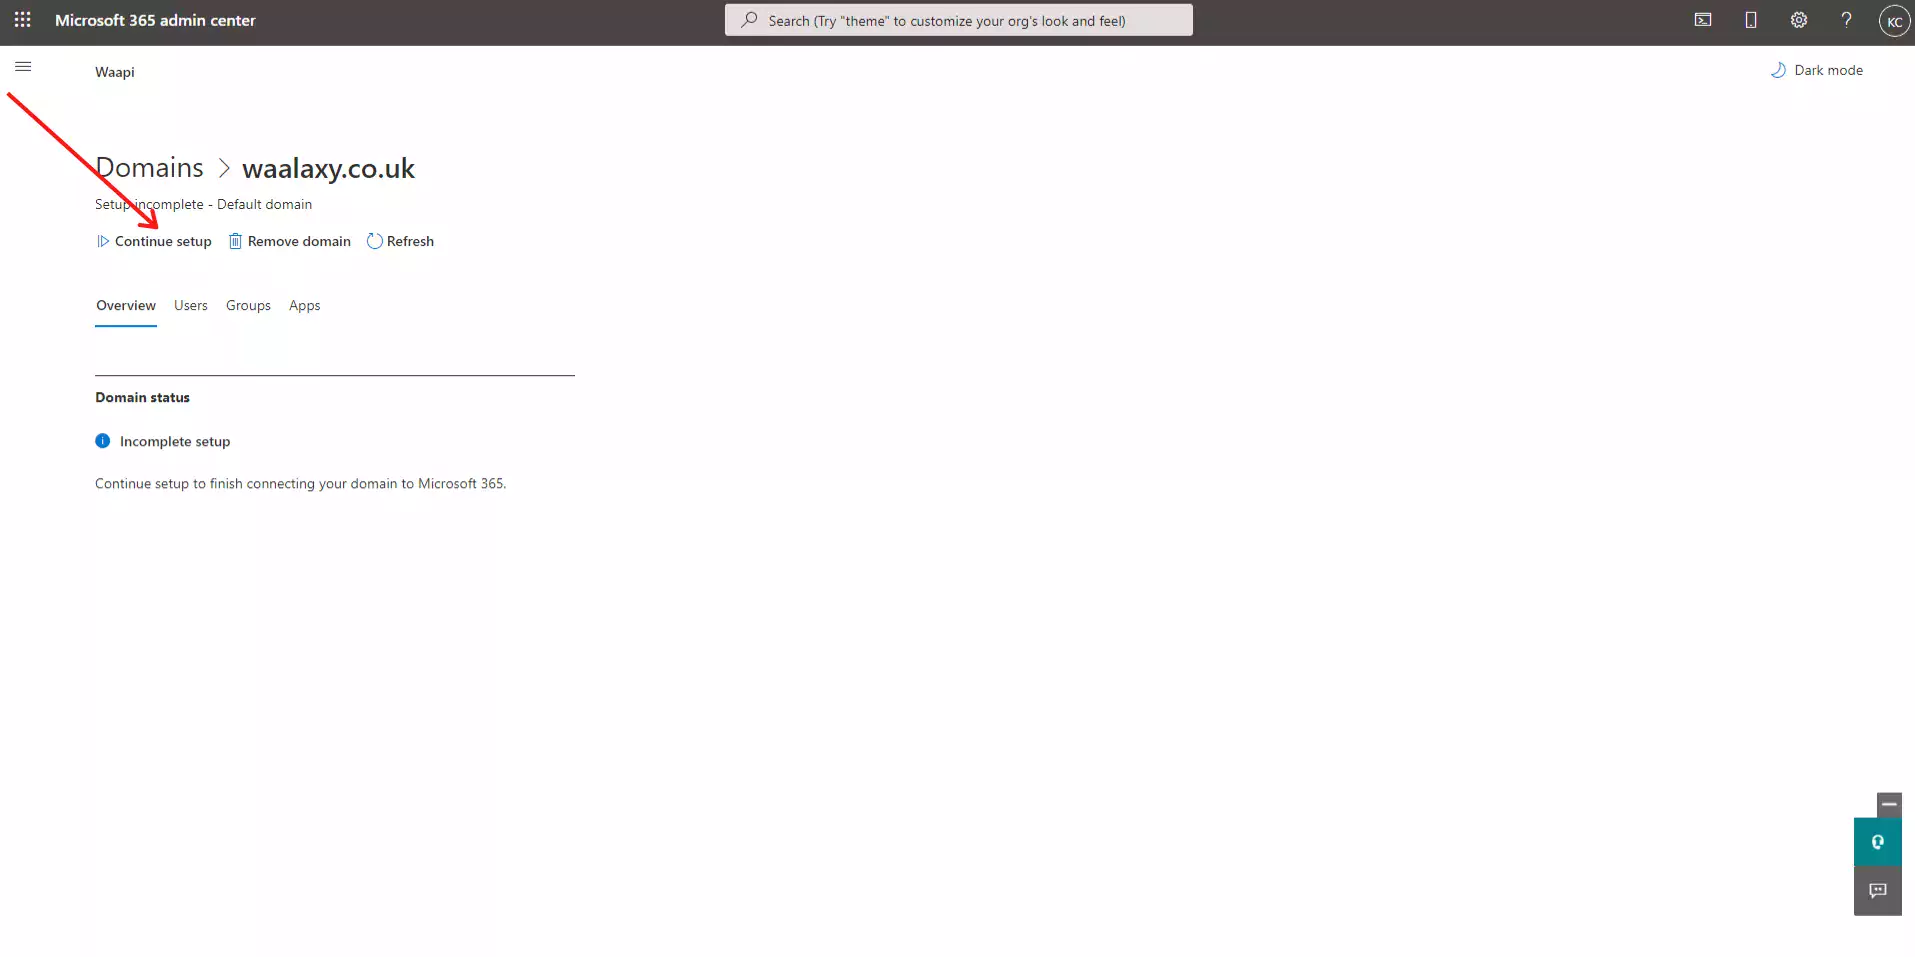
- Click on “Continue” to start connecting your domain:
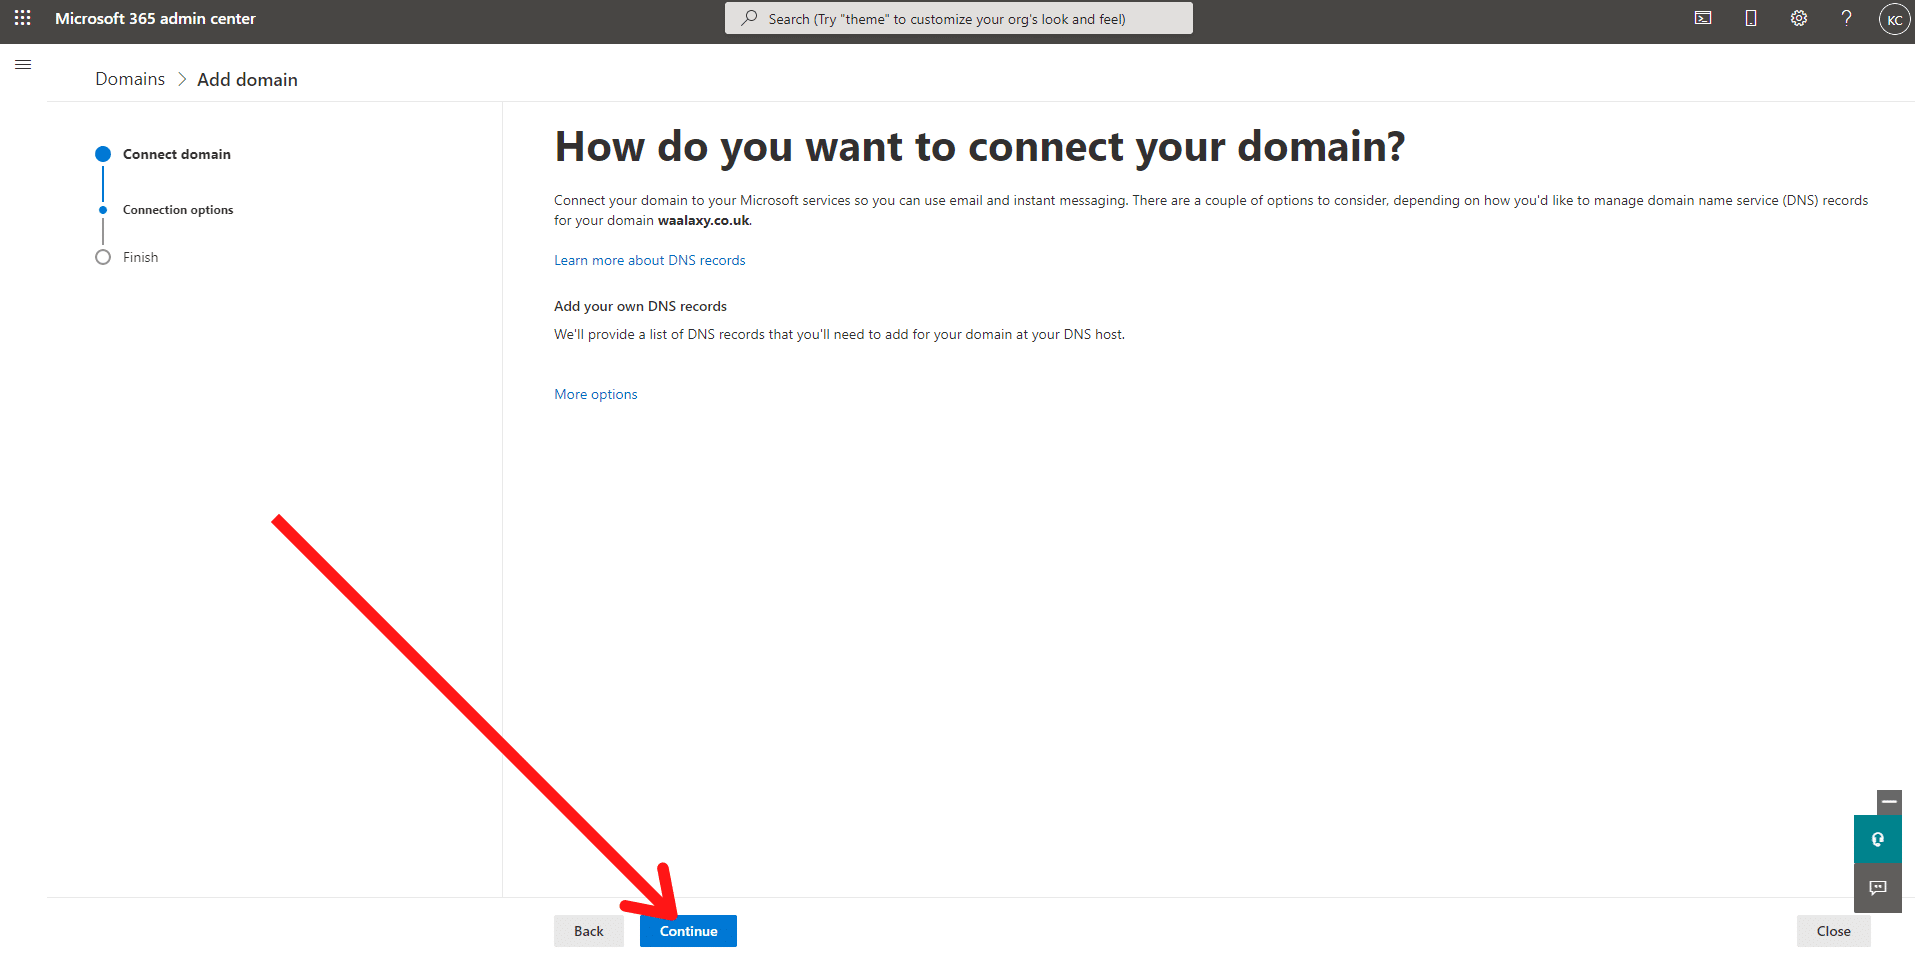
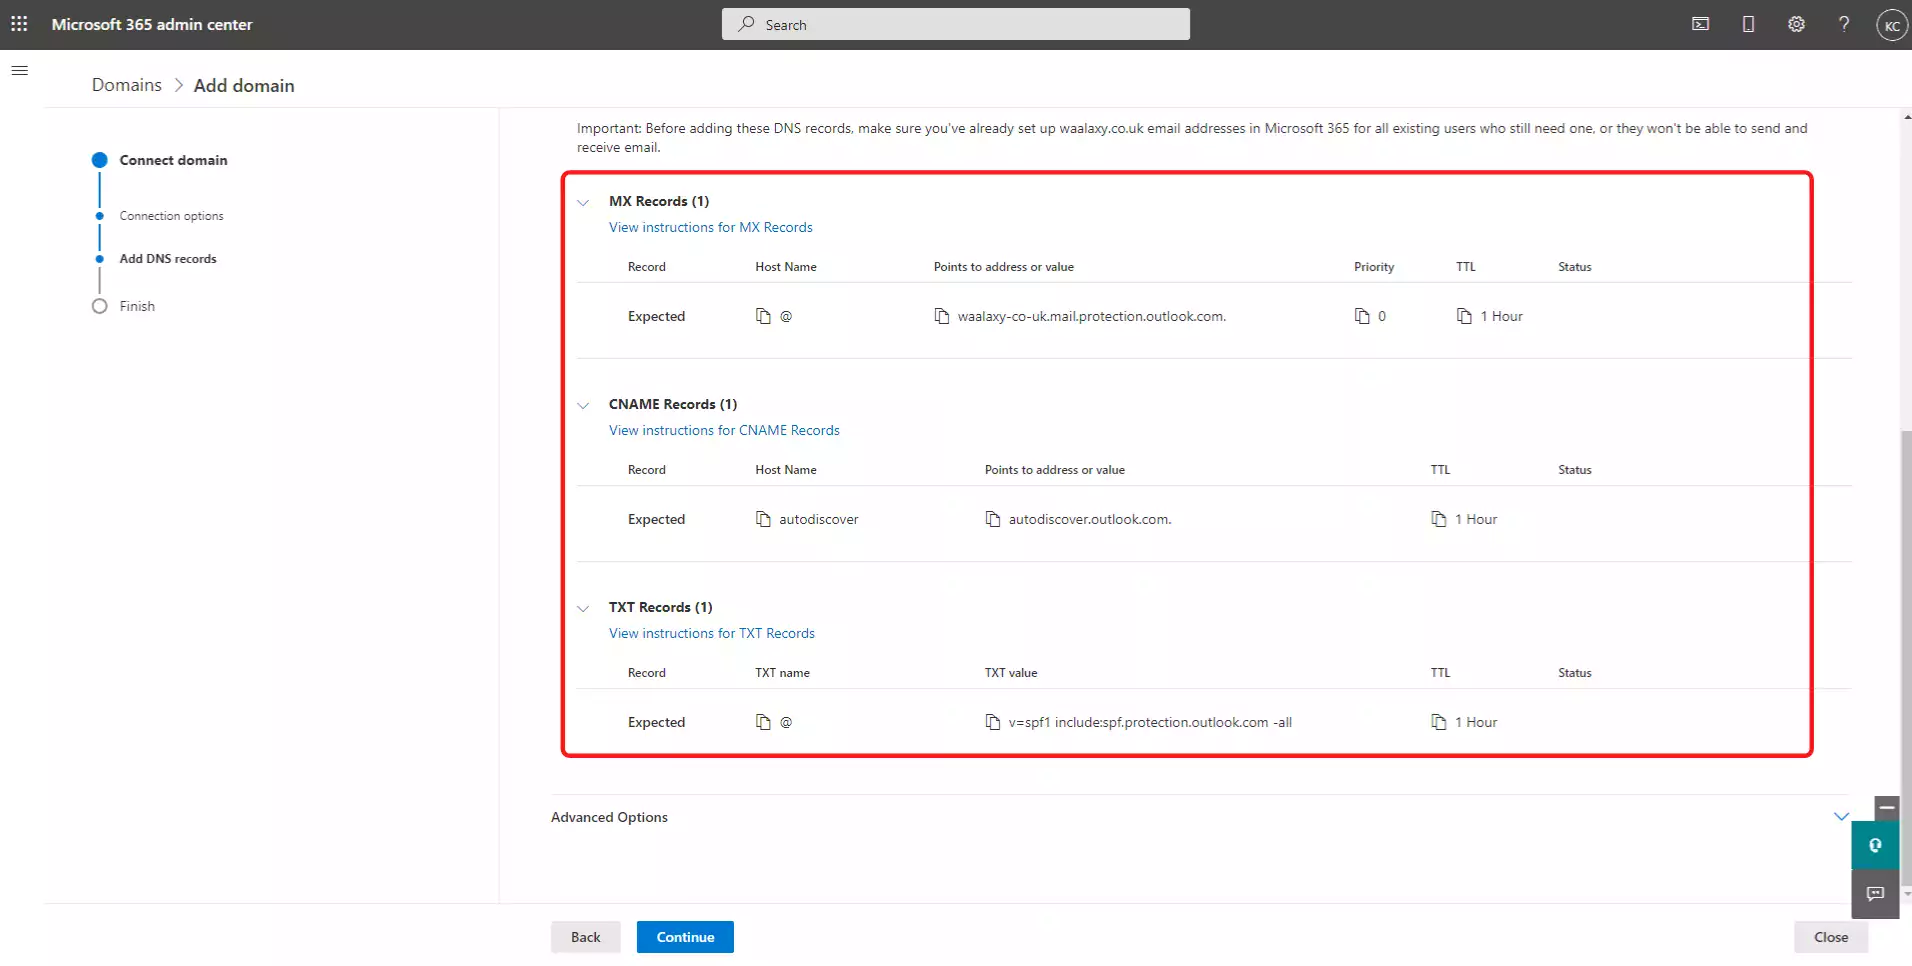
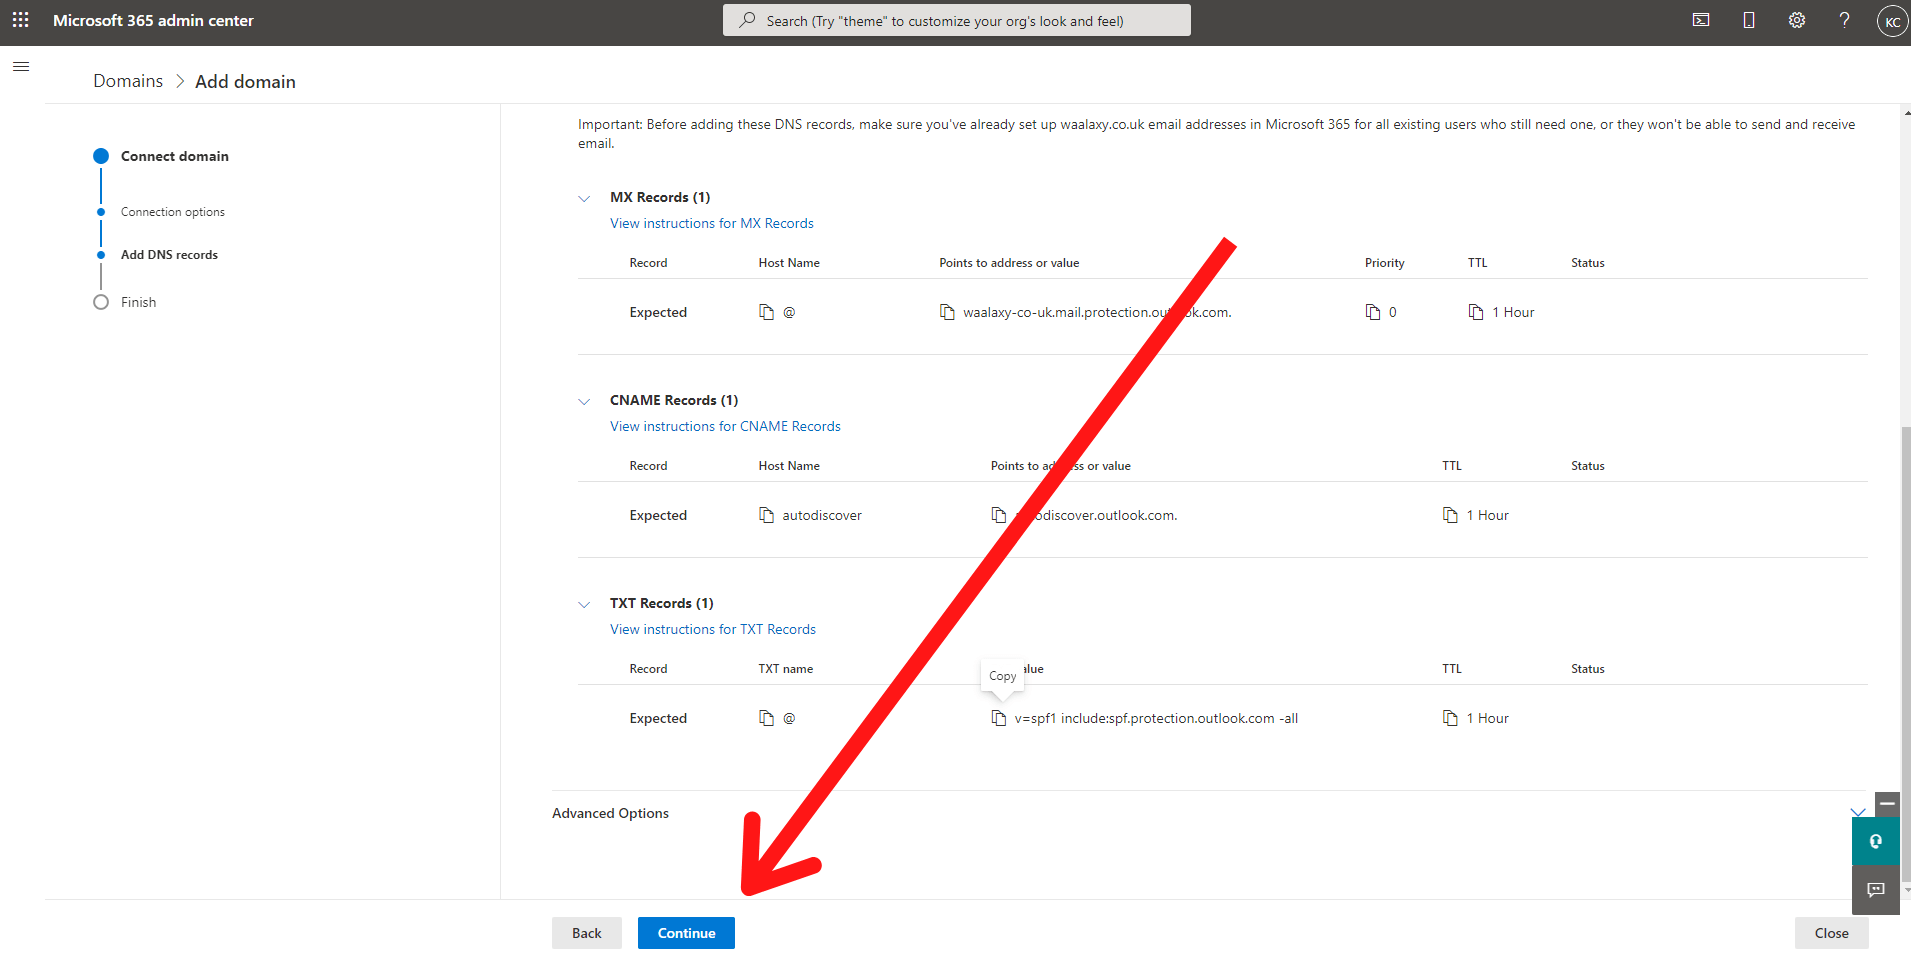
- Unfold the contents of “MX Records”, “CNAME Records” and “TXT Records.
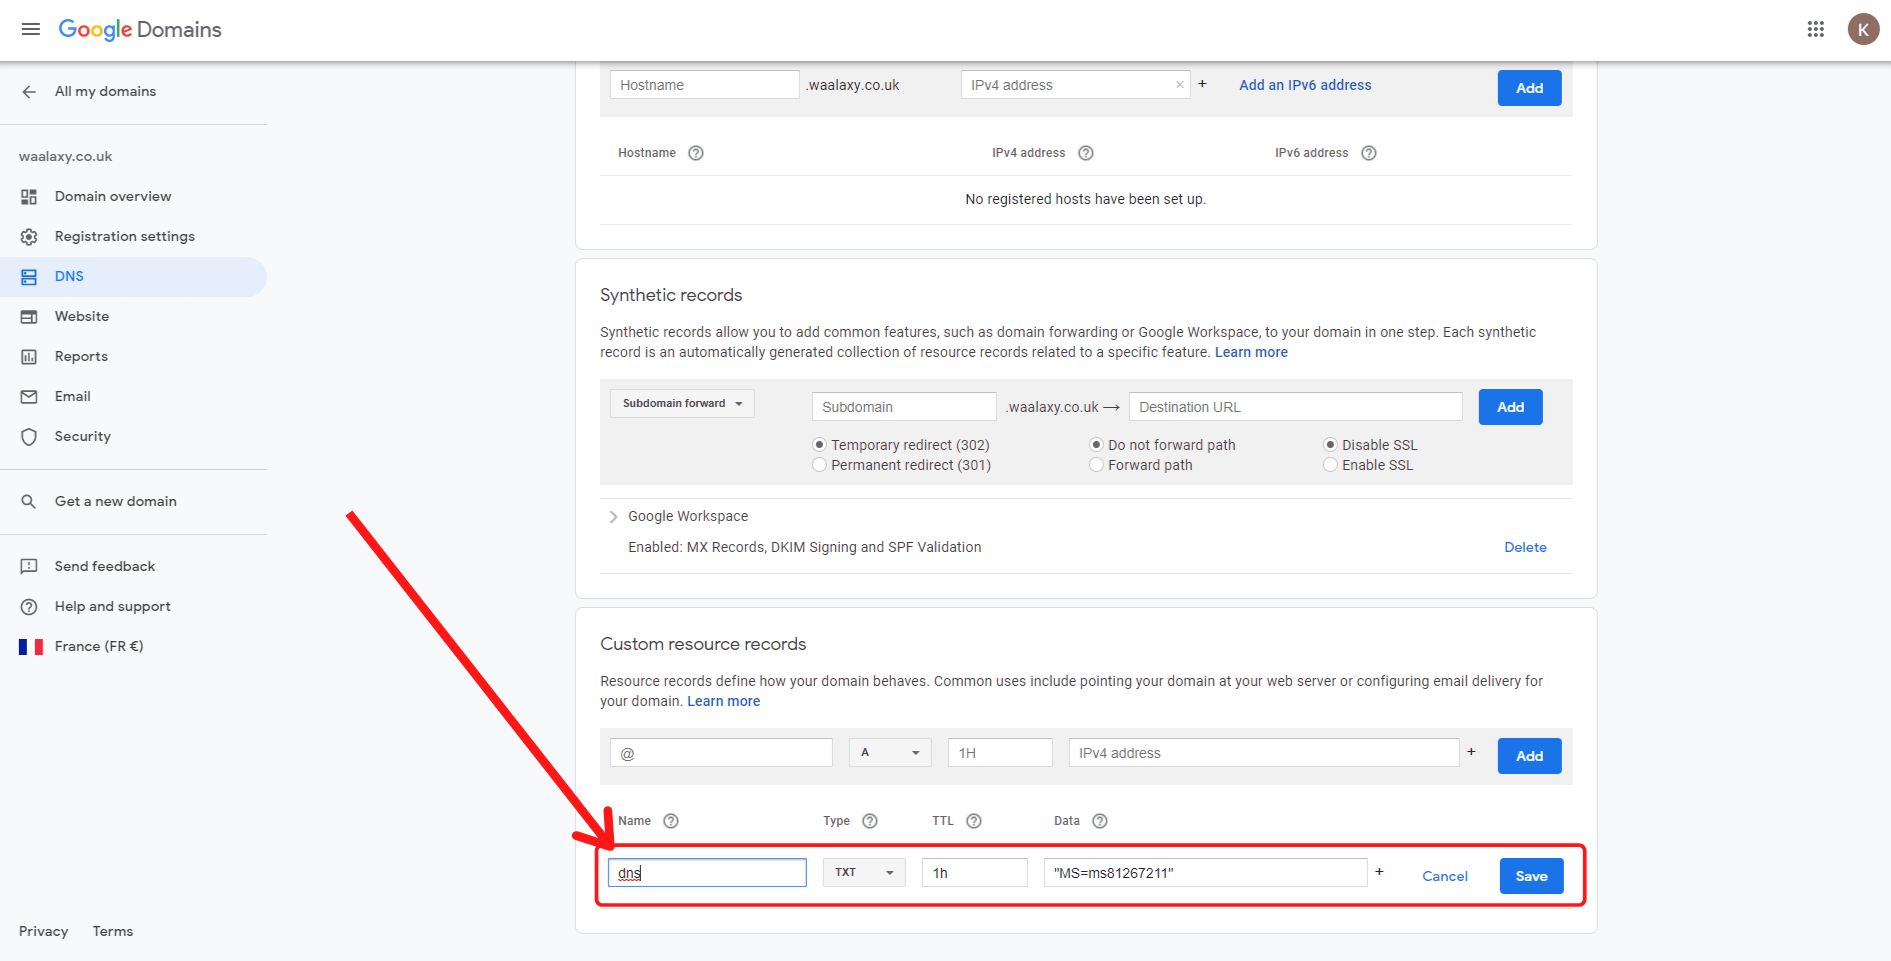
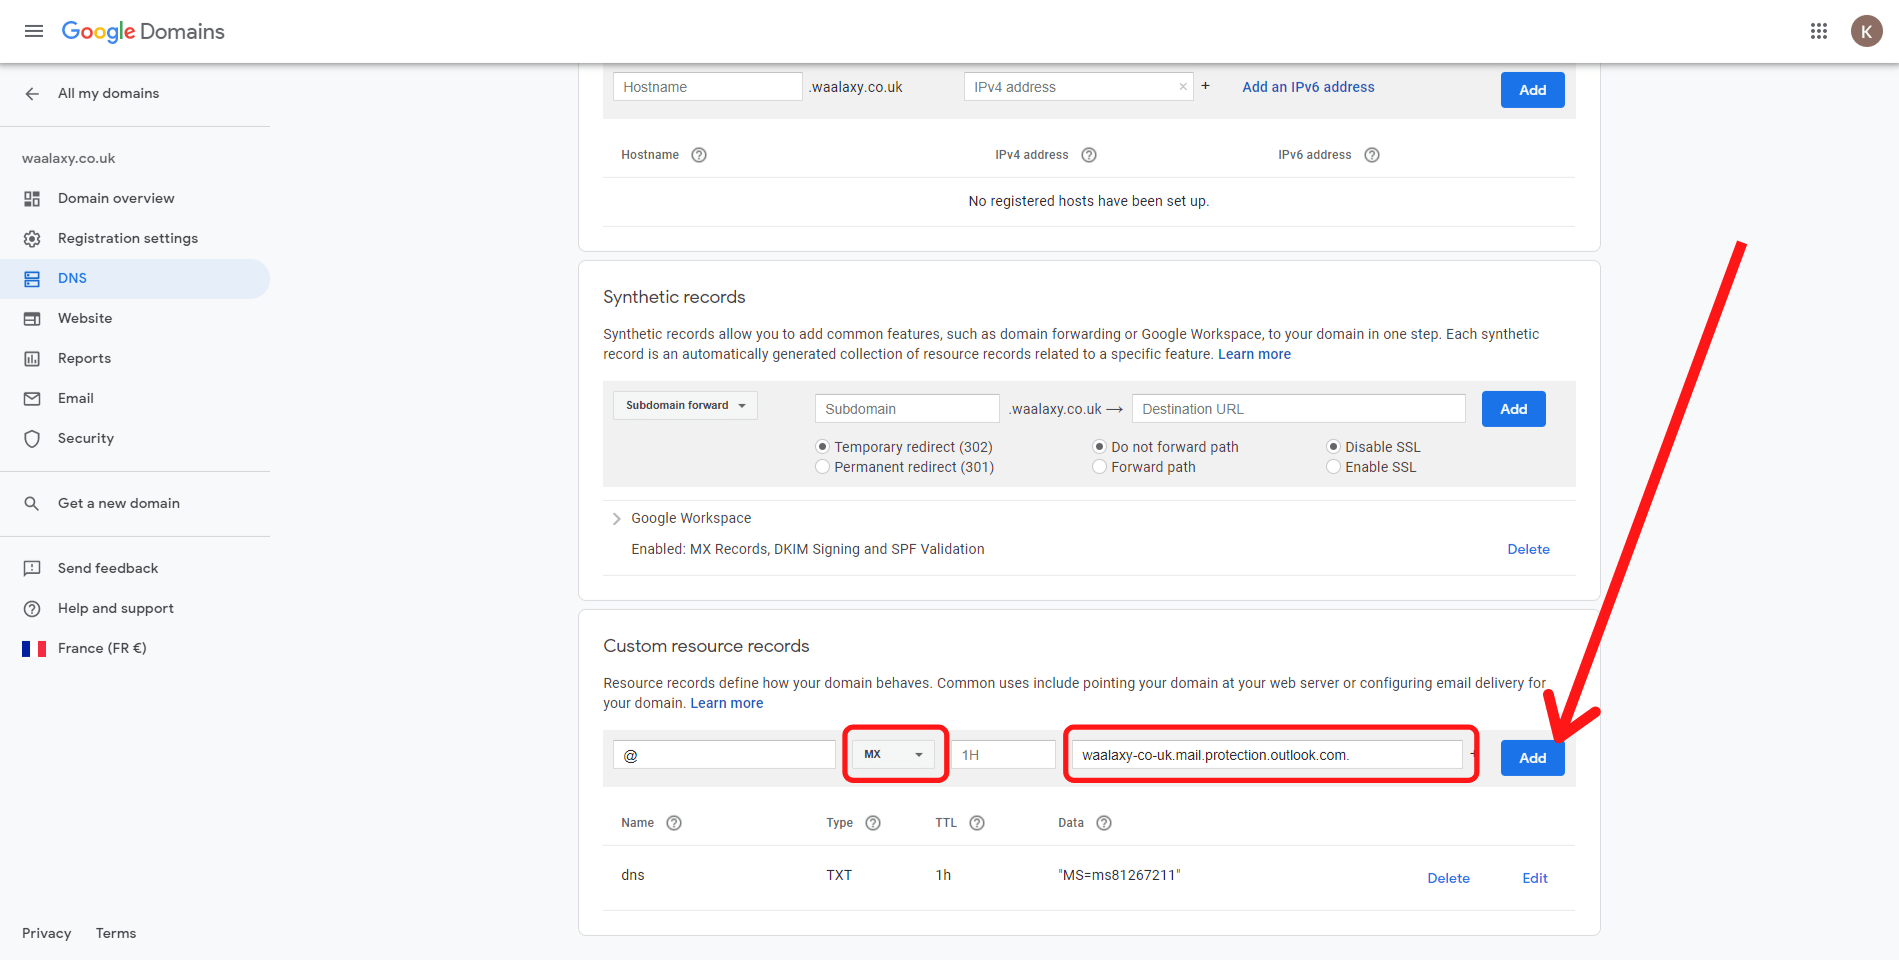
You’ll need to change the name of your first “Custom resource records” from “@” to “DNS”. Simply click on “Edit”, then change the name and click on “Save”.
Then add the 3 records of the Microsoft 365 Admin center to Google Domains.
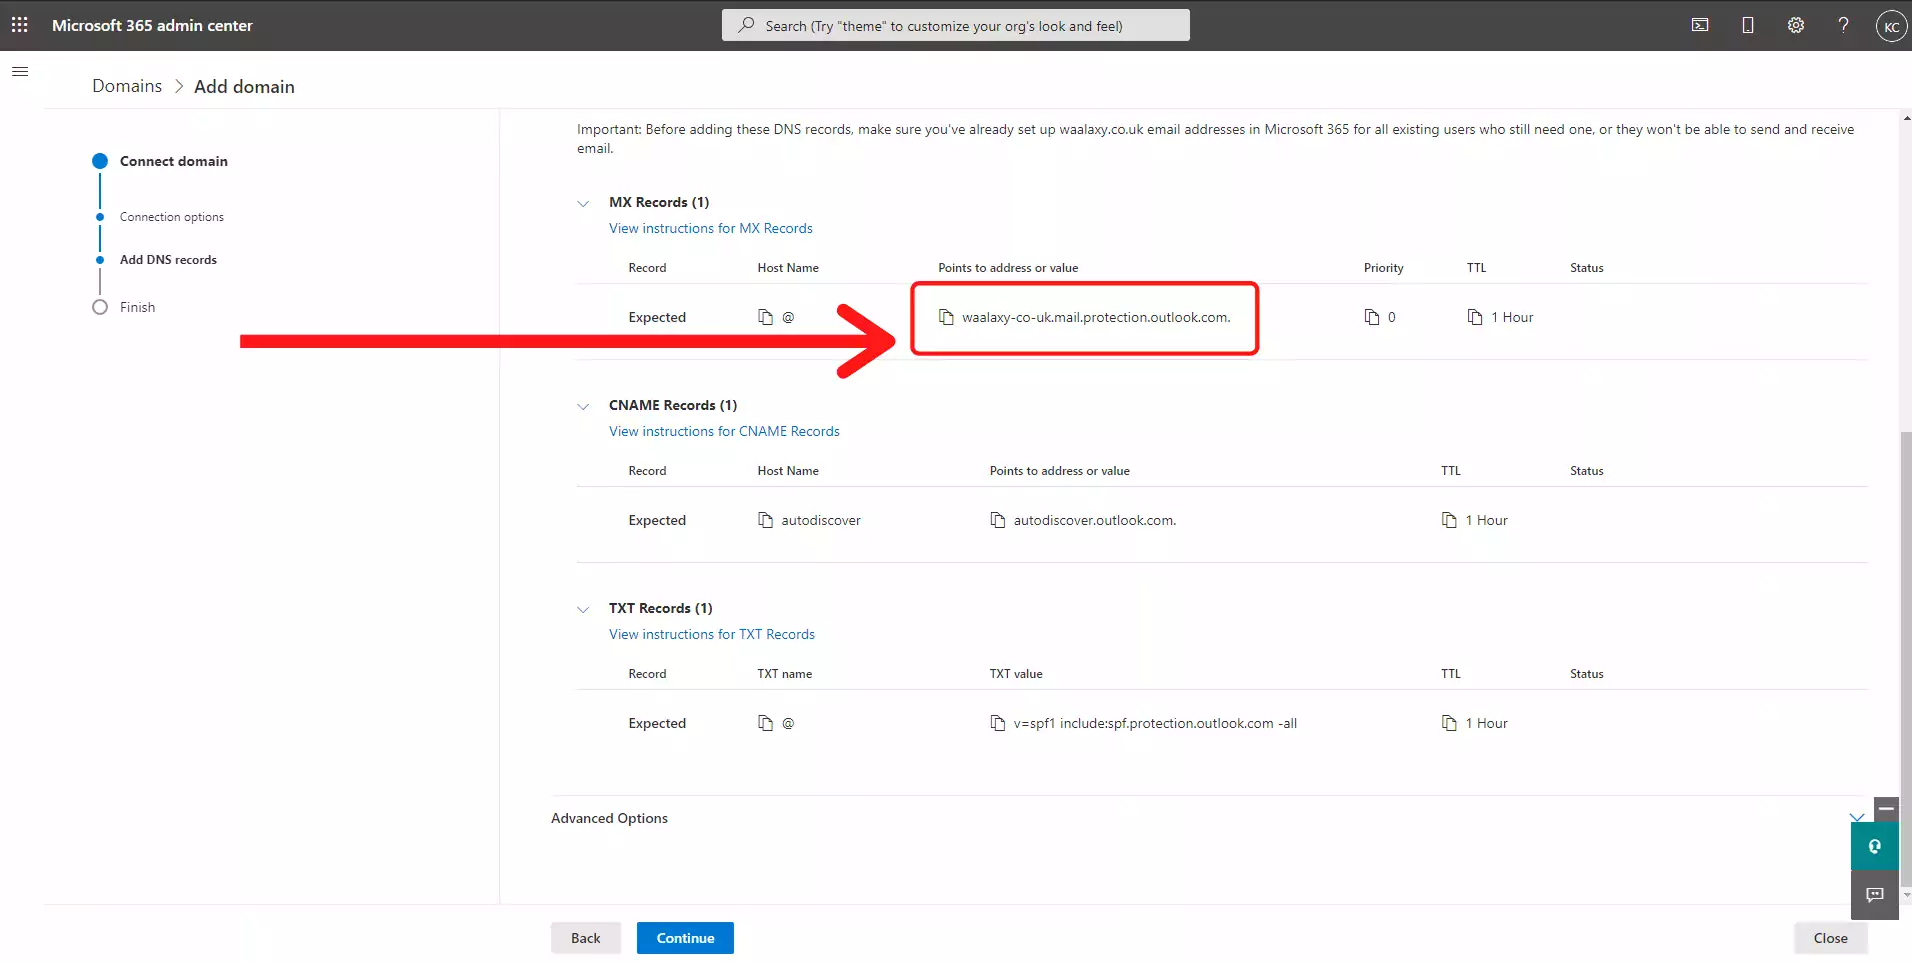
- For the MX record select “MX” in “Type” then copy the Pointing Address in “Data” then click on “add”:
- In the same way, for the CNAME record, select “auto-discover” in “Name” then “CNAME” in “Type” then“autodiscover.outlook.com.” in “Data” then click “Add”.
- For the TXT record, select “@” in “Name”, “TXT” in “Type” then the TXT Value in “Data” then click on “add”.
- Once these records are done, click on “Continue” from your Microsoft admin page.
- You should arrive on this page, indicating that your domain configuration is complete:
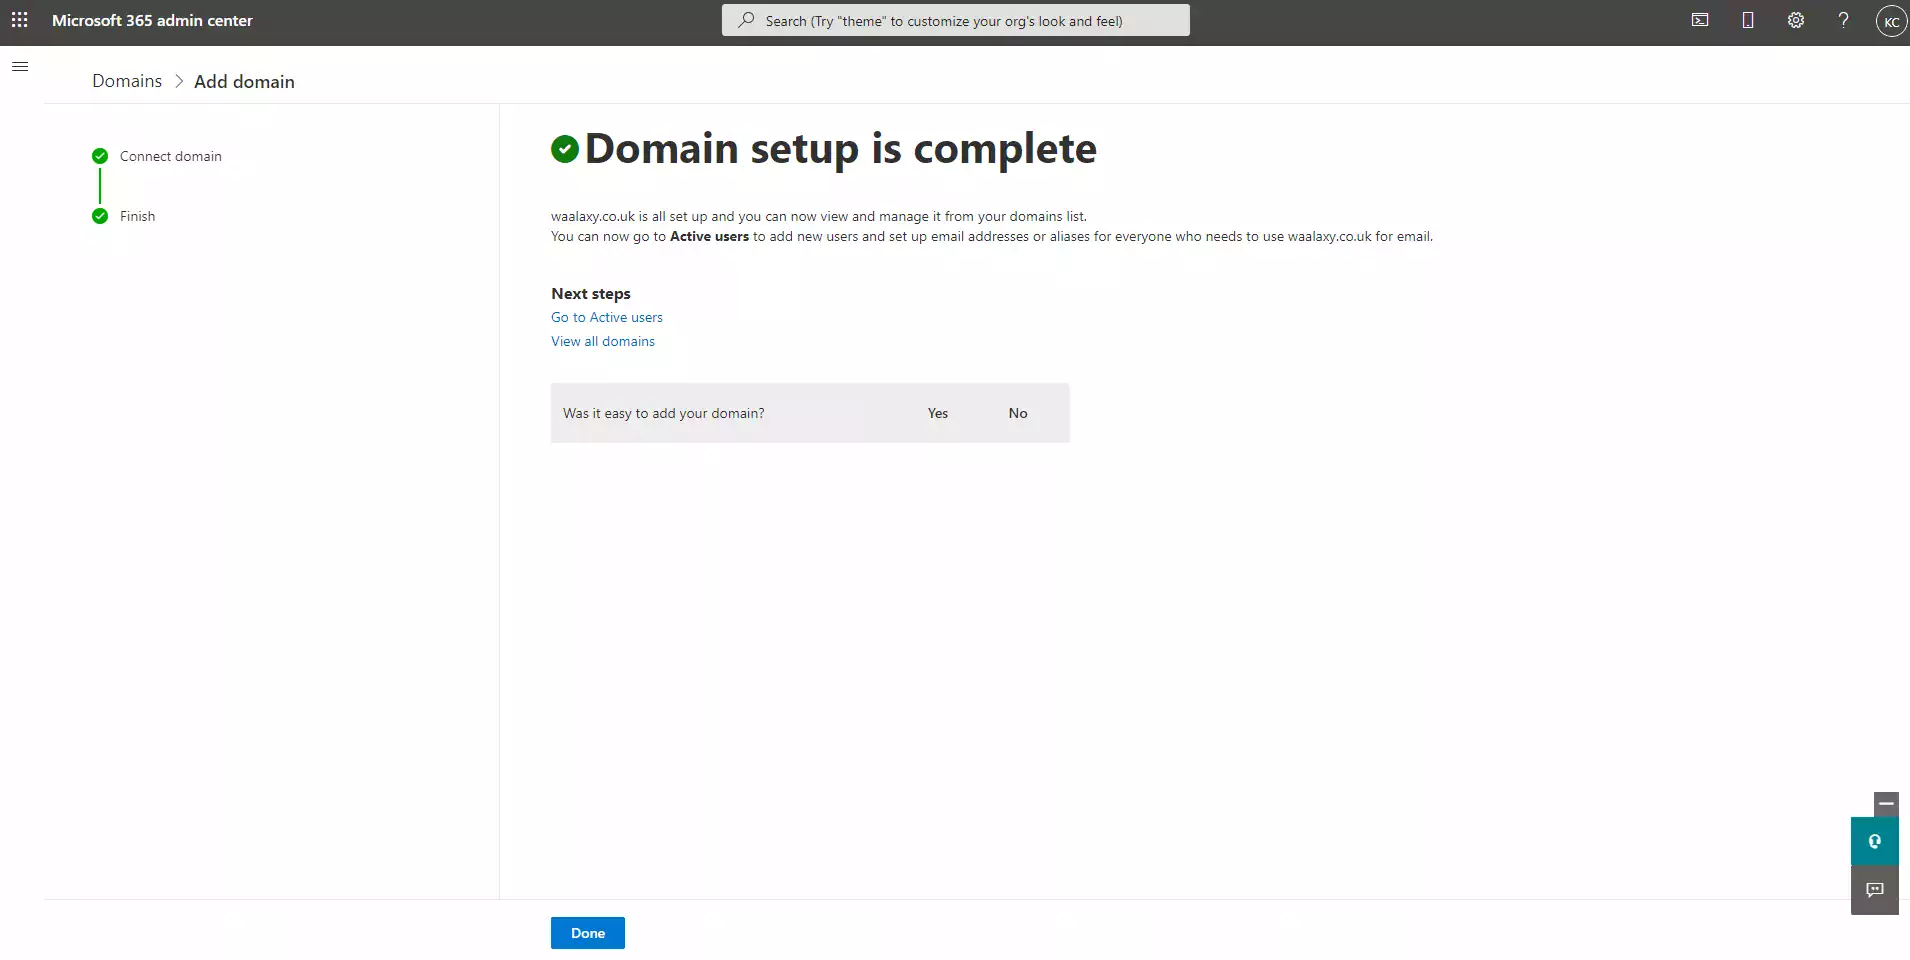
It will take 48 hours for the propagation to be effective.
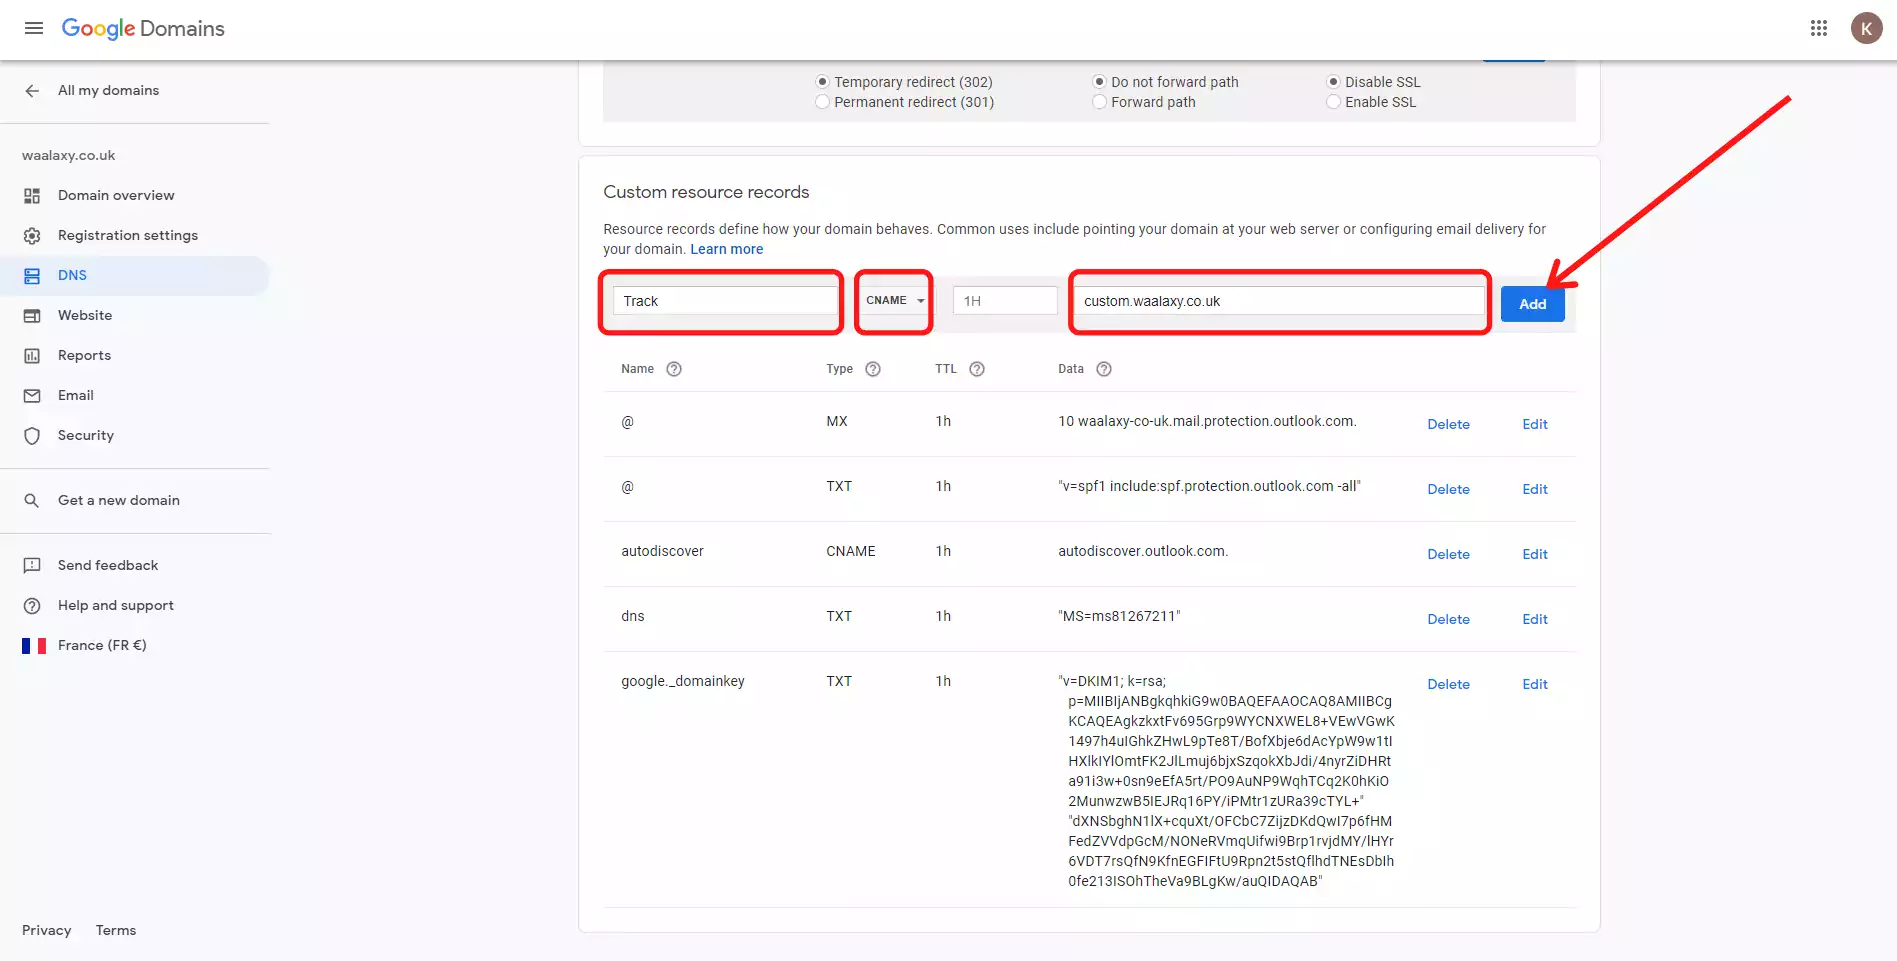
3/ Create a Custom Tracking Domain
The Custom Tracking Domain allows you to measure in real time the openings, clicks and responses received by your campaigns. This is a crucial configuration, which has a considerable impact on deliverability.
Select “Track” in “Name”, “CNAME” in “Type” then “custom.{domainname}“ in “Data” then click on “add”:
4/ Finally, deactivate the WHOIS
Go to Google Domains, “Registration settings” tab and turn off the feature if it is activated.
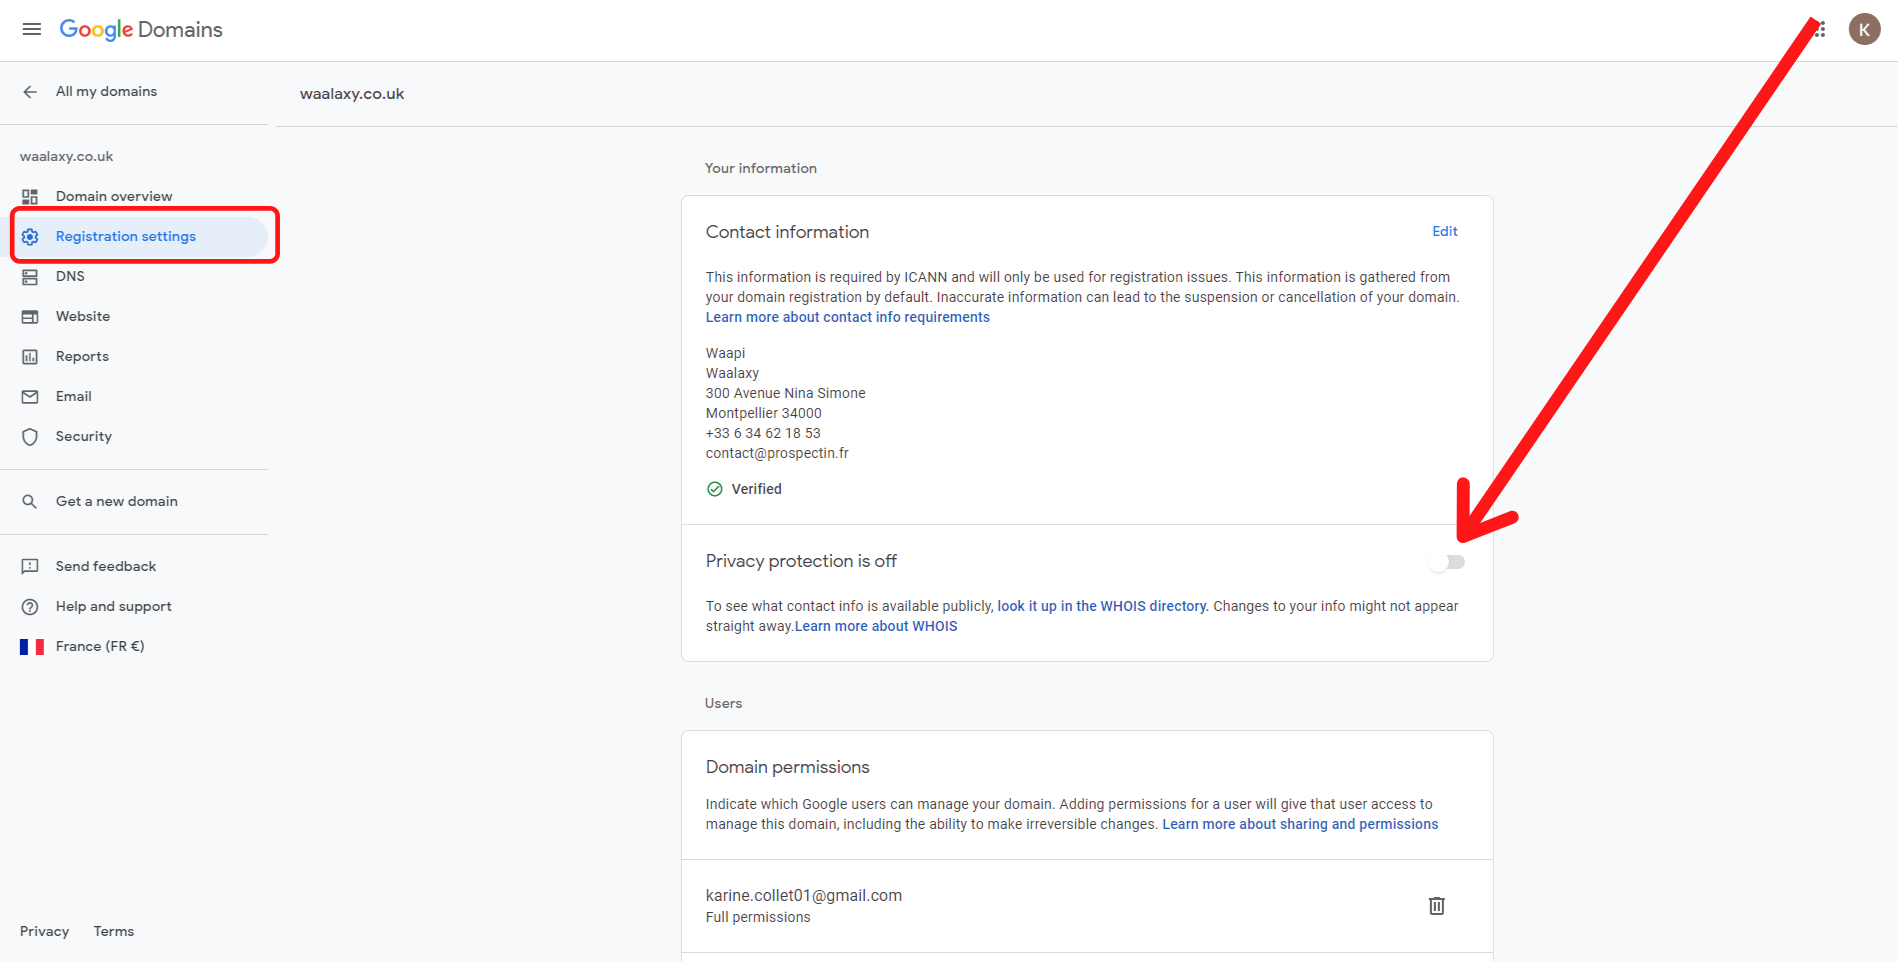
Depending on your domain’s name, the WHOIS can be anonymized by default. It is, roughly speaking, the signature of your domain, consisting of the details of its owner, its IP, and a lot of information that allows ensuring its identity.
The WHOIS has an important impact on deliverability. This is why it is necessary to make it public.
Signature
Now, let’s talk about the signature. It is essential to have a signature that is just right. You can go to your Outlook inbox to change it.
This means:
- Contain a maximum of information about you and your company (name, first name, position, company, domain, phone, postal address…).
- No URL, or a URL in https:// imperatively.
- No HTML formatting.
- The minimum of text formatting possible.
- No photo or logo.
The next step is to add an avatar to your address. This will allow Google to be even more sure of your authenticity.
However, be careful to use a photo of you and not a logo. The algorithms are smart and will notice it without any trouble. 😜
Newsletter subscriptions
In order to increase the credibility of your account, subscribe to several newsletters.
The more varied the source of subscriptions, the stronger the message of authenticity sent to the algorithms will be. 😉
Some examples of newsletters:
- Buzzfeed.
- France Télévision.
- Farnam Street.
- La Missive.
- Nikhil Basu.
- SaaStr.
- Yann Leonardi.
- LaGrowthLetter.
- StationF.
- Rex Woodbury.
- Julian Shapiro.
- TheFamily.
Once you’ve signed up for as many newsletters as possible, remember to validate subscription requests 😜
Email exchange
The idea here is to exchange emails with addresses that belong to the different providers to educate the providers so that they recognize the emails as legitimate and don’t put them in SPAM but in the main inbox.
To do this, you can create the addresses yourself to save time. Between 5 and 10 will be enough, the more the better 😉
Use Mailwarm to heat up your emails
The first step is to take a subscription to the tool.
Once you have taken a subscription you have to proceed to a small configuration, but don’t panic, once again, I am here to guide you 😉
The first thing to do is to activate the authenticated SMTH.
You will need to be Admin to be able to activate authenticated SMTP. Here is the interface you should be in:
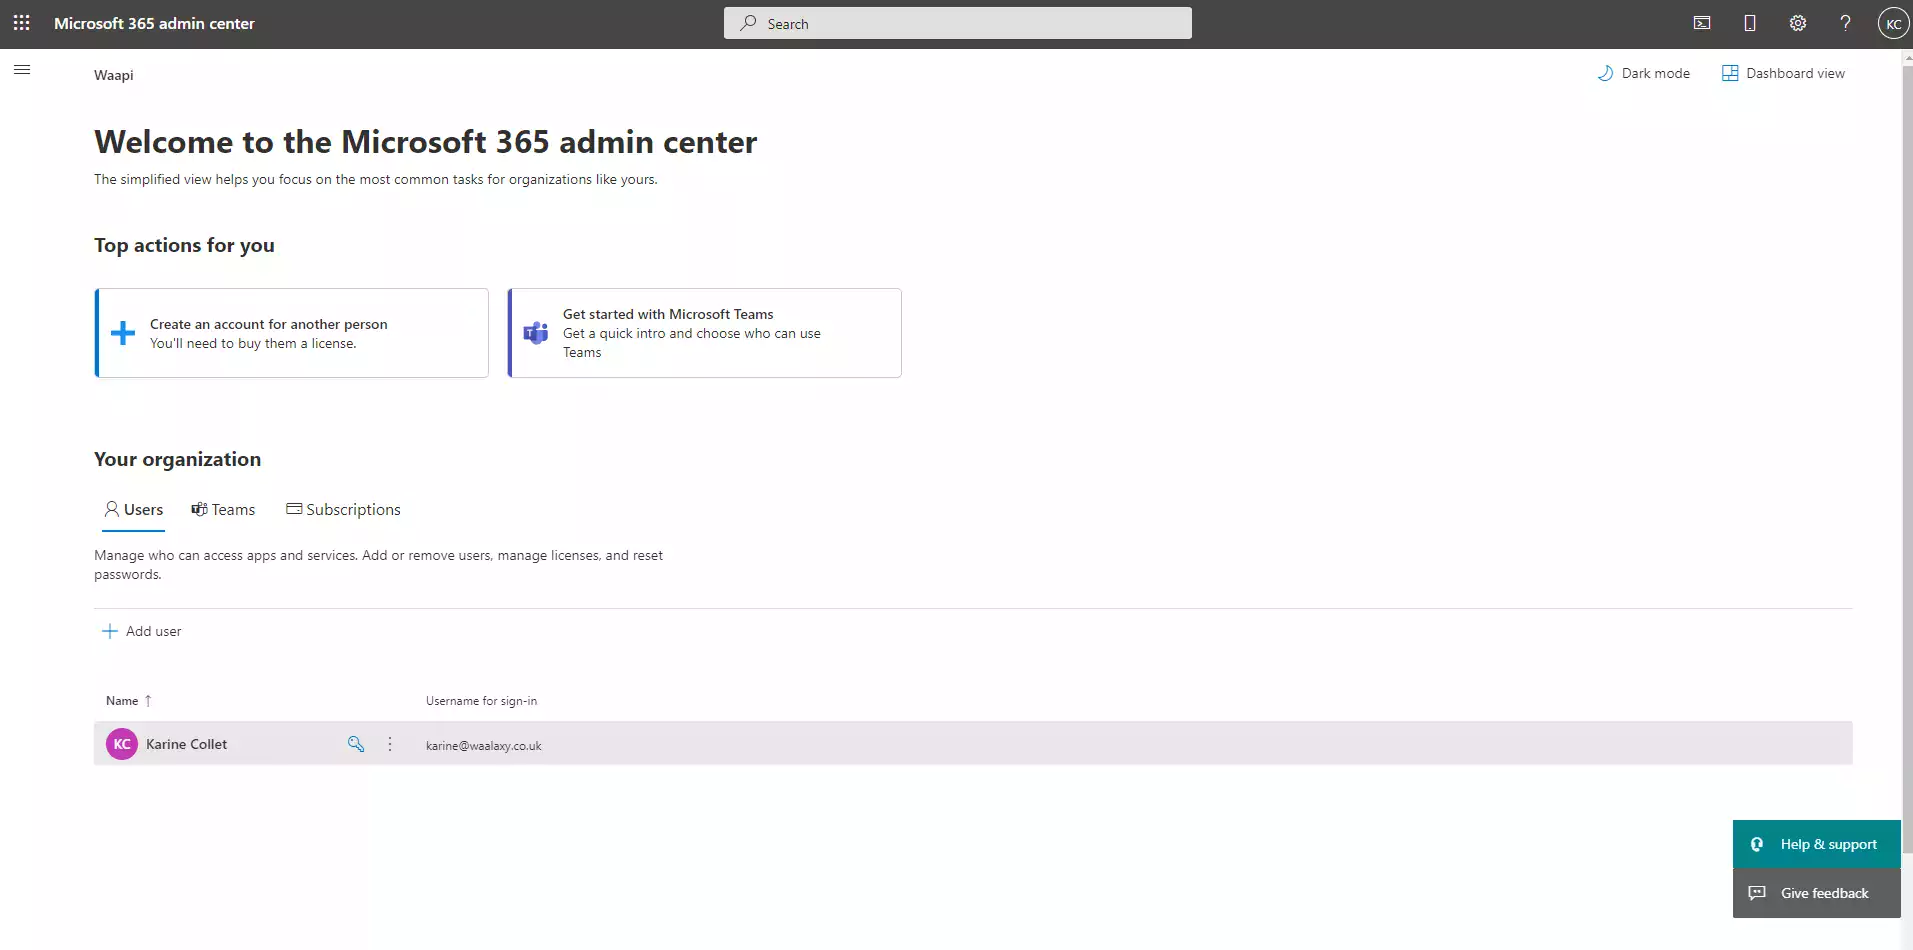
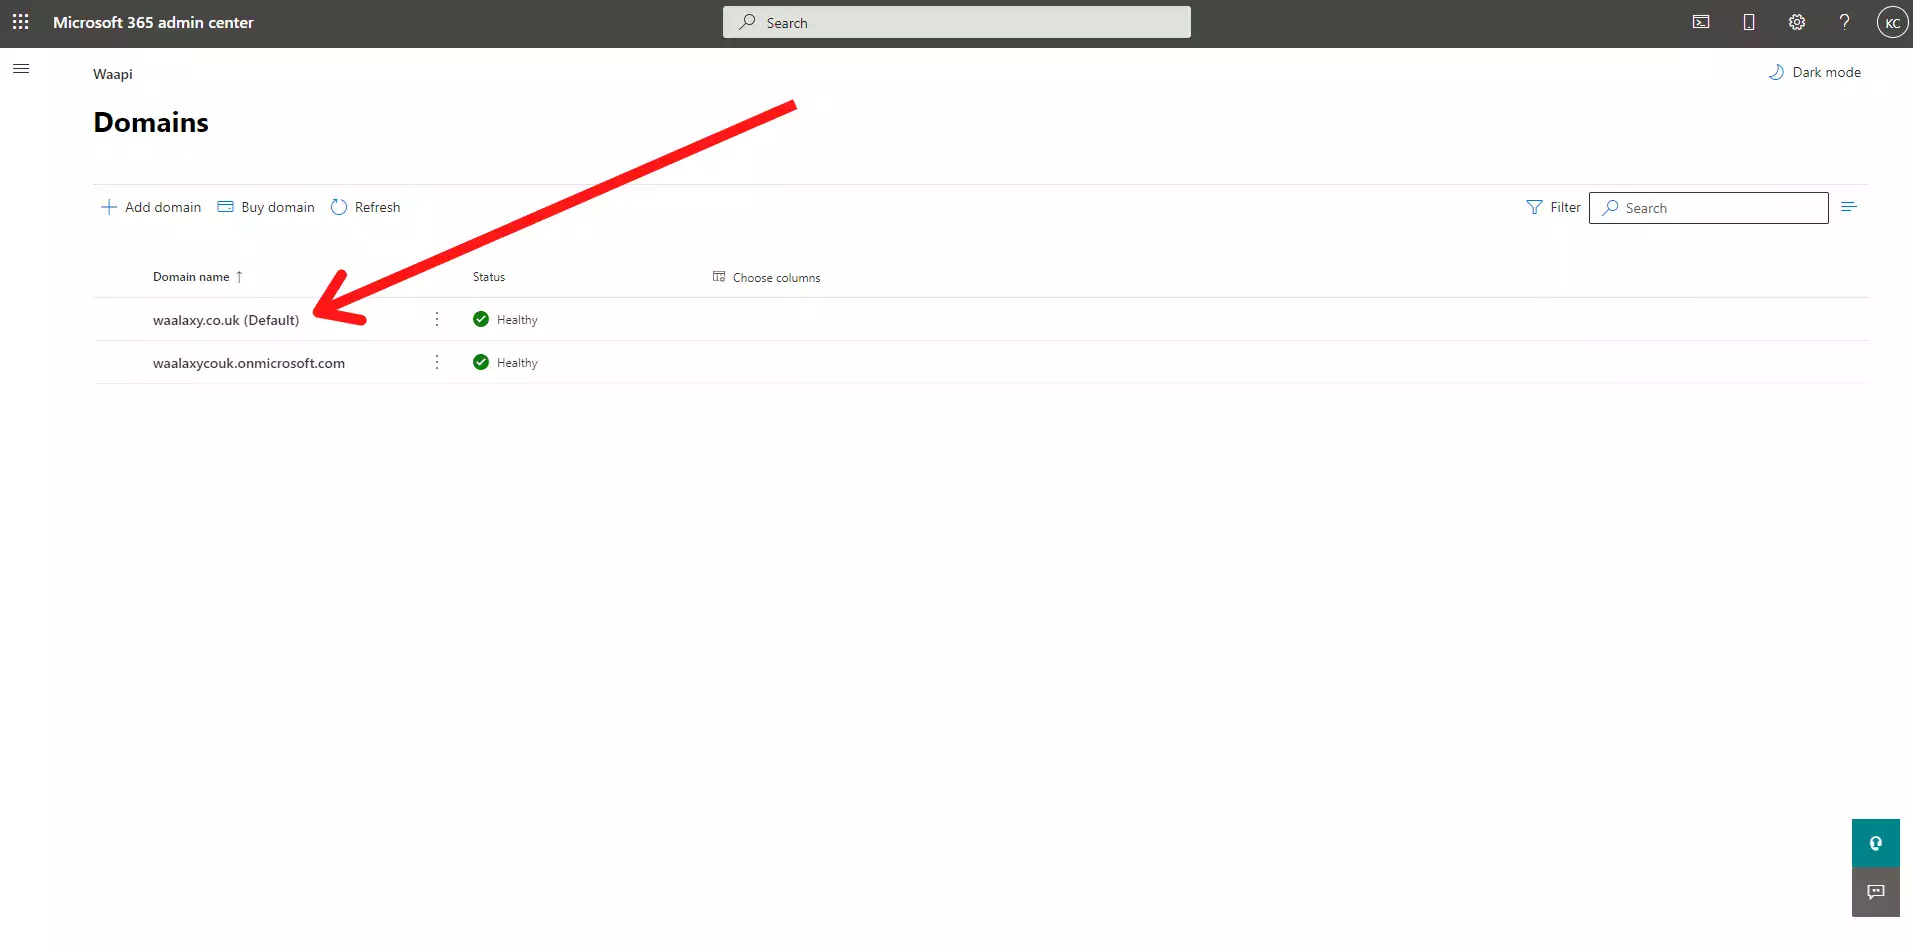
Now that you are on your Admin center page, you’ll need to choose for which domain you are making changes. Go to this page and select the domain of your choice.
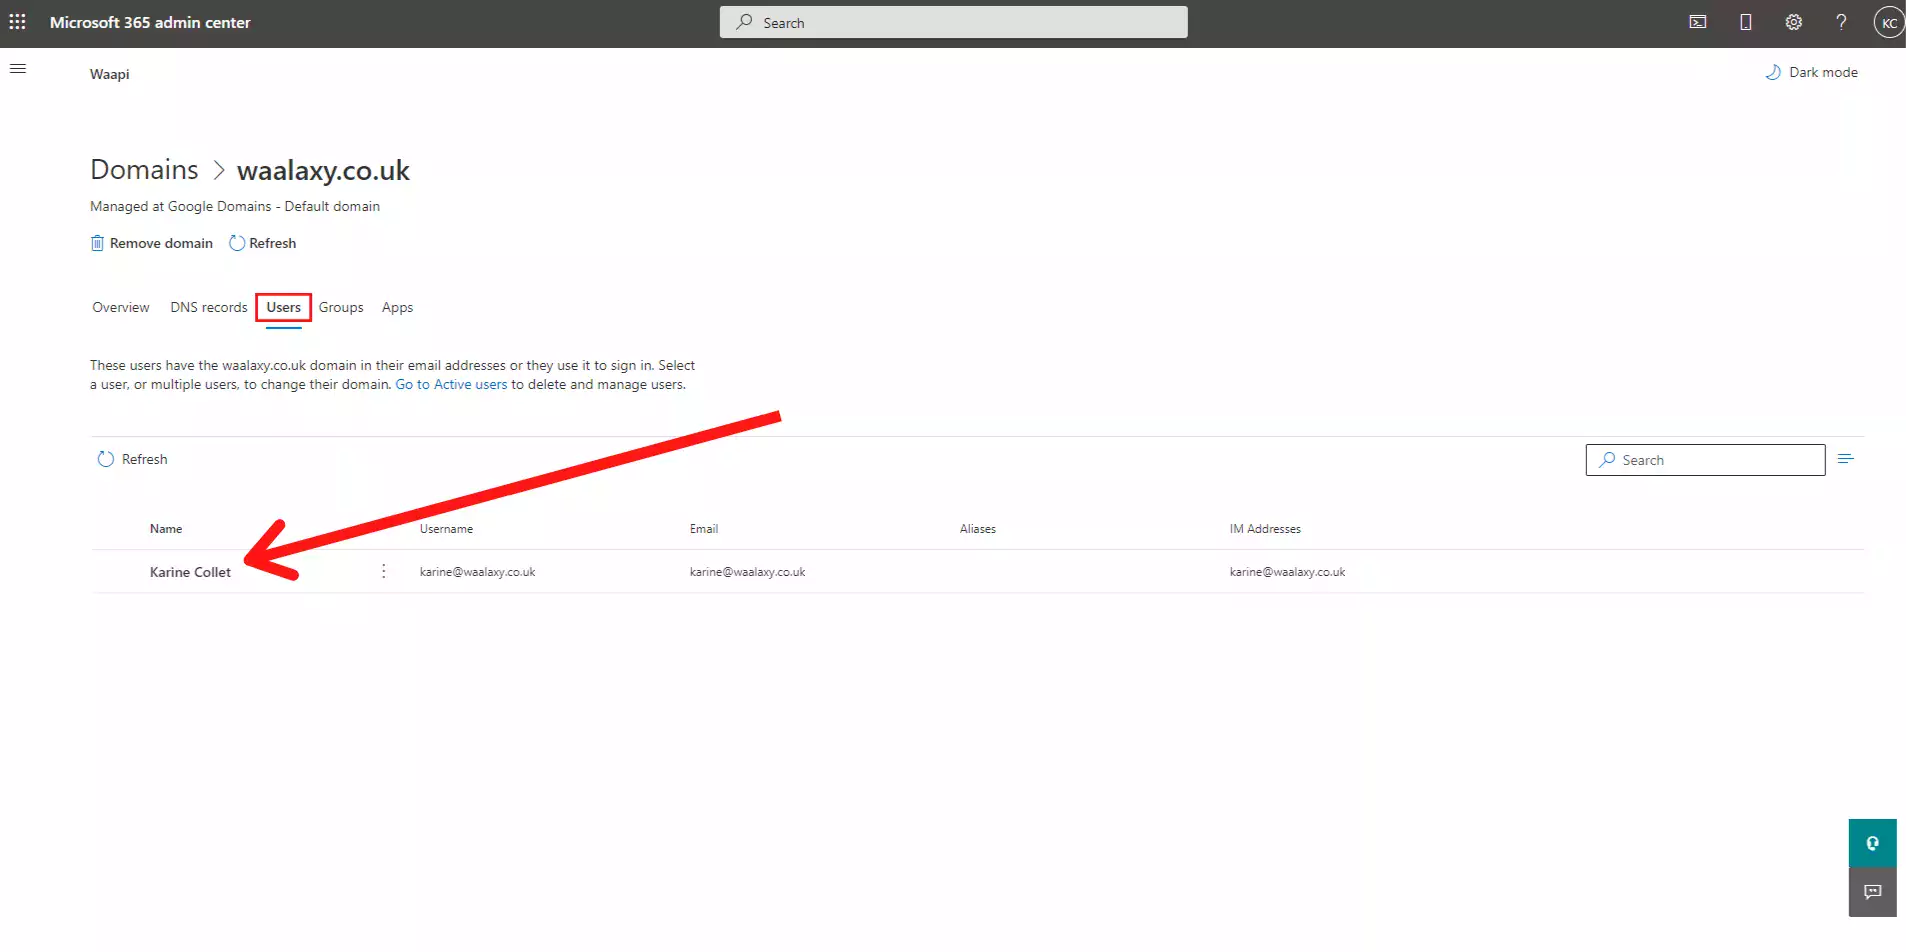
 You now need to change the authenticated SMTP for users of your choice. Once you are on your domain page, simply click on “Users” to see all users defined on your domain. Select the user you want to connect to Waalaxy.
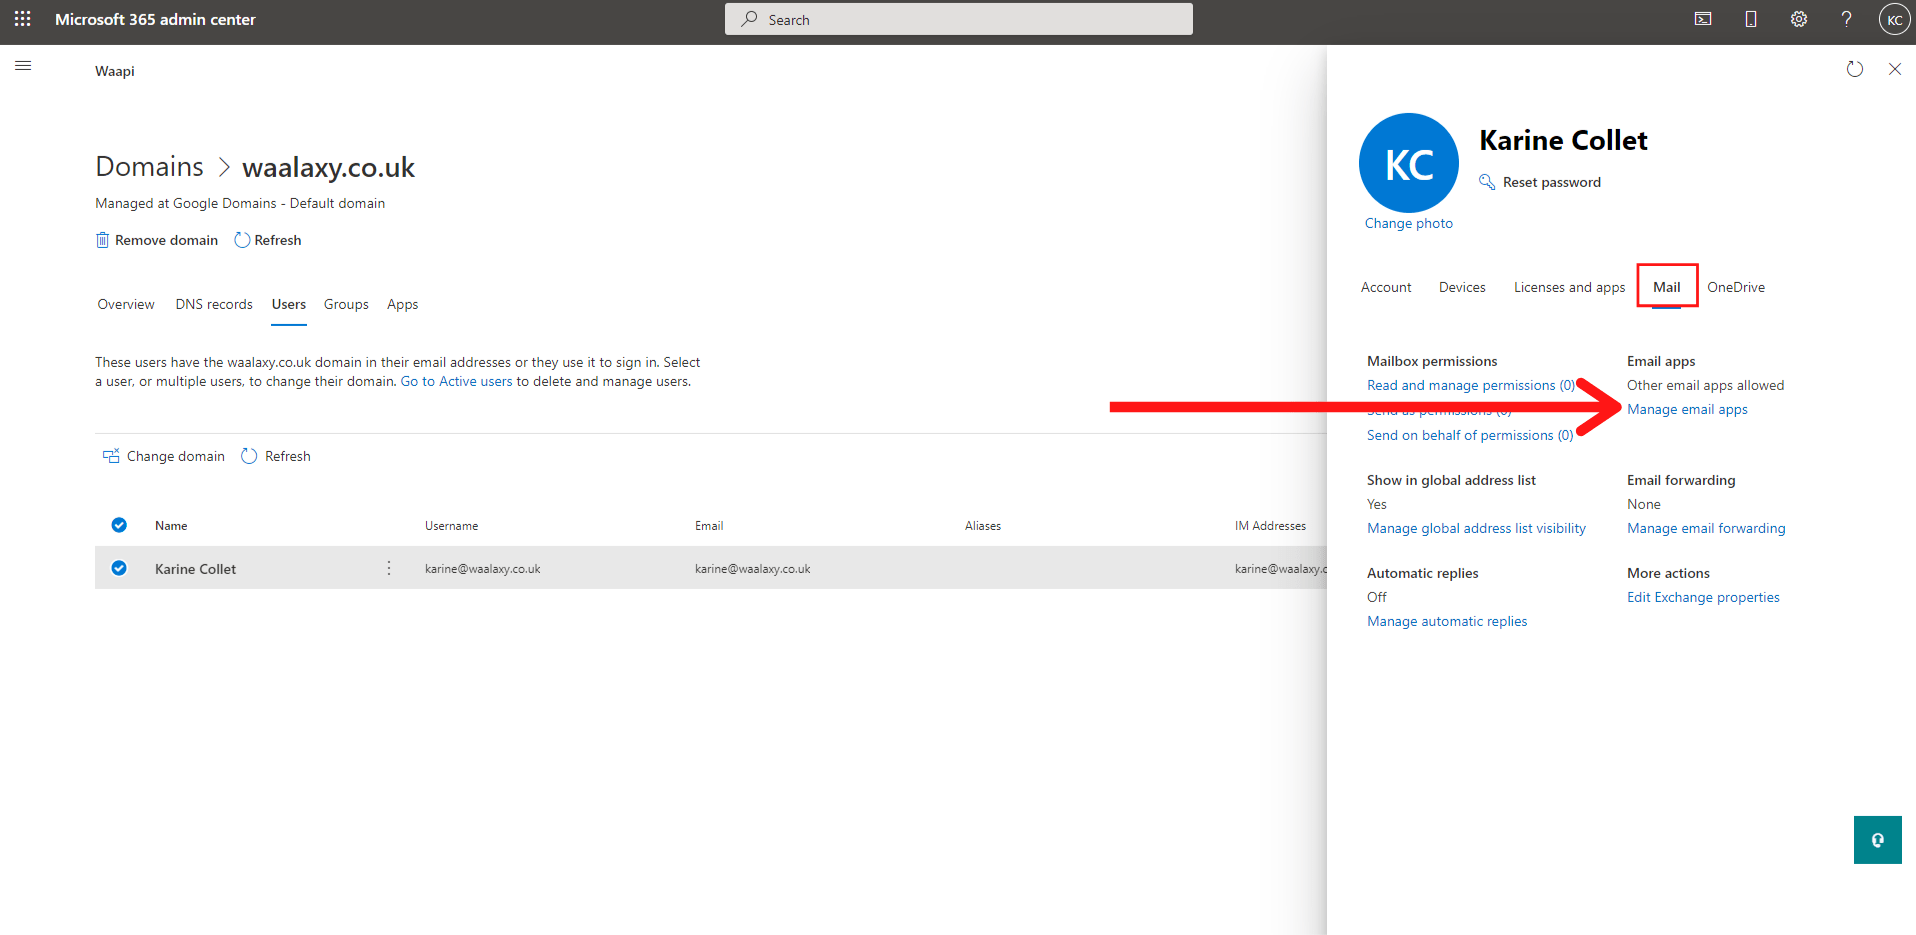
A menu will then appear on the right of the screen.
- Click on “Mail > Manage emails apps”:
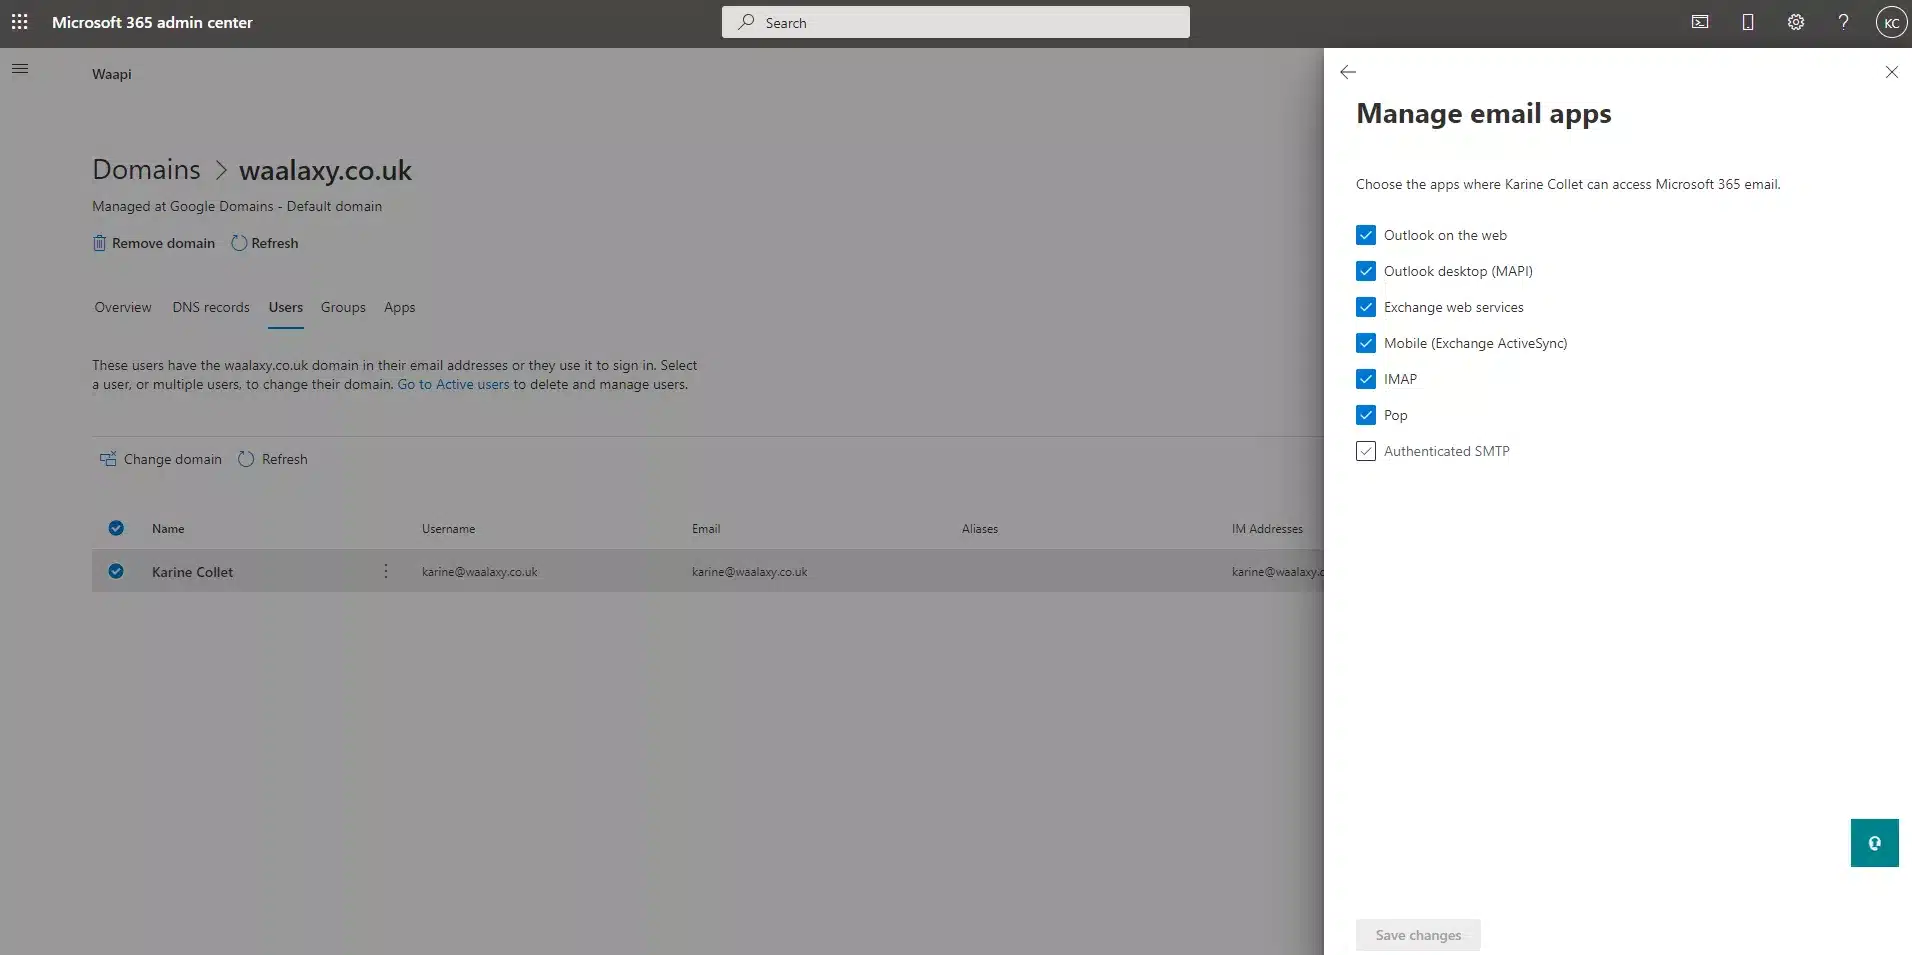
- Click on the “Authenticated SMTP” if the checkbox isn’t checked and save your changes.
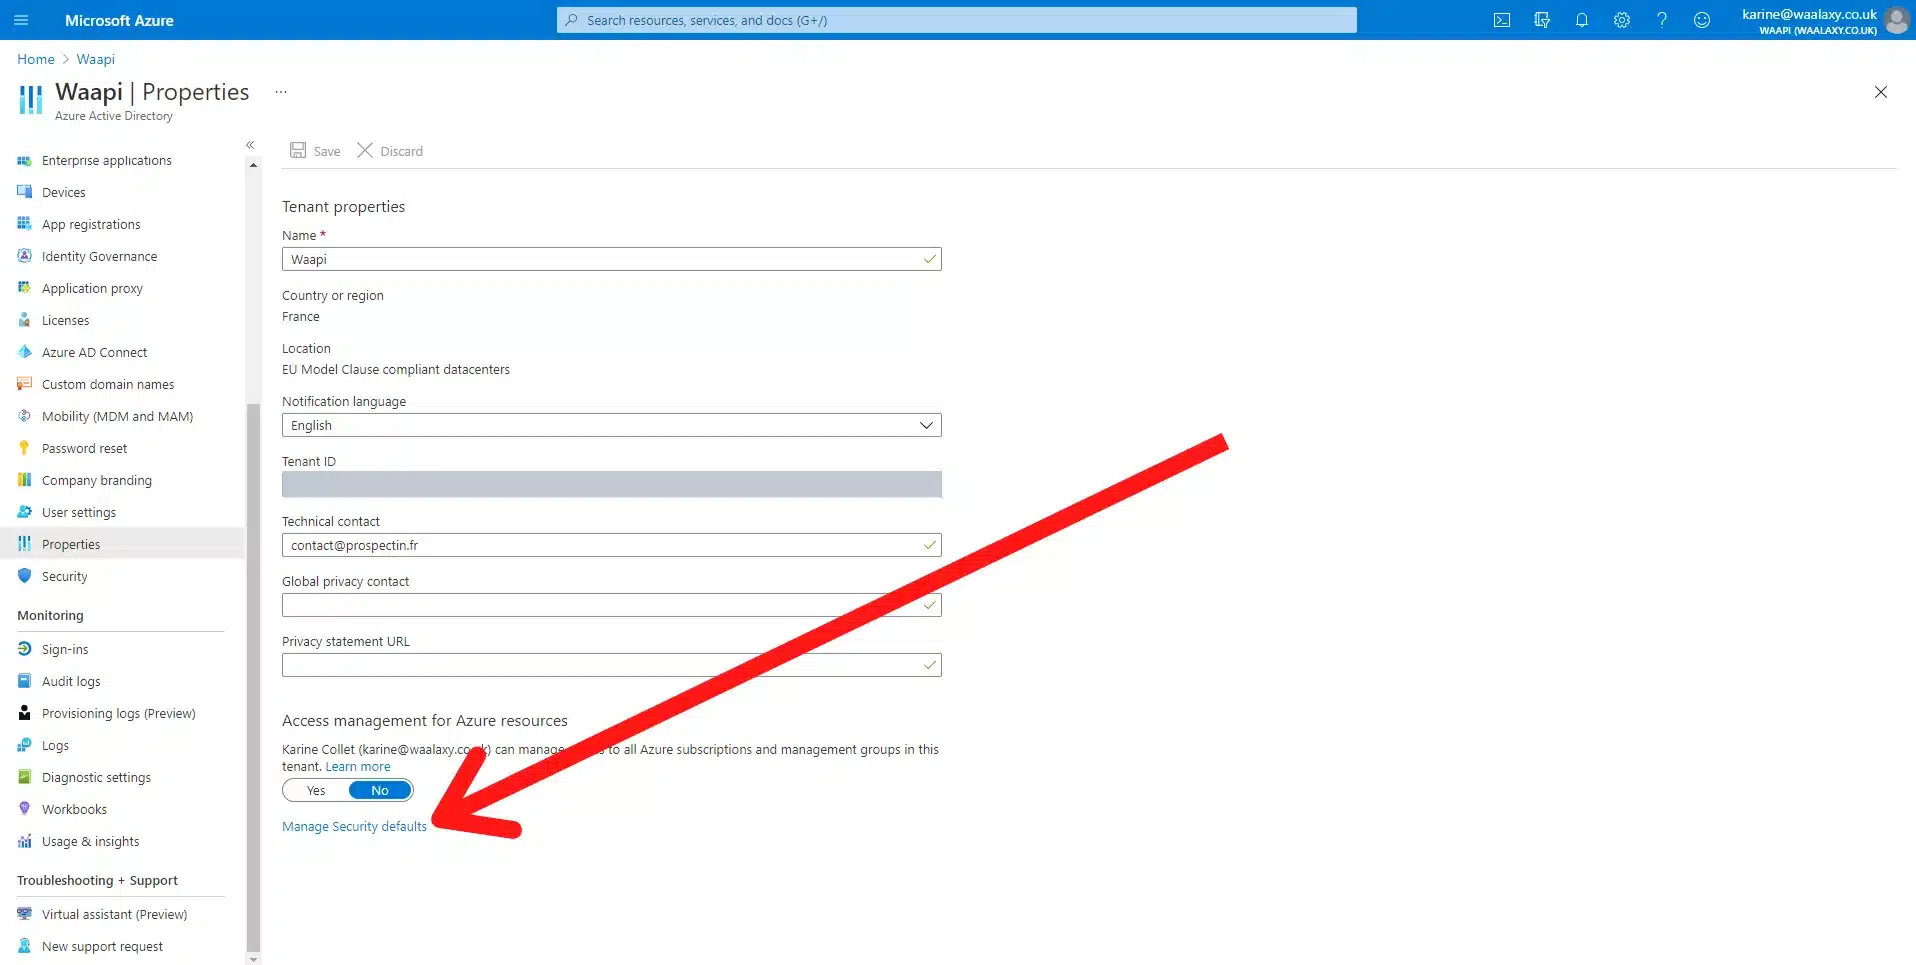
Now, disable the modern authentication. You can directly go on your Azure portal. However, if you want to read first what means disabling modern authentication, you can see it by following these steps:
- From your administration page, click on “Settings” then “Organization settings”.
- Scroll down on the list to find “Modern authentication”.
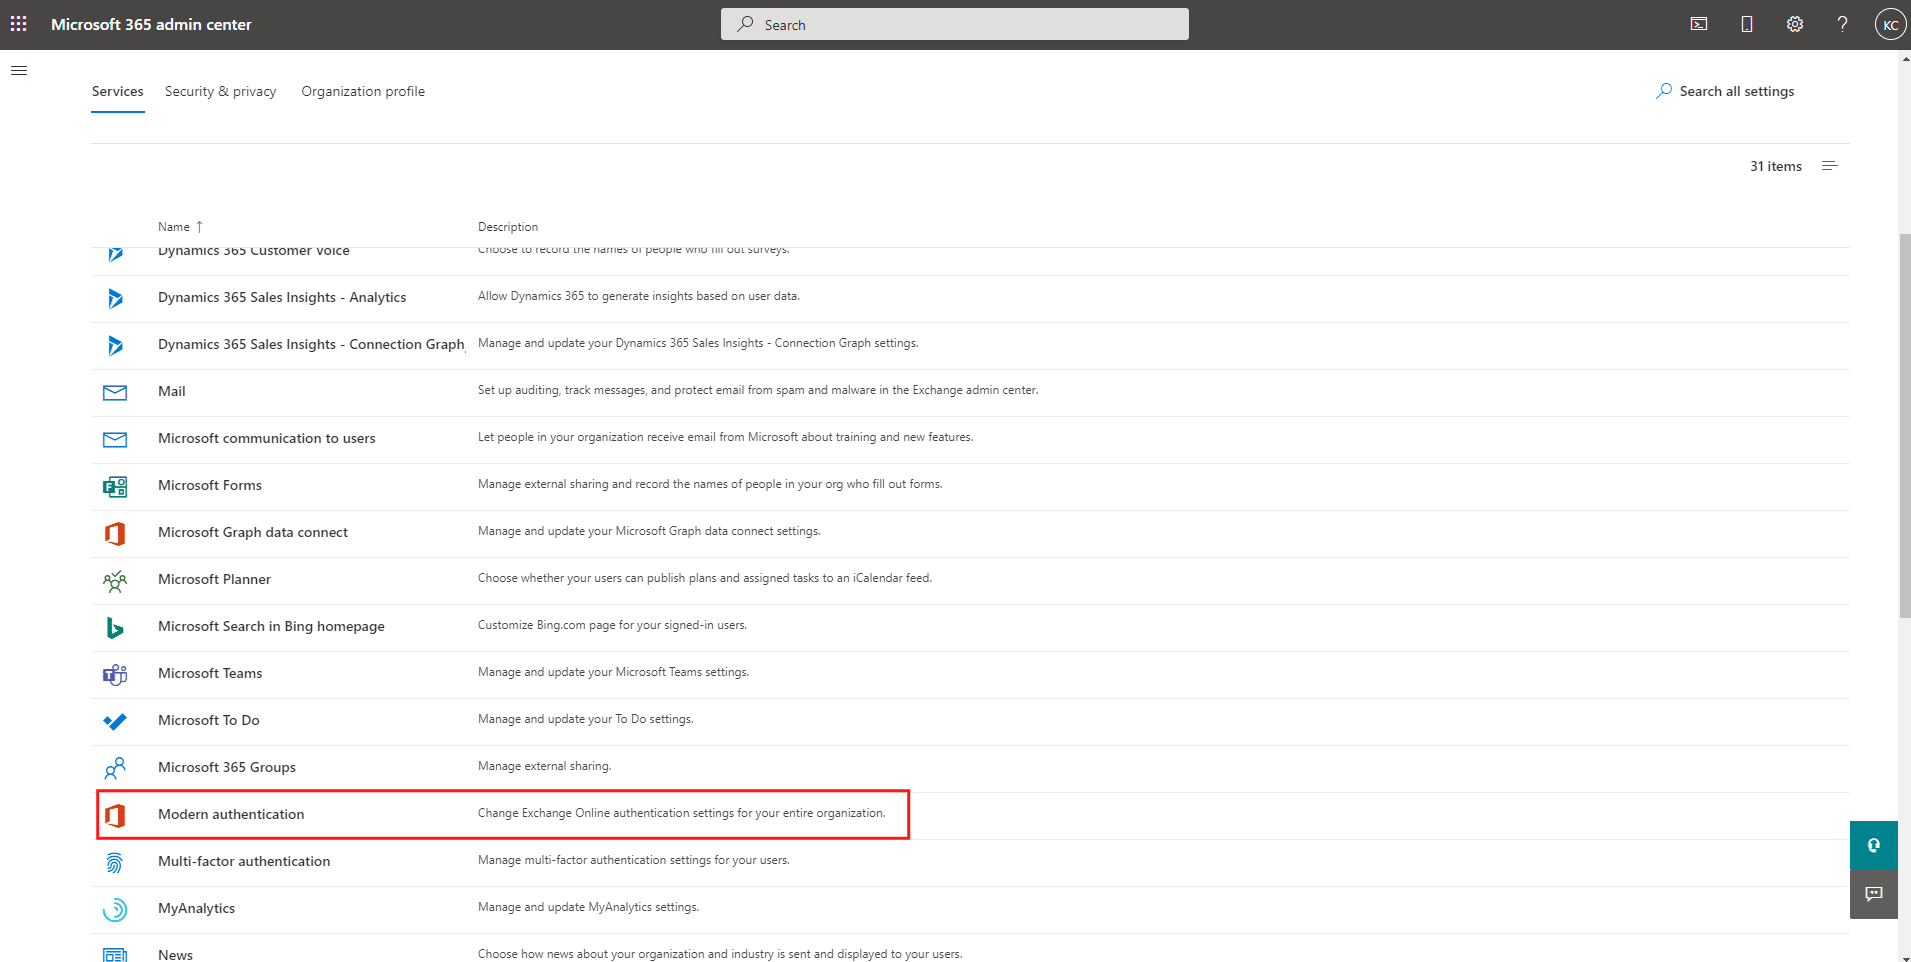
- Click on “Modern authentication”. You’ll have a link: “enable security defaults in the Azure portal”. This links you to your Azure portal.
You made it to Azure portal! Simply click on “Manage Security defaults” and disable it by clicking on “No” on the menu which will open. Don’t forget to save.
Once these changes are made, go to your Mailwarm account to set up your email: Add an account 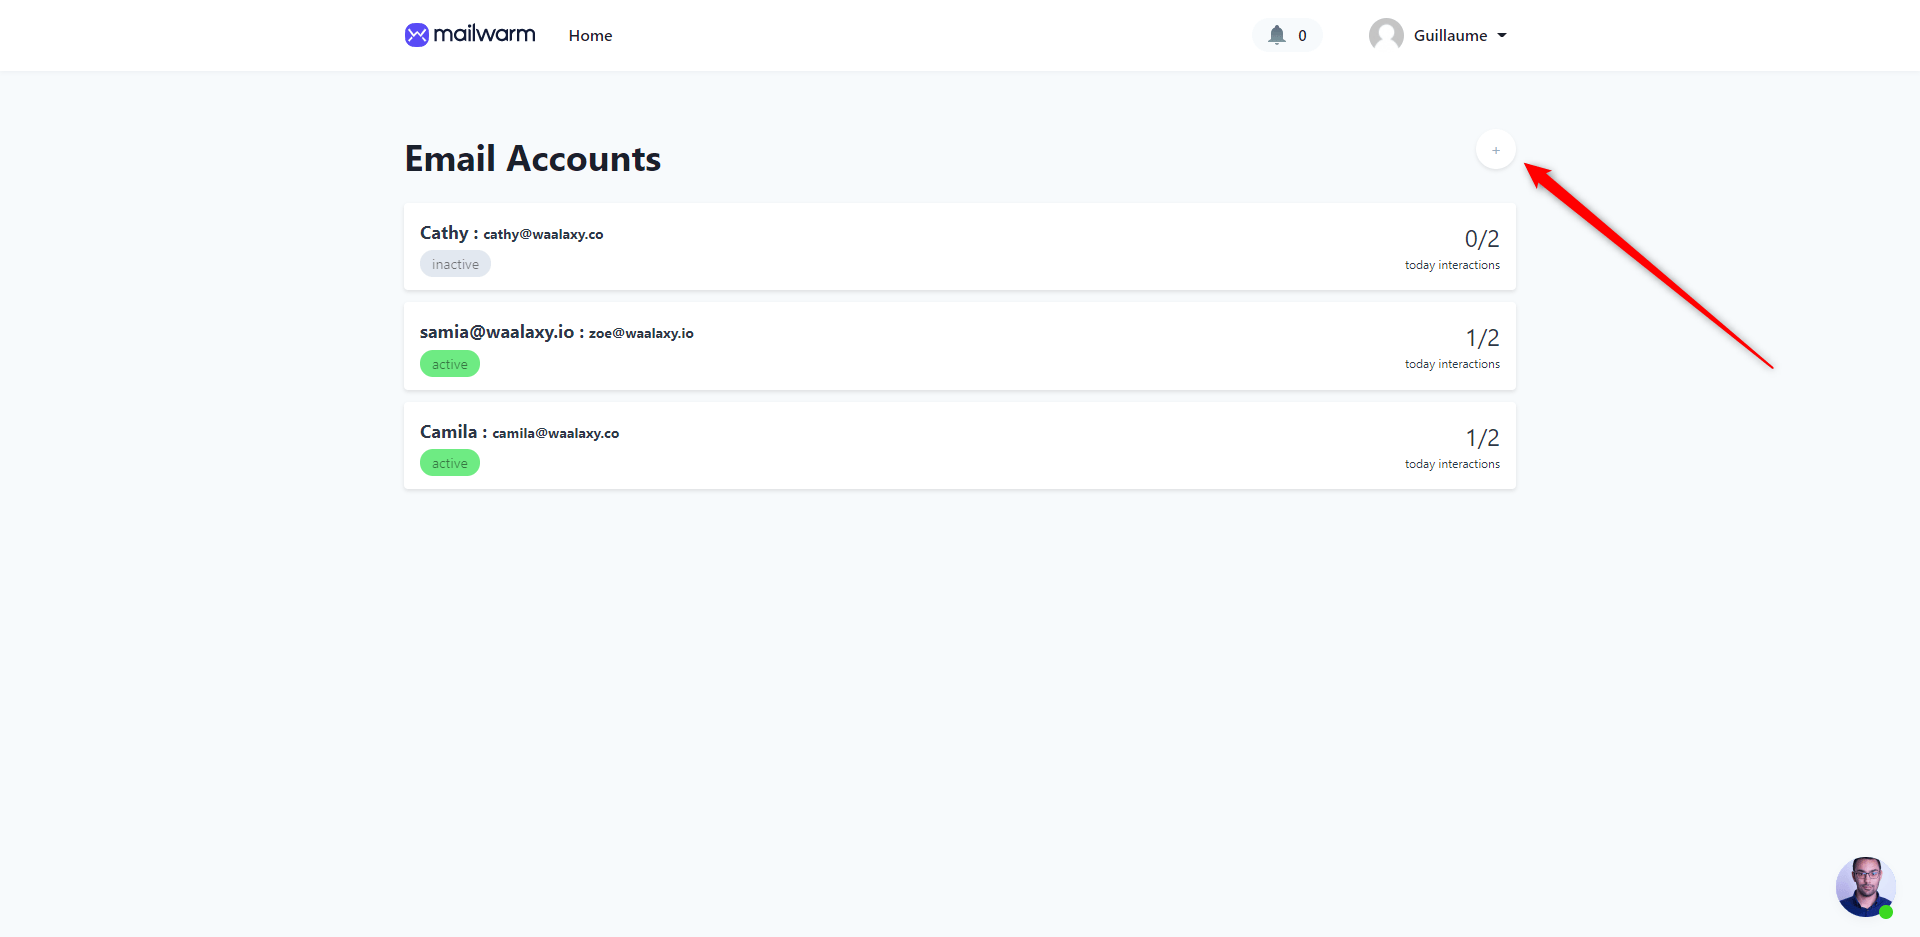 Click on “Connect any account”
  Then fill in the information:
- In “Email address and “Reply-to-email” : enter the email you want to heat.
- In“Smtp host:” enter “smtp.office365.com.
- In
- In
- In
- In
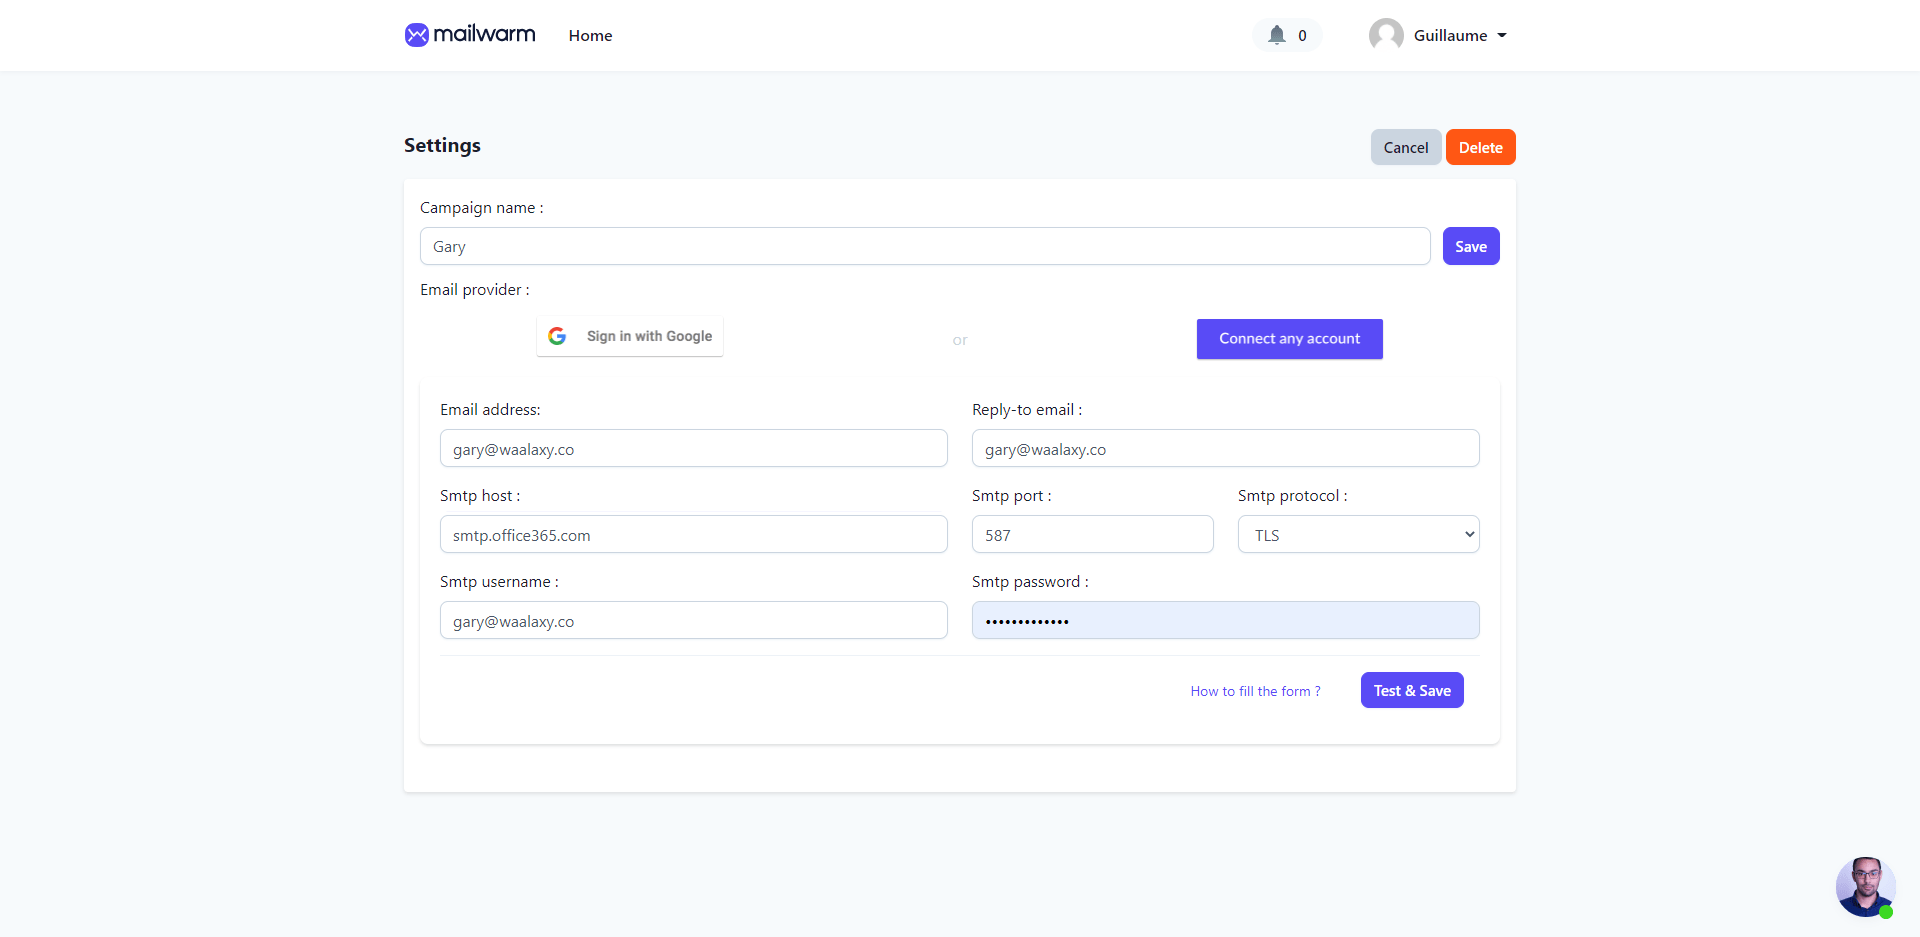 Click on “Test & Save” Then on “Start sending emails”.
 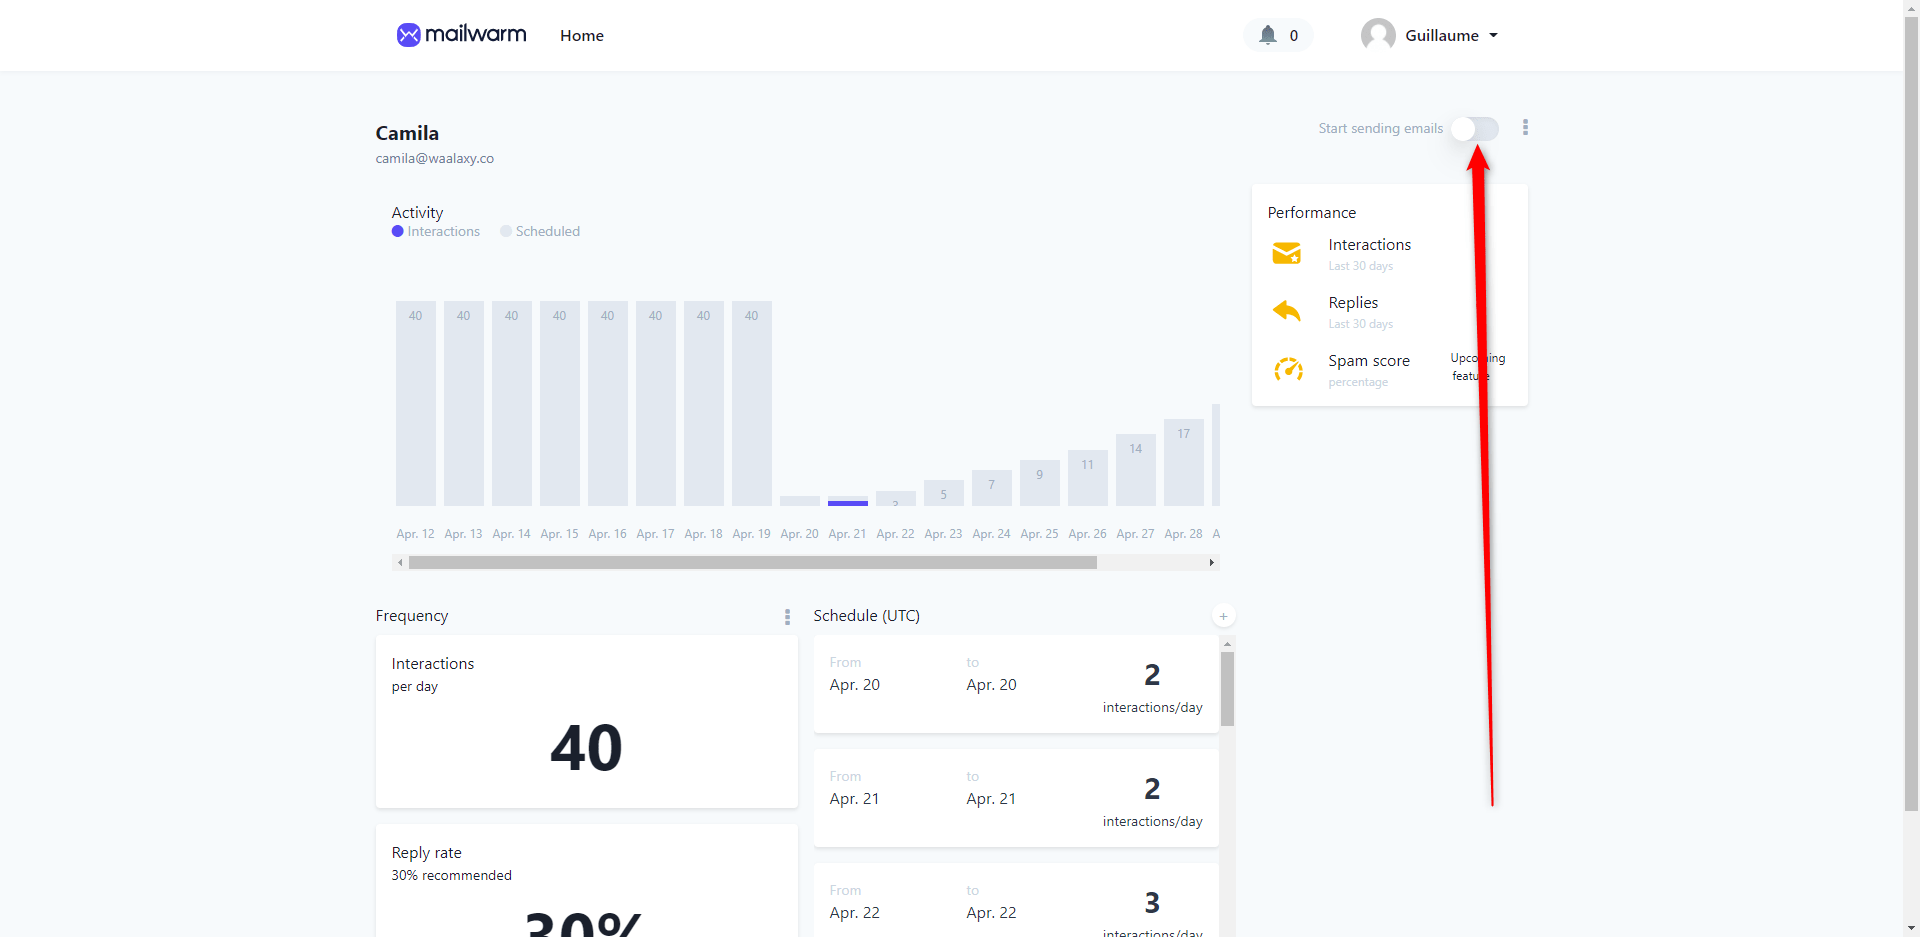 Mailwarm now takes care of heating your email progressively, you have nothing else to do.
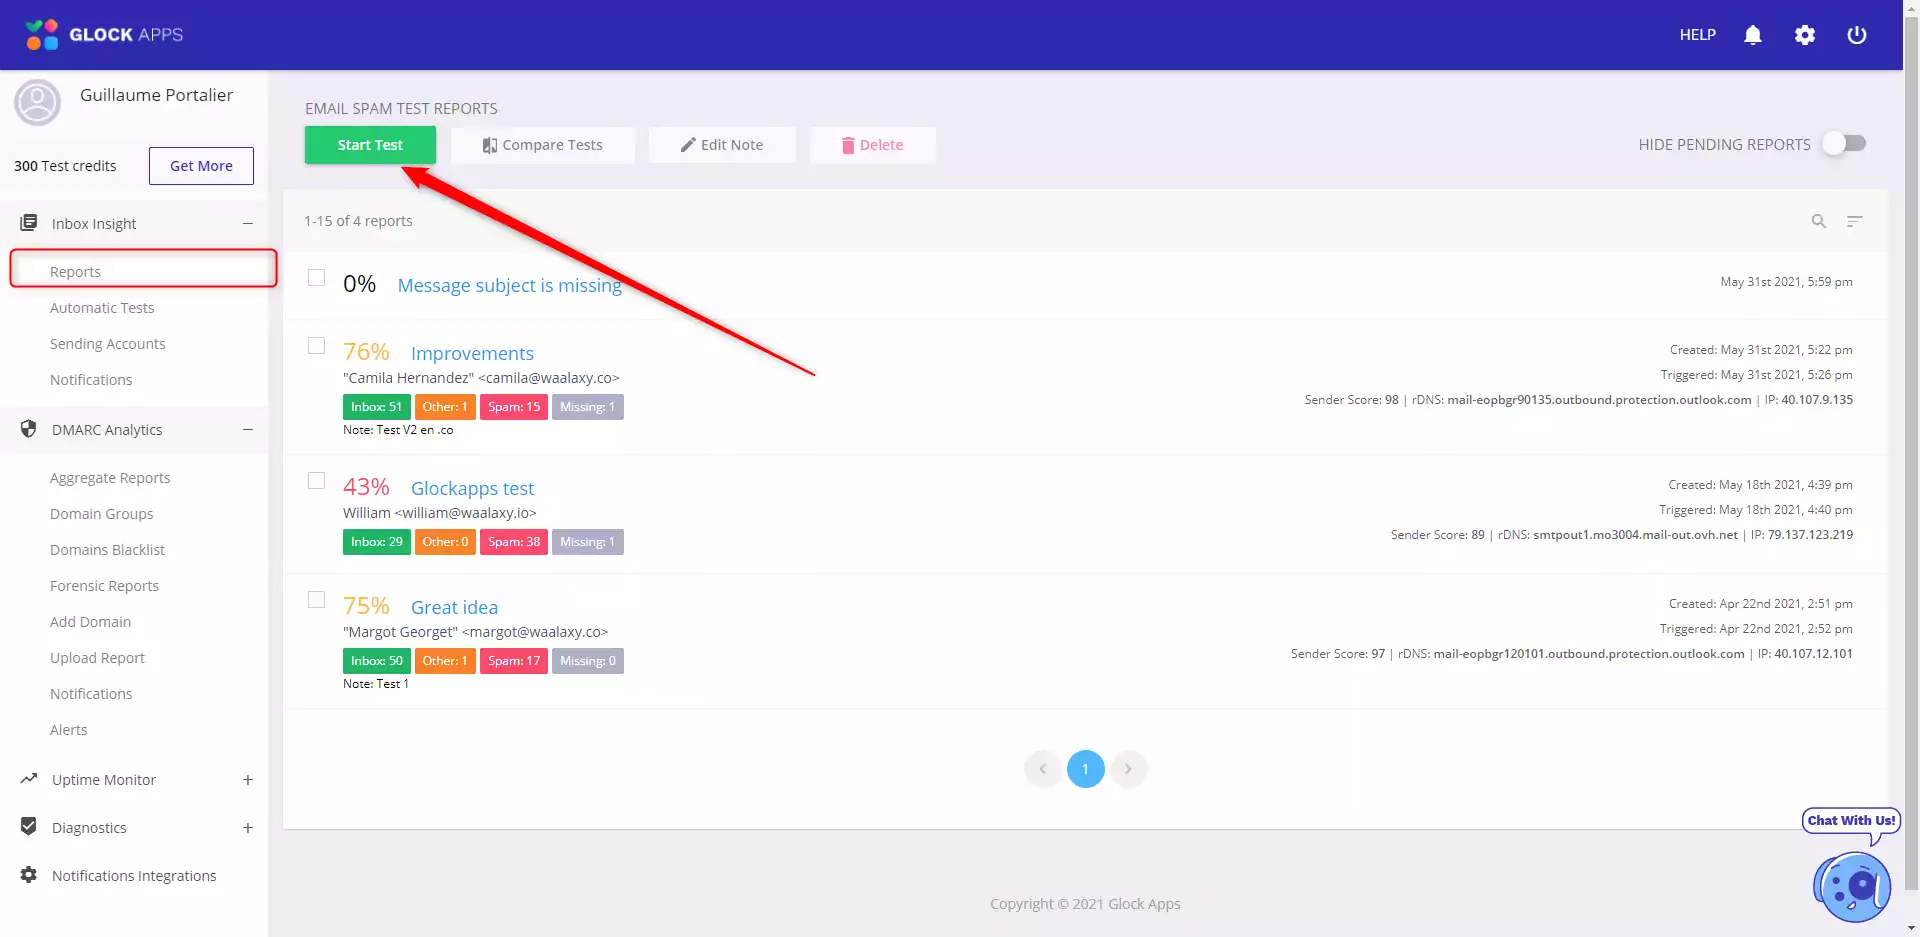
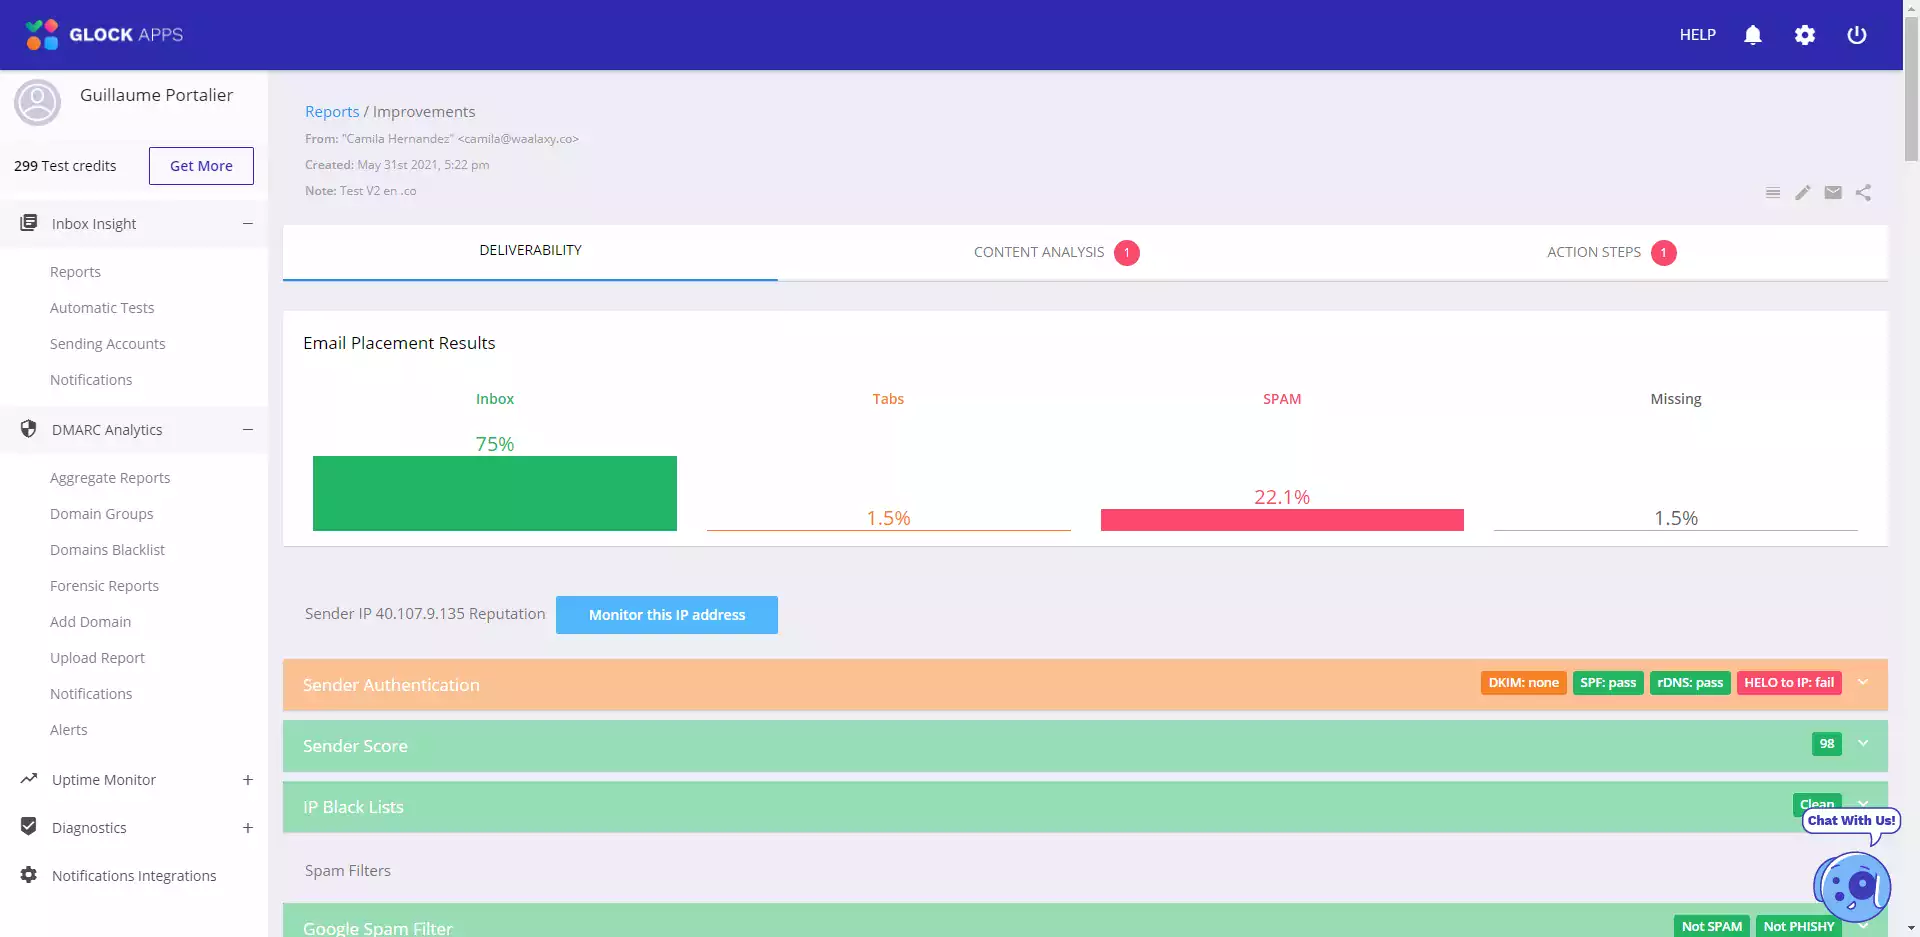
Glockapps allows you to test the deliverability of your emails on all email providers and provide you with a detailed diagnosis of the actions you can take to improve it.
To test your emails, it’s very simple, you just have to click on “reports” then on “Start test”.
Glockapp will then give you your current deliverability rate as well as actions to improve it.
11 tips to maximize your deliverability
1. Contact only 100% valid emails
2. Be consistent in your sending volumes
3. Monitor performance variations
5. Send quality content
6. Contact a qualified audience
8. No URL shorteners, only https://
9. Avoid spam words
10. Include an unsubscribe option
- A click on it will decrease your deliverability.
- It is a clear admission that you have automated the email sending, which undermines your goal of creating an authentic business relationship with your interlocutor.