- Automatically send a welcome message on LinkedIn
- 10 Triggers Examples with ProspectIn
- How to use the CRM synchronization feature with ProspectIn and Zapier?
- Why and how to perform A/B testing with ProspectIn?
- Send an email when a contact accepts your LinkedIn connection request
- On Zapier: Synchro and formatting
- How to send an email to a prospect who does not accept my connection request using Hunter
- Retrieve followers from a LinkedIn page
- Phantombuster: How to target the clients of your competitors
- How to retrieve profiles that have commented a LinkedIn post?
Automatically send a welcome message on LinkedIn
In this article, we’re essentially going to show you how to automatically send a welcome message on LinkedIn to people who send you a connection request. All using ProspectIn ?
ProspectIn, what does it do?
ProspectIn allows you to automate the sending of connection requests and messages on LinkedIn, and to visit and follow profiles automatically. The strength of ProspectIn is its Scenario feature. This feature allows you to automate action sequences (visit/follow/connection request/message).

This allows you to create true follow-up sequences, similar to how you could by email. A key difference being a much higher open and response rate (approximately 10x), as you’d be using LinkedIn profiles instead of email addresses. ProspectIn takes the form of a mini CRM, from which you can perform all your actions. You organize your prospects into Campaigns, and you can use a large number of filters as well as a tag system to better organize your prospecting.
Sending a welcome message automatically on LinkedIn
ProspectIn offers an advanced prospecting feature: Triggers. Triggers allow you to perform an action based on an event and certain conditions, all in a fully automated fashion. It is this feature that enables you to automatically accept connection requests received, and automatically send a welcome message on LinkedIn.
1st step
The first step is to create a Campaign that you will call “Triggers Campaign” (for example). Once the Campaign is created, you go to the message tab and write the message you want to send to the people who send you a connection request on LinkedIn. You can title your message “welcome message” (this title will only be visible to you).

2nd step
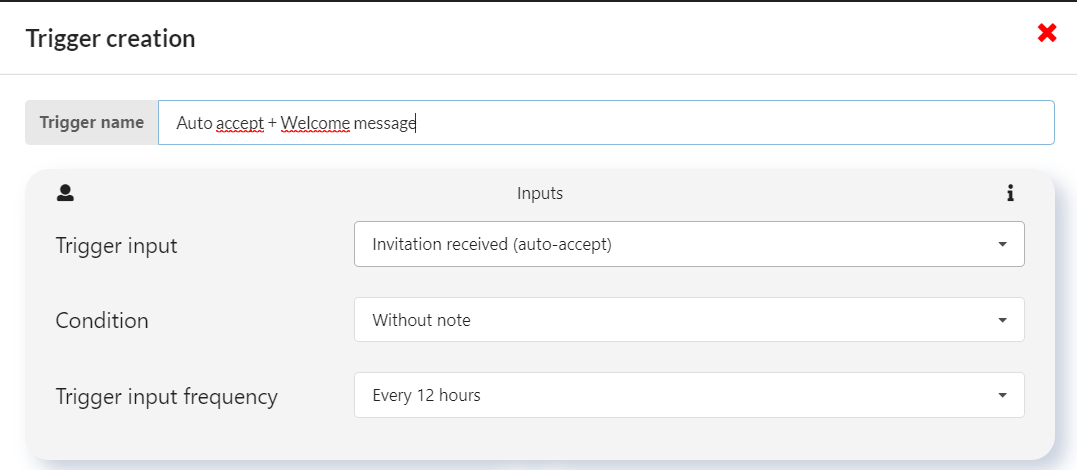
Go to the “Triggers” page and create your Trigger! ?

Choose your Trigger input, that is, the action that will trigger the Trigger. In this case that would be, “Invitation received (auto-accept). Then select the condition “without note” if you only want to accept connection requests and send a message to people who add you to their network without having wrote a note. Finally, choose the frequency of the Trigger execution.
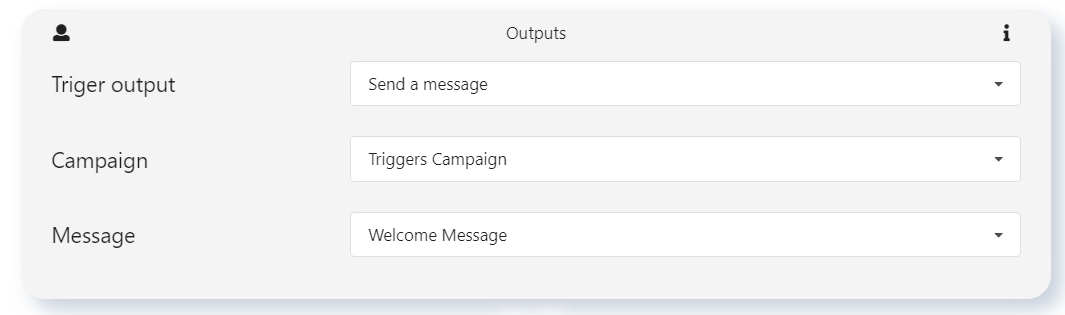
3rd step
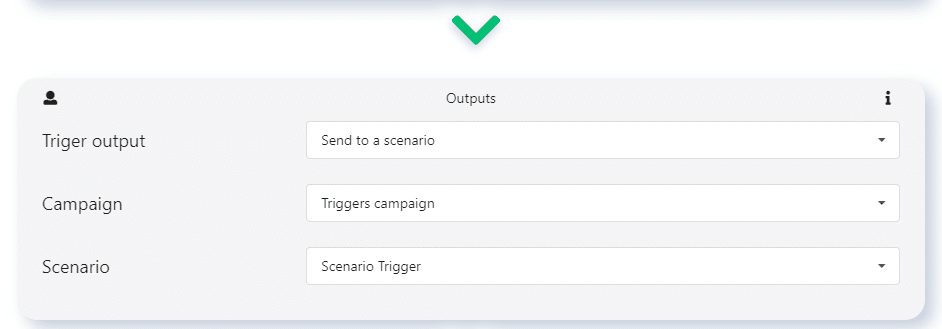
Choose the trigger output, i.e. the action that will be performed when the Trigger is triggered. In this case that would be, “Send a message”, “Triggers campaign” and “Welcome message“.
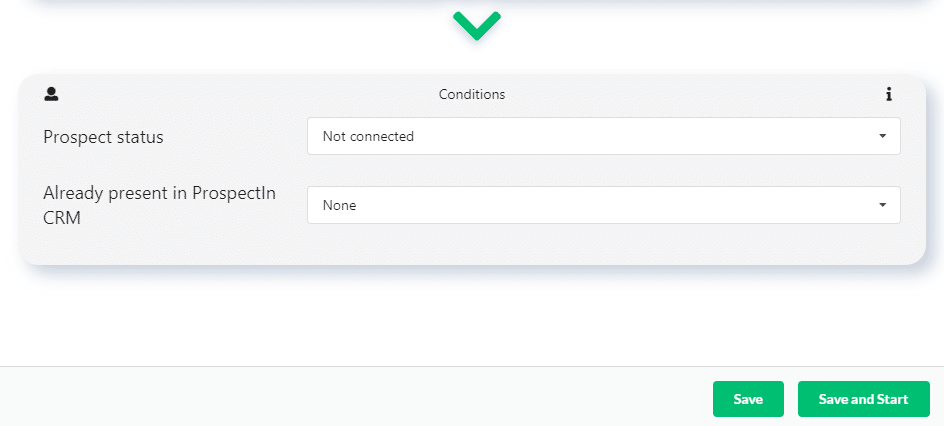
4th step
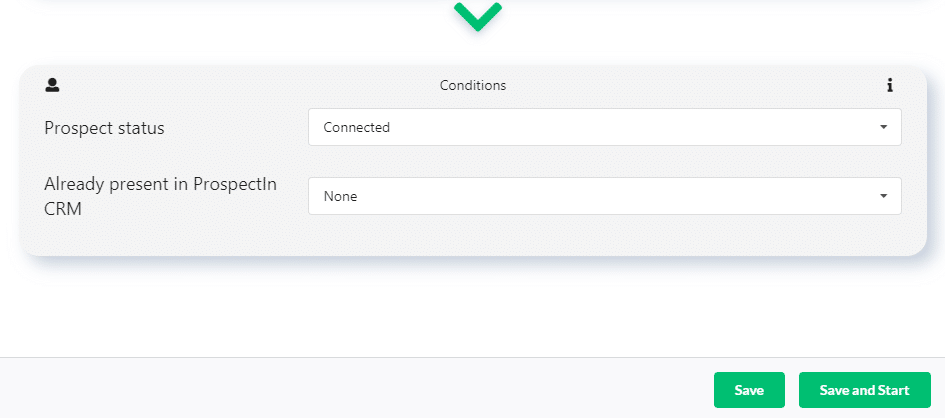
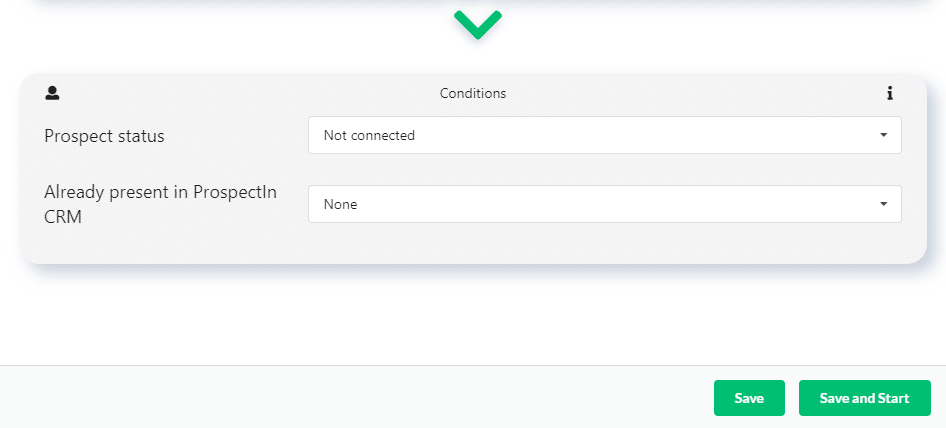
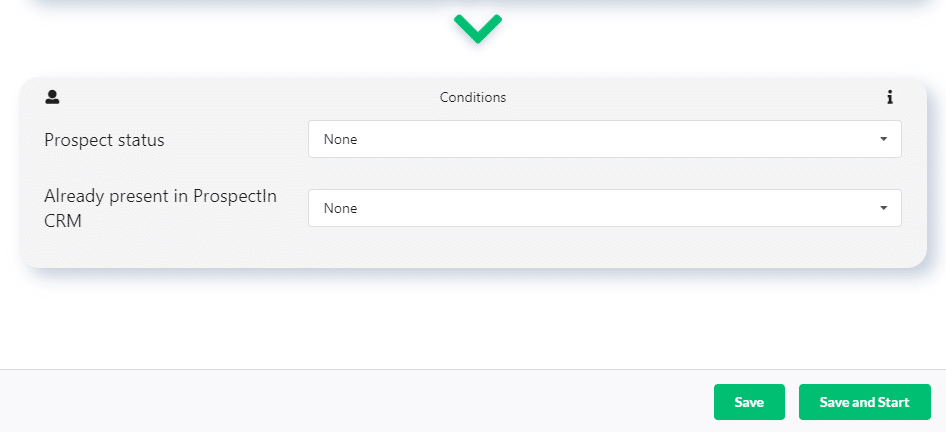
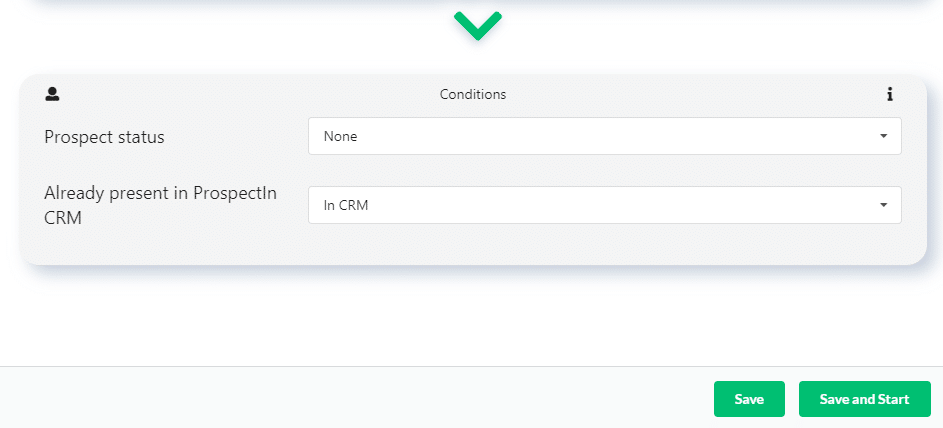
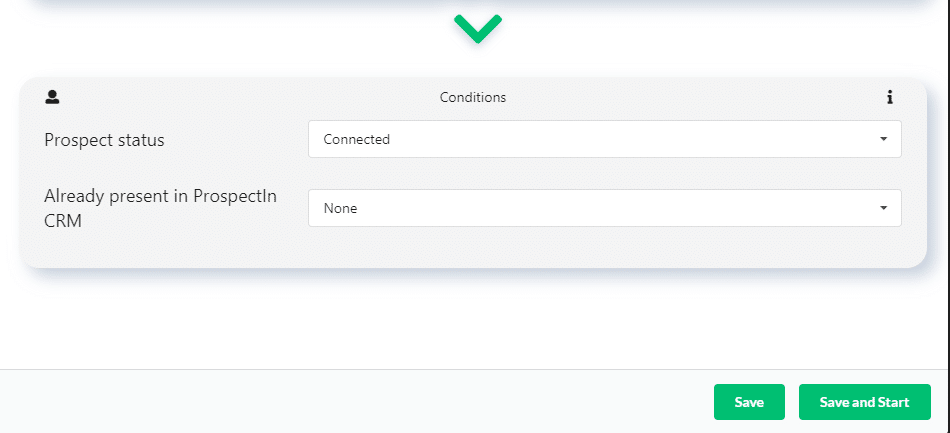
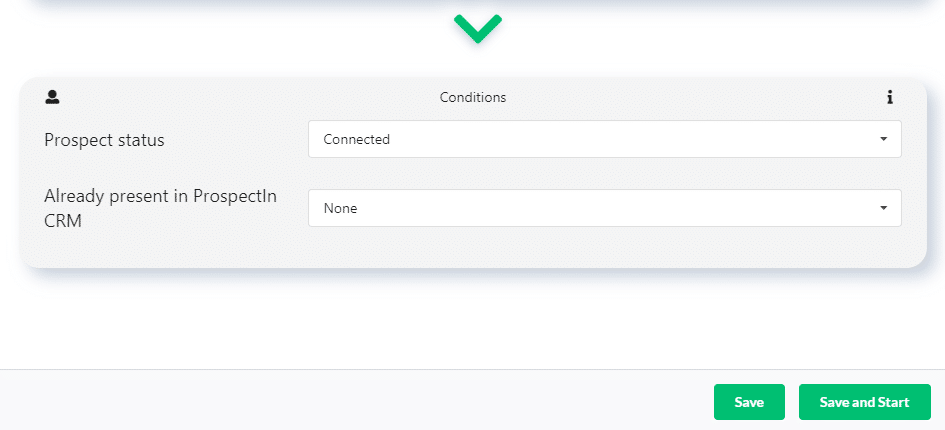
You just have to choose the conditions. So for “Prospect status”, select “connected”, and for “Already present in the CRM ProspectIn”, select “None”.
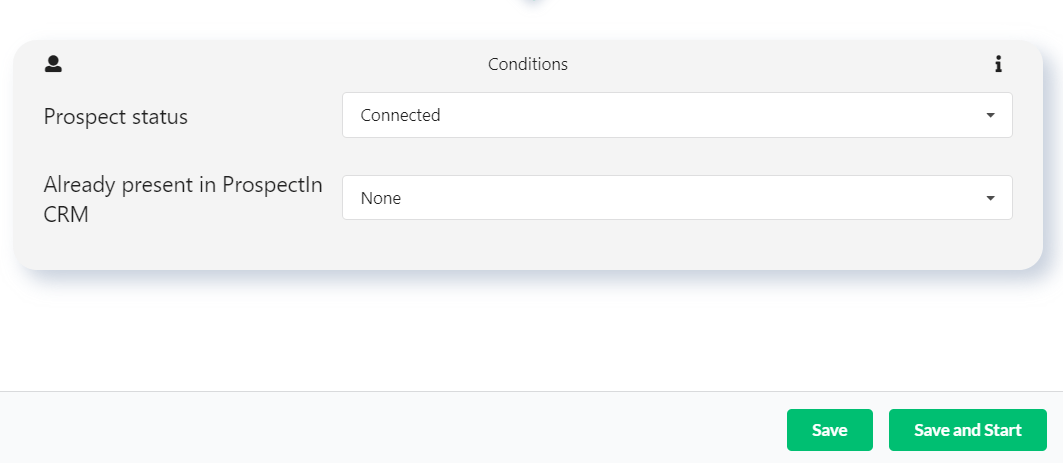
Click on “Save and start”. There you go, your Trigger is all set up. From now on, all connection requests received without a note on LinkedIn will be automatically accepted and the person will also automatically receive a welcome message.
As you can see, the Auto-Accept trigger will save you a lot of time!
The more notoriety you have on LinkedIn, the more connexions requests will increase.
Today we have LinkedIn accounts with over 30 requests per day. ?
But that’s not the only trigger that will make your life easier, here are 10 examples of what you can set up with just a few clicks.
10 Triggers Examples with ProspectIn
The Trigger feature has just been released. You have read our article on how to use it, but you are still wondering, “what exactly should I use it for?”. Well, look no further – you are in the right place! In this article, I’m going to suggest 10 triggers examples with ProspectIn that you can use.
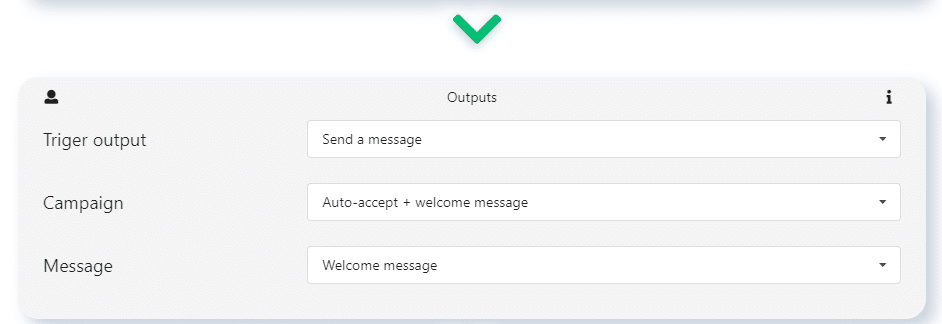
1. Auto-accept connection requests (without a note) + send a welcome message
This Trigger automatically accepts all invitation requests (that do not contain a note) that you receive, and then automatically sends them a pre-determined message of your choice. 
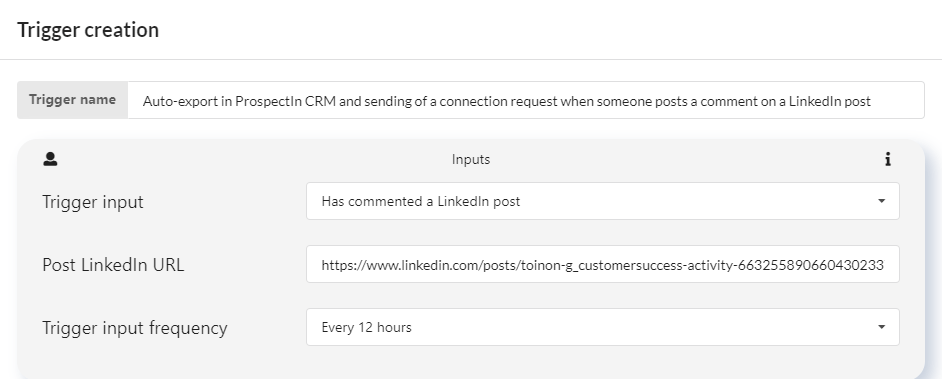
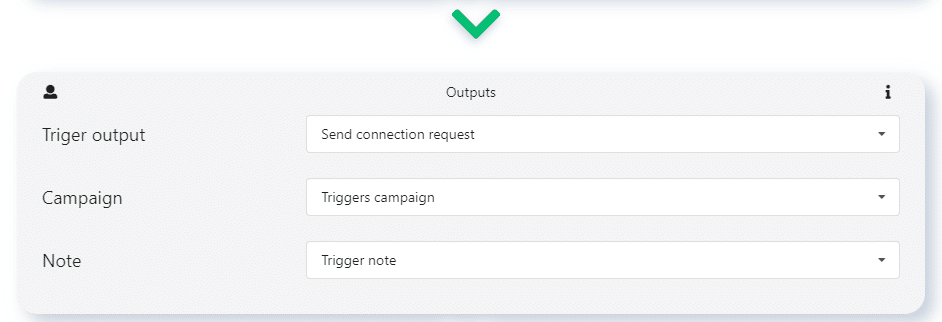
2. Auto-import into ProspectIn’s CRM + send a connection request when someone posts a comment on a LinkedIn post
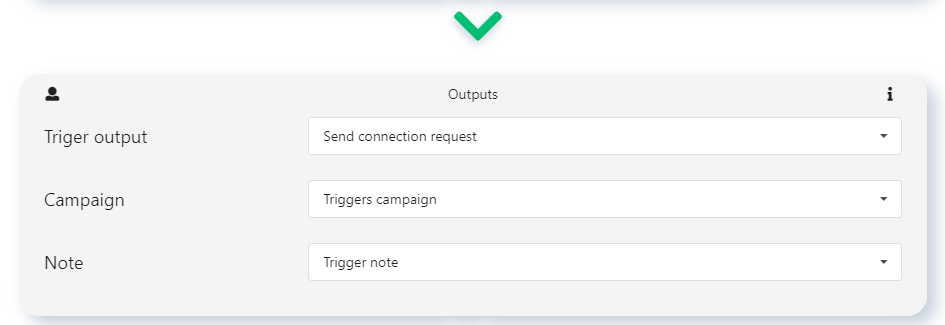
This Trigger allows you to automatically import into ProspectIn a prospect who has posted a comment on a LinkedIn post. Once the prospect has been imported into a Campaign, they are then sent a connection request.
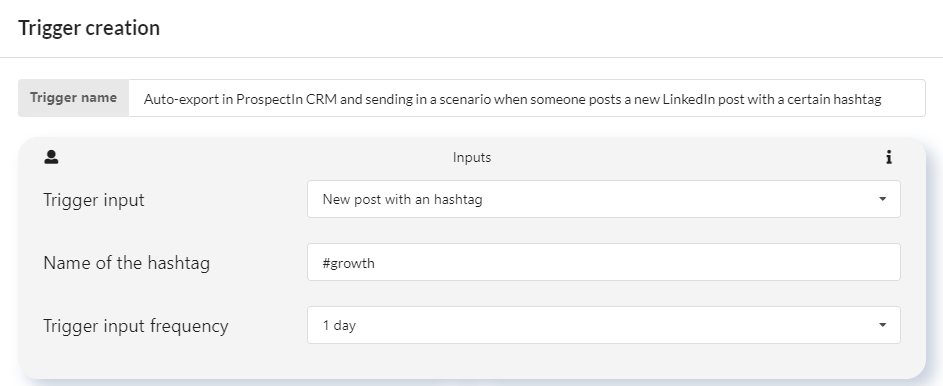
3. Auto-import into ProspectIn’s CRM + send to a scenario when someone posts a new LinkedIn post with a certain hashtag
This Trigger allows you to automatically import into ProspectIn profiles of anyone who creates a post containing a certain hashtag, and to automatically send that profile to a Scenario.
4. Auto-import into ProspectIn’s CRM + send a connection request when someone visits your profile
This Trigger allows you to automatically import into ProspectIn all the people who visit your profile and send them a connection request.

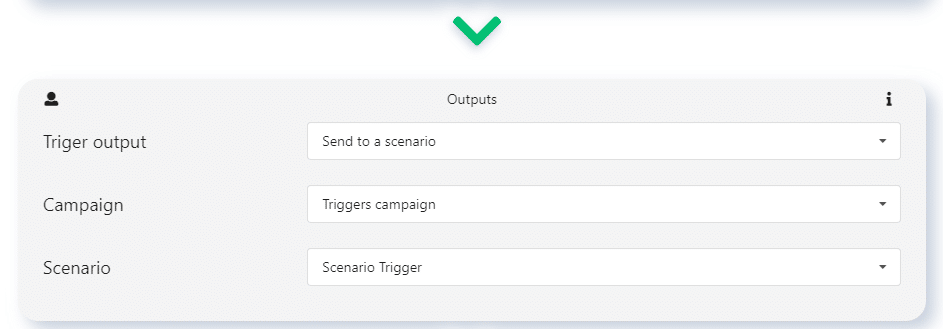
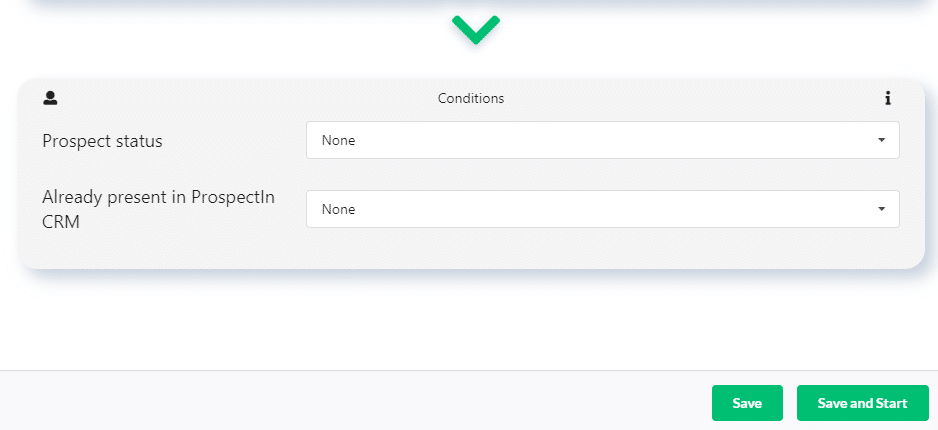
5. Auto-import into ProspectIn’s CRM + send to a Scenario when a new prospect appears in a saved Sales Navigator search
This Trigger allows you to automatically import into ProspectIn all the new prospects that appear in a saved Sales Navigator search. They are then automatically added to a chosen Scenario. 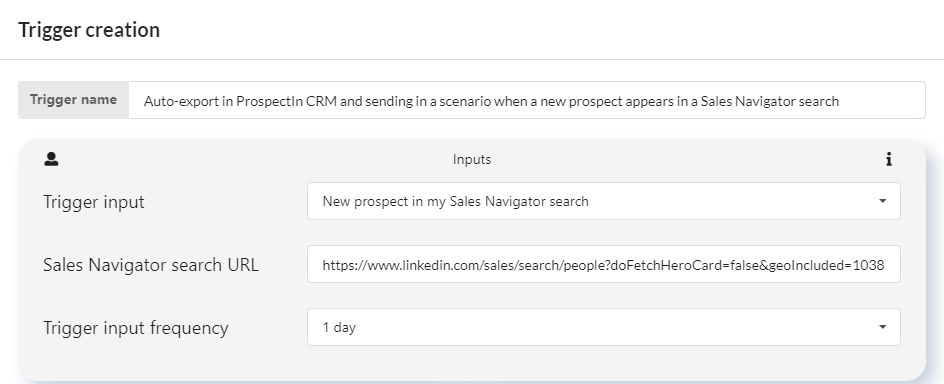
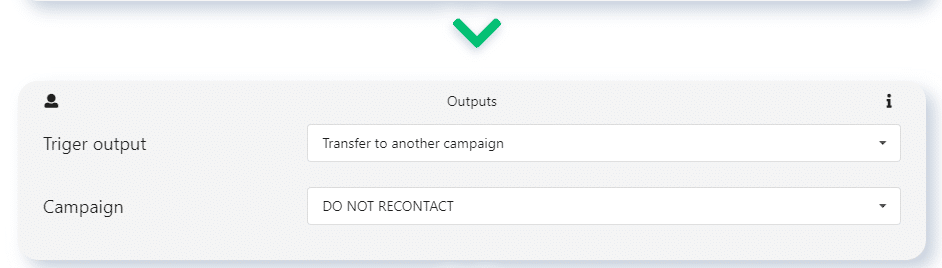
6. Auto-transfer in a Campaign when a prospect is tagged as “do not re-contact”
This Trigger allows you to automatically transfer a prospect from one Campaign to another when you assign a specific tag to them, for example, a “do not re-contact” tag. 
7. Auto-import into your personal CRM when a prospect replies to a message
This Trigger allows you to automatically export a prospect to your personal CRM (Hubspot, Pipedrive, Salesforce etc) when they reply to a message. 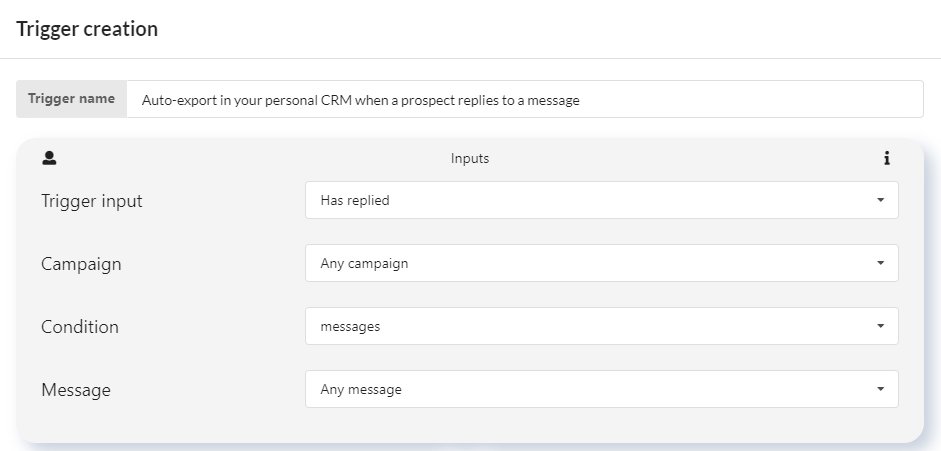

8. Auto-import into your personal CRM when a prospect is tagged from a LinkedIn message page
This Trigger allows you to automatically export a prospect to your personal CRM when you assign a specific tag to them from the messaging page on LinkedIn. 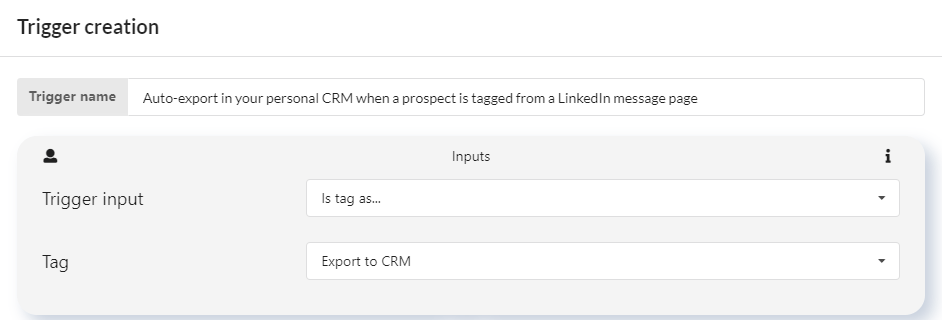
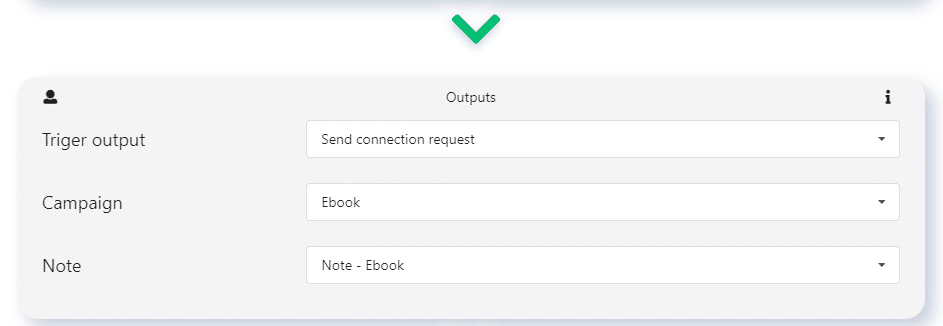
9. Auto-import into ProspectIn’s CRM + send a connection request + send a document via a note when someone replies to your LinkedIn post
If you create a LinkedIn post in which you offer to send a document (such as an Ebook) to people who respond with a comment, you can use this Trigger to automatically import people who comment on the post into ProspectIn’s CRM. They will then automatically receive a connection request with a link (in the invitation note) to download the offered document. 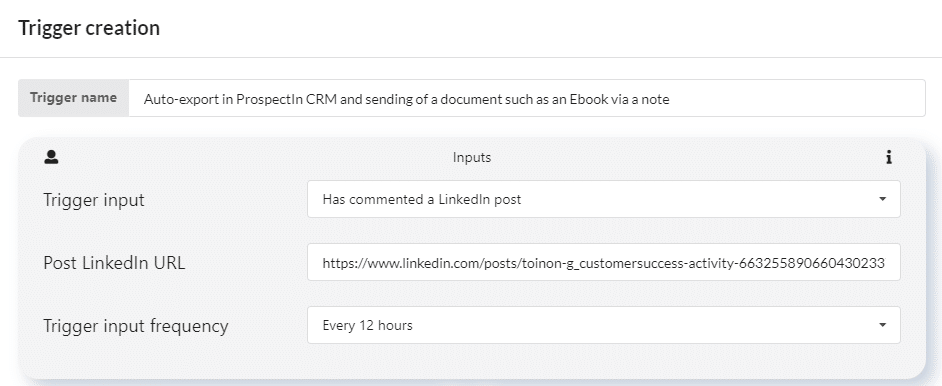

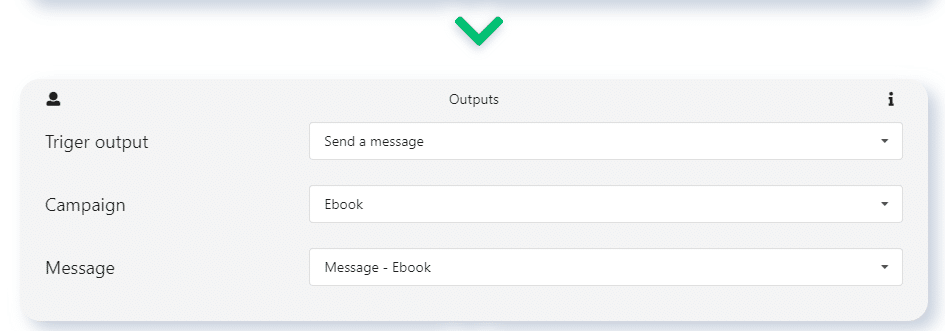
10. Auto-import into ProspectIn’s CRM + send off a document via a message when someone replies to your LinkedIn post
This Trigger is exactly the same as the one above, with one small difference: while the previous trigger allows you to send your document to people you are not connected (via a note), this Trigger allows you to send your document to people with whom you are already connected (via a message). 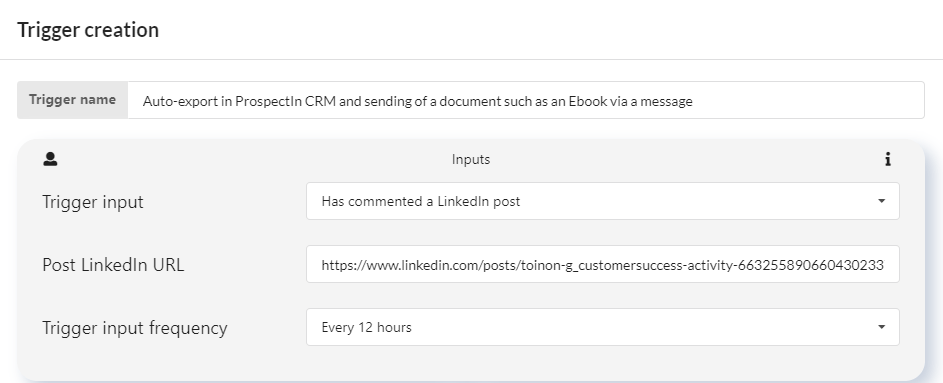
These 10 use cases are only examples, to give you a better understanding of the world of possibilities open to you with the Triggers feature. It’s up to you to create Triggers that will be most effective for you. If you have any question regarding a Trigger, do not hesitate to contact us via chat – we are very responsive. ?
I really invite you to set up your triggers directly after reading these examples by asking yourself the right questions:
- Which triggers would be the most effective for my industry, my target and my product?
- How will I personalize my triggers?
Imagine that these triggers are your little soldiers and that they are going to work for you, you have to give them the right guidelines to accomplish their missions ?. Once you have your triggers in place, let’s get into how to export your leads to a CRM. Some of you may have heard of Zapier?
How to use the CRM synchronization feature with ProspectIn and Zapier?
Looking to connect ProspectIn with Zapier? Thanks to the “Triggers” update, it is now possible to automatically export prospects from ProspectIn to most CRMs, via Zapier synchronization. This synchronization can be a little tricky. We’ll explain everything here! ?
What is Zapier and Triggers?
Zapier is a tool that allows you to synchronize more than 2,000 applications and software, all on a very simple interface. Discover Zapier. Triggers allow you to automate actions on incoming events (invitation request, new message sent…) and create outgoing events (sending to Zapier, sending a message, etc …).
How to connect Zapier to ProspectIn?
0. Prerequisite
- Zapier’s pricing is based on the number of actions performed. In order to reduce costs, we have implemented a group sending system, updating prospects 10 by 10 in your CRM. To use ProspectIn and Zapier synchronization, you will need to perform a 3-step “Zap”, which is only available with a premium Zapier account.
- ProspectIn Triggers are only available on the Advanced (and Enterprise) plan.
1. Create the Zap
Click on “Make a Zap!” then search for “Webhook By Zapier” => “Catch Hook” and click on “Continue”. You’ll get a URL to copy.
2. Create the Trigger on ProspectIn
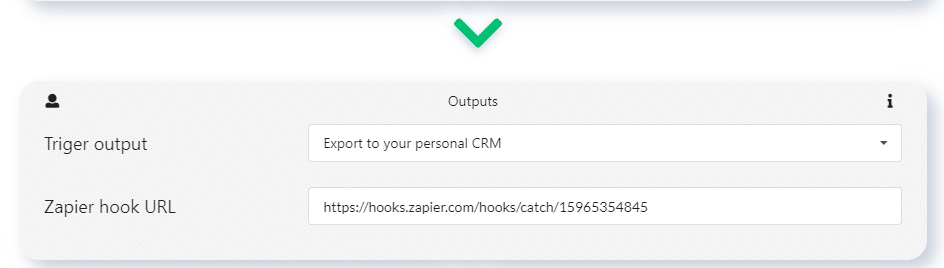
Go to the “Triggers” tab in the backoffice of ProspectIn. Choose “Create” and define the input event you want. For example, if you want to automatically synchronize prospects who have responded in your CRM, choose “Has replied”. For your output event, choose “Export to my own CRM”. Copy the Zap URL previously obtained and click on “Save and start”.

The validation sends a request to Zapier to start synchronization.
3. Synchronize and test
Click on “Continue” and “Test & Review”. You should have “Hook A”: this corresponds to the test data that was sent. It provides Zapier with the format of the data to be processed.
Click on “Done editing”
4. Format your data
This step allows you to define the keys and the associated data that you will export to your CRM. For example, if the field in your CRM is “Email”, you will create an “Email” key associated with the “Email” data received in the Zapier Webhook.
- Click on “Do this”. Look for “Formatter” and select “Formatter By Zapier” then “Text”. Go to the next step. Choose “Split Text”.
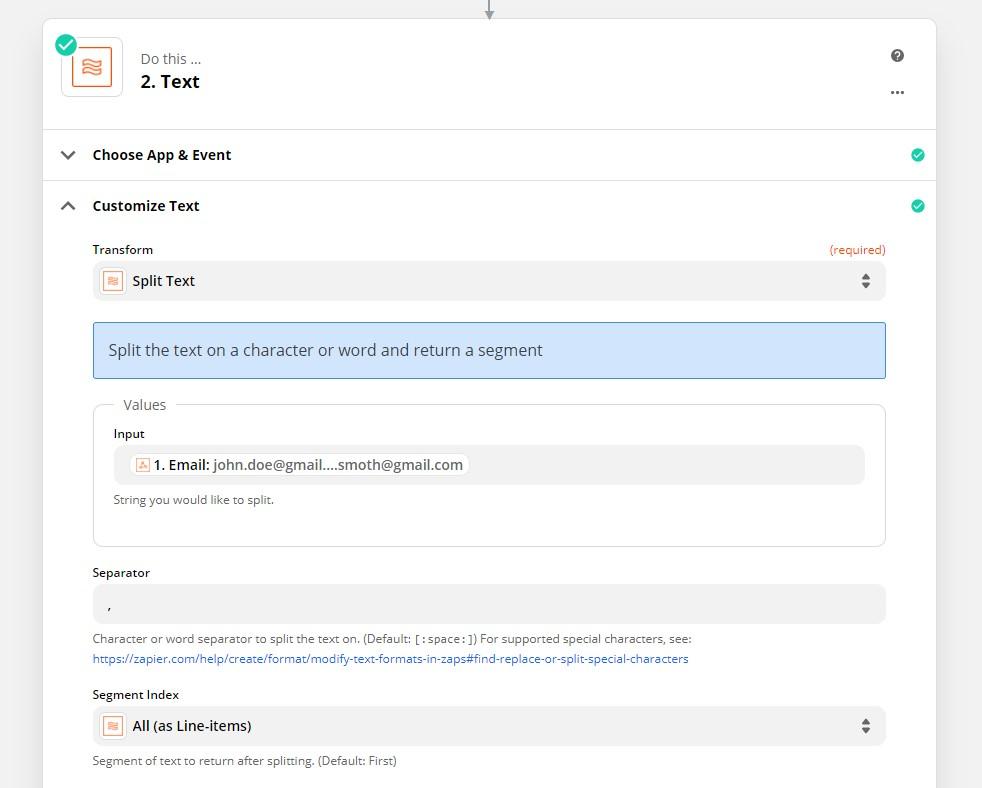
- You need to create one step for each data requested. In this instance, we want to retrieve emails. So we select the Email input and enter “,” as a separator, and select “All (as Line-items)” in Segment.
NB: As we send bulk data, some information may at times be re-grouped in the same row on Google sheet. Following these steps will avoid this.
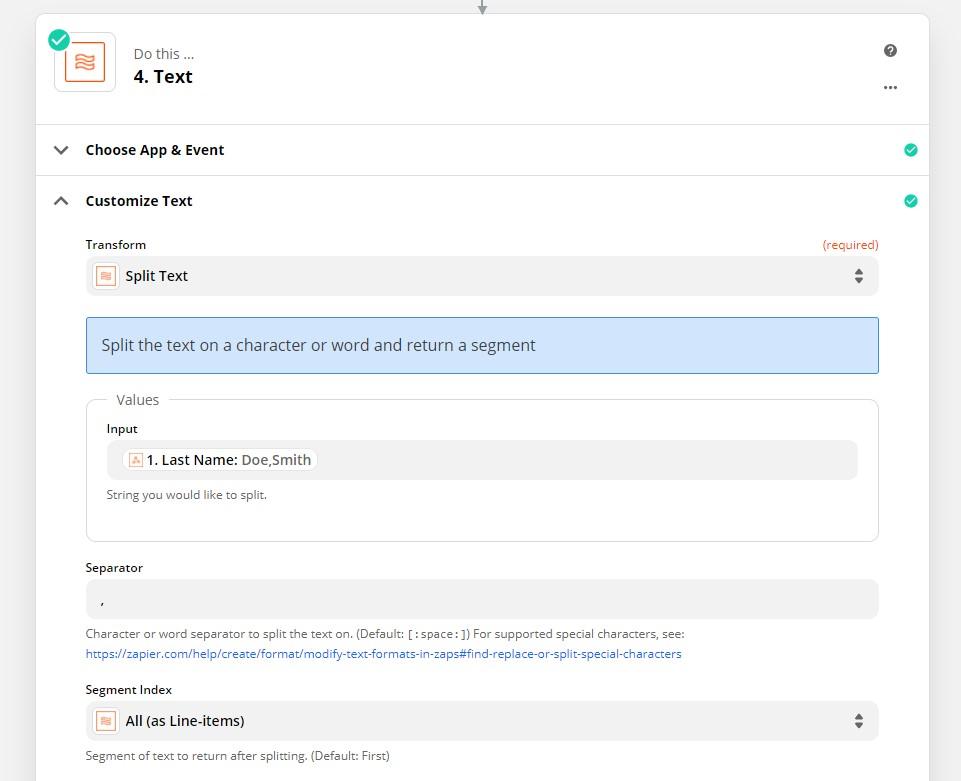
- Do the same for every variable you want:
5. Define your output action
If you want to export in another CRM, you’ll need to create a second zap after this one. You need to use a Google sheet to separate bulk data.
- Click on “+”.
- Find your desired app. In this case, “Google Sheet”. In the “Choose action event” box, choose “Create Spreadsheet Row(s) in Google Sheets“. (The plural (s) is important)
- Click on “Continue” to synchronize with Google Sheet and retrieve the correct URL.
- Choose the Excel sheet to export your data to. Then enter the data
- Click on “Continue” then “Test & Continue” then “Done editing”

NB: We’ve updated this article since it first written, but note that where you see “Update Spreadsheet Row”, you will actually need to select “Create Spreadsheet Row(s)”. Well done! Your data will now be automatically synchronized!
6. Export in a different CRM other than Google sheet
We’re going to stop here for this tutorial, but by no means are your exports limited to Google Sheets. You can export to many many more CRMs. To do so, you will need a two-step zap:
- Step 1: Trigger – Google Sheets : New spreadsheet Row
- Step 2: Action – CRM : Create/Update Contact
What you need to know about ProspectIn – Zapier sync
You can create as many triggers as you want to send to the same Zap. Please note that if the prospect’s email is not retrieved, your Trigger may fail. Do not hesitate to contact us on support if you have any questions! ? Now you know how to connect Zapier and ProspectIn together! ?
Once you have your CRM in place, your triggers and campaigns launched, you’ll be able to focus on even more in-depth strategies. ?
The first one we want to talk about is A/B testing.
Why and how to perform A/B testing with ProspectIn?
When you are prospecting on LinkedIn, finding the right strategy or the right sequence is essential. A/B testing is a “scientific” approach that allows you to determine the optimal message for your campaigns. Let’s dive into it.
What is A/B testing?
A/B testing is a fairly simple and scientific technique. “Scientific” because it is based on quantified results. It consists of drafting two different messages (message “A” and message “B”), then sending these 2 messages to a representative sample of your prospects base. Doing so allows you to determine which message is the most effective. Once you’ve found the message that works best, you can use it on the rest of your prospect base.
Why perform A/B tests?
When prospecting, it is important to test out your best strategies and iterate them. When prospecting on LinkedIn, the prospect base is almost infinite, so you will probably send a very large volume of messages. Under these circumstances, a variation as small as 5-10% in the response or acceptance rate can be huge in the end. It is therefore important you carry out a certain number of tests and be rigorous in measuring performance before launching a frantic prospecting “strategy”.
How to implement A/B tests with ProspectIn
The golden rule of A/B testing is rigor. The differences between the approaches are, in most cases, quite subtle, and the differences in performance between one approach and the other are often – but not always – small. It is therefore essential you apply a lot of discipline in the execution of these tests, so that the results are meaningful and can positively impact your prospecting.
1st step: target and import your prospects into ProspectIn
For A/B testing to be valid, an approach must be linked to a specific prospect (or persona) segment. Just because message A works very well for the prospect segment “Marketing director in the luxury industry”, does not mean it will be just as effective for the prospect segment “Sales freelance”. When setting up an A/B test, the 2 messages (“A” message and “B” message) are therefore sent to the same and specific target. Now that you’ve targeted and exported your prospects to ProspectIn, let’s go on to the next step.
2nd step: definition and distribution of messages
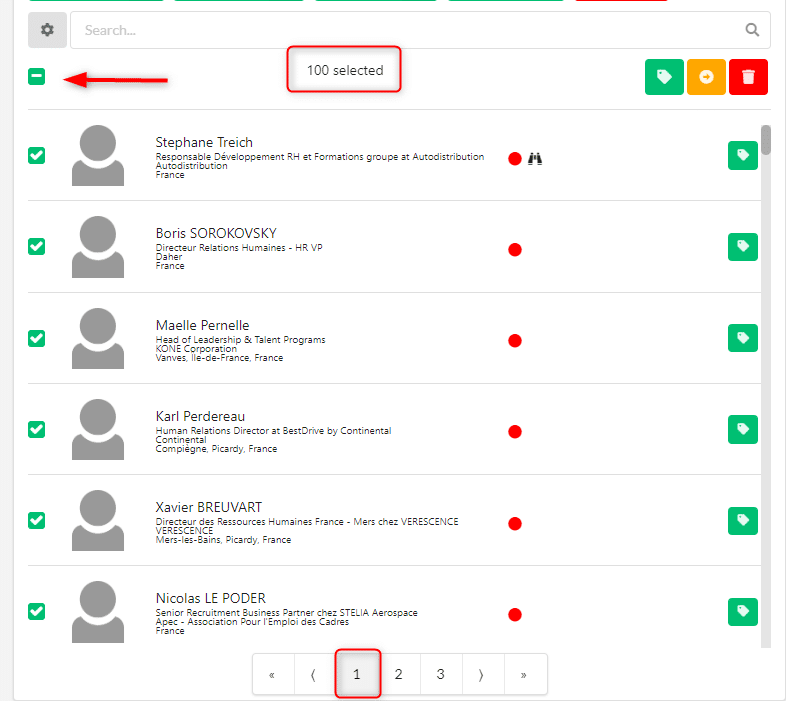
Once again, for A/B testing to be valid, it is crucial you send the message a minimum number of times. In general, we recommend each message is sent at least 100 times. Keep in mind that this is a minimum, but the more times a message is sent, the more significant the results. The two messages must also be sent the exact same number of times. Take the example of an A/B testing on the connection request, here we want to measure the acceptance rate of our invitation requests. Start by defining your 2 messages “A” and “B” on ProspectIn. Keep in mind though that messages associated with connection requests (a “note”) are limited to 300 characters. Once your 2 messages are ready, simply send your first message to your first 100 prospects by clicking once on the checkmark. Doing this will select all the prospects on the 1st page.
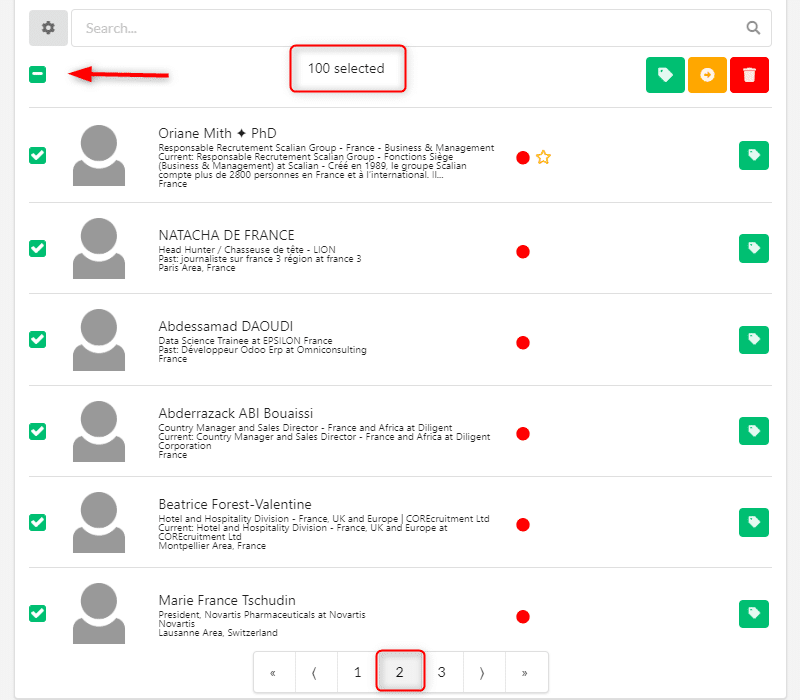
Then send your 2nd message to the next 100 prospects by selecting the 2nd page.
The actions are now in the queue and will be sent gradually – provided you have a LinkedIn tab open. After a maximum of 3 days (quotas limit connection requests between 80 and 100 requests per day), all your requests will be sent.
3rd step: analysis of the results
In order for the results to be valid, you have to wait a minimum of 10 days. This essentially gives your prospects time to connect to LinkedIn to see your connection request – not everyone connects to LinkedIn every day ? Once this waiting period has passed, you only have to consult the results provided by ProspectIn for each of the notes.
These results will help you determine which approach works best when it comes to acceptance rates. Note that if you have a large number of prospects on which to perform A/B tests, you can iterate your tests as many times as you want.
A/B testing on messages
We have given here the example of an A/B test on a connection request, but it is also possible to set up A/B tests on messages. The principle remains exactly the same. The only difference is that you will have to already be connected with the prospects, and the response rate will be measured, as opposed to the acceptance rate.
If you want to go much further in your prospecting process and it makes sense for your strategy to contact your target by email, then the next step is for you. ?
Warning: This is about making you masters of growth hacking and going to a much higher level of automation.
So are you ready to take that step ?
Send an email when a contact accepts your LinkedIn connection request
Welcome to our all-in-one tutorial, dedicated to ProspectIn’s new feature, Triggers! We’e going to dive deep into an advanced Trigger. This is for the Masters of Growth Hacking, who want to go much further.
The Use Case: Send a mail to your LinkedIn Contact
Let’s say you want to send an automatic mail as soon as a prospect accepts your LinkedIn connection request. It’s a great way to thank them and introduce yourself, using a new communication channel! Here is the process to automate the sending of this email to your LinkedIn contact:
- On LinkedIn, your prospect accepts your connection request
- On ProspectIn, a Trigger identifies the action and sends the prospect to Zapier
- On Zapier, a Trigger transfers the prospect to a Lemlist campaign
- On Lemlist, a campaign receives the prospect and sends them your email


 To be clear: We are using Lemlist in this example as it is optimized for cold mailing and small volumes of leads. However, it is possible to use other tools such as Mailchimp or Sendinblue.
The main steps
To set up the process, follow these 7 steps:
- Install the pre-requisite tools
- On Zapier: Create a Zap
- On ProspectIn: Create a Trigger
- On Lemlist: Create a campaign
- On Paper: Synchro and formatting
- On Google Drive: Prepare a Google Sheet
- On Zapier: Separate prospects and export to Lemlist
Are you ready? Shall we get started? Hang on tight, it’s gonna be one heck of a ride!
Install the pre-requisite tools
To set up this process you need to:
- Download the ProspectIn extension
- Take at least an ADVANCED or ENTERPRISE subscription plan. This subscription plan is required in order to have access to the Triggers feature. More info on this page
- Create a Lemlist account. You can start with the FREE TRIAL
- Connect your mailbox to Lemlist
- Create a Zapier account. You can start with the FREE TRIAL
- Connect your Lemlist account to Zapier. Zapier will ask you for a Login and a Password. You can find these details your Lemlist account, on this page
- Create an account on Google Drive to have access to Google Sheet
On Zapier: Create a Zap First, go to Zapier and log in.
- Click on “Make a Zap!
- Name it in the top left corner, for example “Zap Prospectin / Lemlist”.
- In the “When this happens” section of the “Choose App & Event” tab, use the search bar to select “Webhook by Zapier” then “Catch Hook”.
- Click on “Continue”.
- In “Customize Request”, copy the URL from the “Custom Webhook URL” field, which will be used later to create the “Output Trigger” on ProspectIn. Leave Zapier to one side.
On Prospectin : Create a Trigger
In the “Triggers” menu, create a trigger and give it a name, for example “Trigger send to Zapier if Connection Request is accepted on Linkedin” Input Trigger
- Trigger input: select “A connection request has been accepted”
- Campaign: choose the campaign for which this trigger should apply
- Note: choose the connection request note for which this trigger should apply
Output Trigger
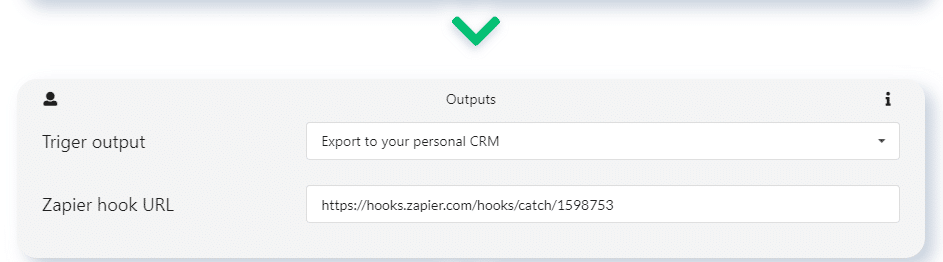
- Trigger output: choose “Export to your personal CRM (via Zapier)”
- URL of your Zapier hook: paste the URL of your Zapier hook
Conditions
- Prospect status: choose “Doesn’t matter”.
- Already present in the CRM Prospectin: choose “Whatever”
- Click on “save and launch”.
On Lemlist: Create a campaign
Next go to Lemlist and log in.
- In the menu, click on “Campaigns (All)”.
- Click on “Create a new campaign“.
- On the “Name” page, in the “Campaign Name” field, enter a name for your campaign, e.g. “Thank you for accepting my invitation on Linkedin!
- Click on “Next”.
- On the “Buddies-to-Be” page, click on “Next”.
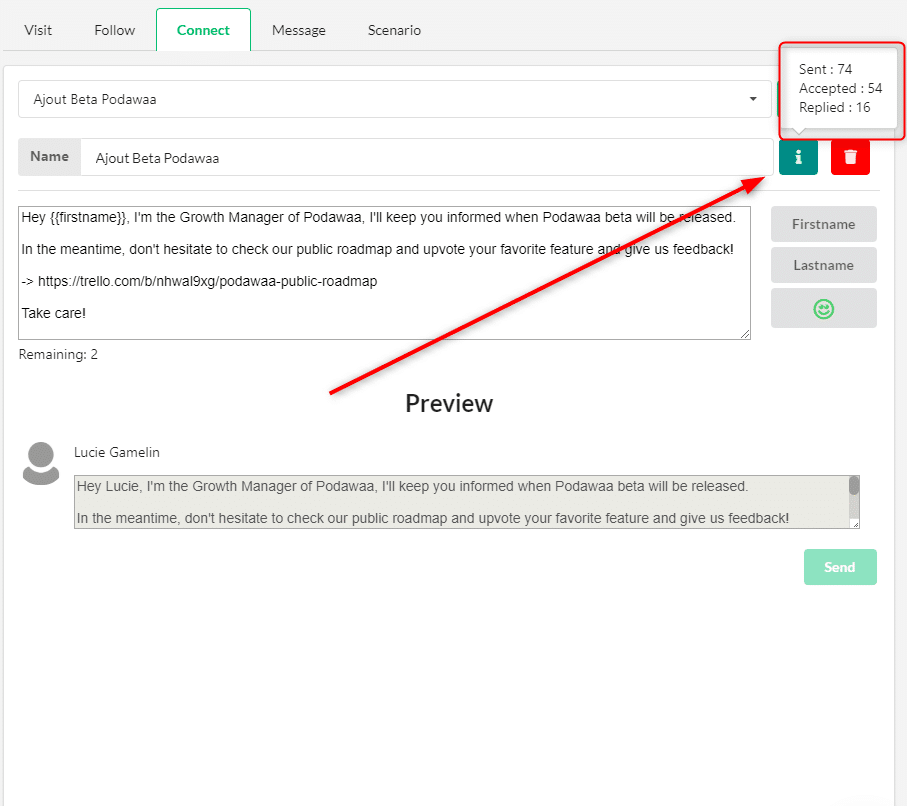
- On the “Messages” page, click on “Blank Email”.
- Fill in the subject and content of your email. This is a good opportunity to thank the person, or/and introduce yourself, or/and let the prospect discover your product/service. You can add a link, a video, an image, a GIF. You can integrate “Custom Variables” thanks to a dedicated picto at the bottom left. Be original, and above all: enjoy yourself!
- Click on “Next”.
- On the “Schedule” page, choose a timezone and your schedule. They are customizable.
- Click on “Next”.
- On the “Options” page, select a Sender, i.e. the mailbox that you have connected to Lemlist and that will send the email.
- To avoid having to validate each email that will send when a new prospect enters the campaign, go to the “Experimental” section and check the box “Review automatically new Buddy-to-Be inserted in the Buddy-to-Be list”.
- Click on “Create the campaign”.
Ok, great! So now you have your trigger on Prospectin which sends info to Zapier, and a campaign set up on Lemlist.
And in-between the two you have Zapier, which essentially links them.
On Zapier: Synchro and formatting
- Still in the “When this happens : Catch Hook” and in the “Choose App and Event” tab, click on “Continue”.
- In the “Customize Request” tab, click on “Test your trigger”. If you used the URL of the Hook to create the Trigger ProspectIn, you should have “Hook A” or “Request A”: these are the test data sent at creation to give Zapier the format of the data to be processed.
- Click on “Continue”.
Format your data on Zapier (Utilities)
- Click on “Do this”.
- In the “Choose App & Event” tab, use the search bar to select
- “Formatter By Zapier” and then “Utilities”.
- Click on “Continue”.
- In the “Transform” field, choose “Line Itemizer (Create/Append/Prepend)”.
- In the “Line Item Properties” part, you will define the data that will be exported to Lemlist and the associated keys. Choose the desired data by clicking on the right field and writing the corresponding title in the right field. Click on the “+” to add new ones. At minimum you will need the email, but we recommend you add more info (like First Name, Last Name, Company, etc.), so you can then create “Custom Variables” on your emails in Lemlist. This will allow you to personalize them.
- Click on “Continue”.
On Google Drive: Preparing a Google Sheet
Then go to Google Drive and open Google Sheet. You will have to prepare a Google Sheet in which Zapier will send your prospects (one line per prospect). This simply allows you separate the prospects, to allow them to be processed individually by Lemlist.
- Rename the file, for example “Zap Prospectin / Lemlist”.
- On the 1st line, fill in the column headings, which must correspond to those you put in your zap, in the “Utilities” part > “Customize utilities” tab > “Line-item Properties” part.
Separate prospects on Zapier (Create Spreadsheet Row(s) in Google Sheets)
Go back to Zapier.
- Click on “+”.
- In the “Choose App and Event” tab, use the search bar to select “Google Sheet”, then “Create Spreadsheet row(s)” > with one (s)
- Click on “Continue”.
- In the “Choose Account” tab, select your Google Account In the tab “Customize Spreadsheet Row”, for the Drive field, choose your Google Drive
- In the “Spreadsheet” field, select the Google Sheet created for this purpose
- In the “Worksheet” field, select the sheet you previously pre-filled with the column headings
- In the “Rows” section, for each field”, click on “Utilities” and choose the name of the corresponding data item
- In the “Send data” tab, click on “Test and continue”.
- If the test was successful, click on “Done editing”
Define exit action on Zapier (Add Buddy-to-be to Campaign in Lemlist)
- Click on the “+” button
- In the “Choose App & Event” tab, use the search bar to select “Lemlist”, then “Add Buddy-To-Be to a Campaign”.
- Click on “Continue”
- In the “Choose Account” tab, click on “Search and select” and select your Lemlist account
- Click on “Continue”
- In the “Customize Lead” tab, fill in each field. To do this, click on the field, click on “Utilities”, click on “Show all options”, select the corresponding field from the list. For Campaign, simply select the Lemlist campaign you created previously.
- Click on “Skip test” then on “Continue”.
- A pop-up will appear at the bottom to recommend you activate your Zap. Click on “OFF” to switch it to “ON”. Alternatively, the push button is also located at the top right of the page
There you go! Your Zap is now active. You have just made the link between ProspectIn and Lemlist, via Zapier!
Go ahead and launch a first test yo
check that everything is all good
- That on ProspectIn your Trigger is active:
- Same for your Zap on Zapier:

- Same on Lemlist, for your campaigns:
![]() All you have to do is send a connection request to the prospects that are part of the campaign used for the Trigger (with or without a Scenario). If a prospect accepts your connection request on Linkedin, they will automatically receive… an email! You will be able to see the email in the mailbox you linked to Lemlist. All within a maximum of 1.5 hours after the acceptance of the connection request.
All you have to do is send a connection request to the prospects that are part of the campaign used for the Trigger (with or without a Scenario). If a prospect accepts your connection request on Linkedin, they will automatically receive… an email! You will be able to see the email in the mailbox you linked to Lemlist. All within a maximum of 1.5 hours after the acceptance of the connection request.
Key things to note
This will only work:
- For connection requests made via ProspectIn (with or without scenario) but not the ones made directly on LinkedIn.
- If you have the person’s email. On LinkedIn, you only have access to emails of your 1st level contacts (connected). For people who are not part of your network, you will have to use an enrichment tool to get their email address.
Other interesting uses related to the sending of emails
You can replicate this process of reacting by email to many other actions performed by your prospects on LinkedIn. Setting up the process is just a matter of habit! Here are a few other use cases for this method:
- If one of your LinkedIn contacts comments on one of your posts, send them an email to engage them in further discussion about the subject of the post!
- Send an email to thank a user who just added you on LinkedIn (with automatic acceptance of the invitation this is possible)
- Propose your services by email the minute your prospect accepts your request to be added to their LinkedIn contacts.
- If one of your LinkedIn contacts publishes a post with a specific hashtag, send them an email to exchange on the topic!
At ProspectIn, we are not afraid to tell you about other brands. What matters to us above all is to help you grow your business in every way possible. ?
In this case, we prefer to give you quality information so that the student surpasses the master.
It’s quite logical that we wanted to tell you about Hunter, to retrieve the email addresses of LinkedIn users.
How to send an email to a prospect who does not accept my connection request using Hunter
With ProspectIn, it is very easy to send hundreds of connection requests per week to your prospects on LinkedIn. For prospecting, LinkedIn remains by far the most effective platform, especially in B2B. ?? Unfortunately, if your prospect does not accept your connection request, they will not be able to enter your sequence, and consequently you will not be able to send them a message. Fortunately there are other ways to get in touch with your prospect: welcome to the world of multi-channel! ?
What is Hunter?
Hunter is an enrichment tool. Enrichment tools allow you to complete or “enrich” the data you already have on a prospect, in order to contact your prospect via another channel, or simply to improve the personalization of your approach thanks to the new data captured.

How does it work?
Enrichment tools retrieve all the data available on the web and their internal database. Then they format and clean the data, before reconciling the data according to the “key” data that you have specified. For example name/first name/company. From these 3 elements, tools like Hunter are able to bring out a whole lot of data, and in particular the email of your prospects. You can then use this data to contact your prospect via email. This is what we are going to have a look at together ?
Export prospects who did not accept your connection request on LinkedIn
The first step is to retrieve the data of prospects who have not accepted your connection request. You can do this by using ProspectIn to export their data as a CSV file.
- Go to ProspectIn, then the “Prospects” tab:
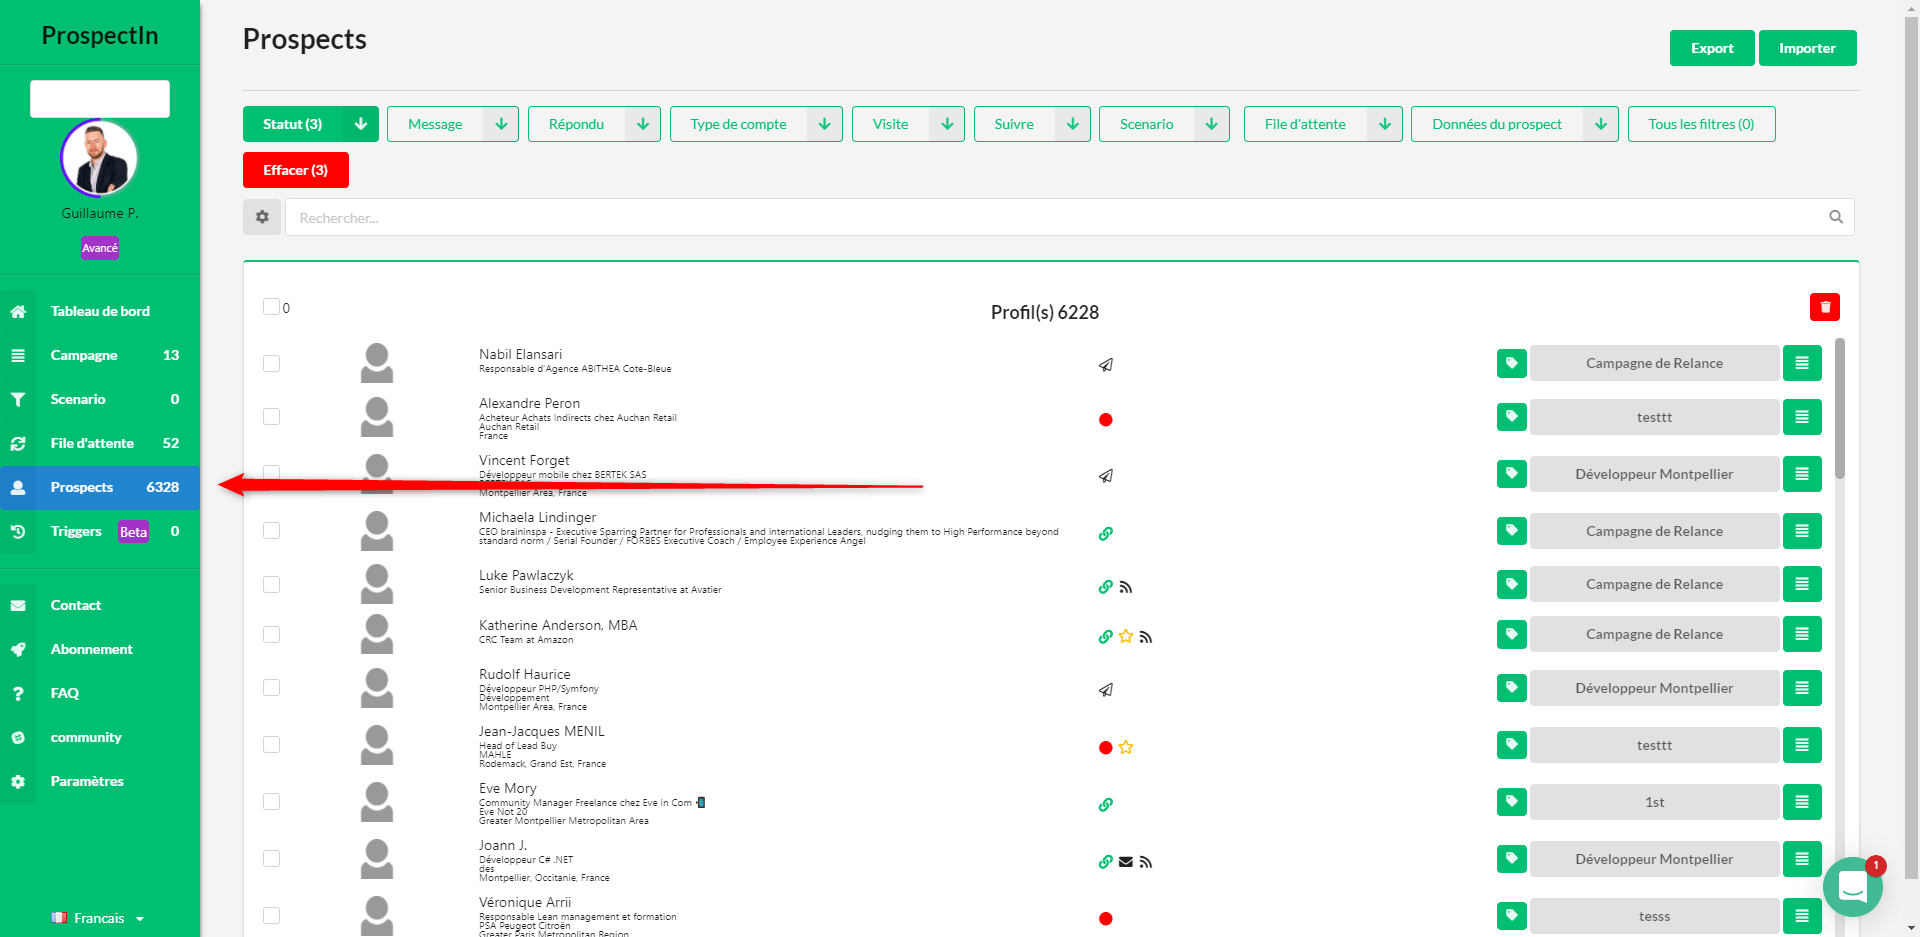
- Filter by “pending”;
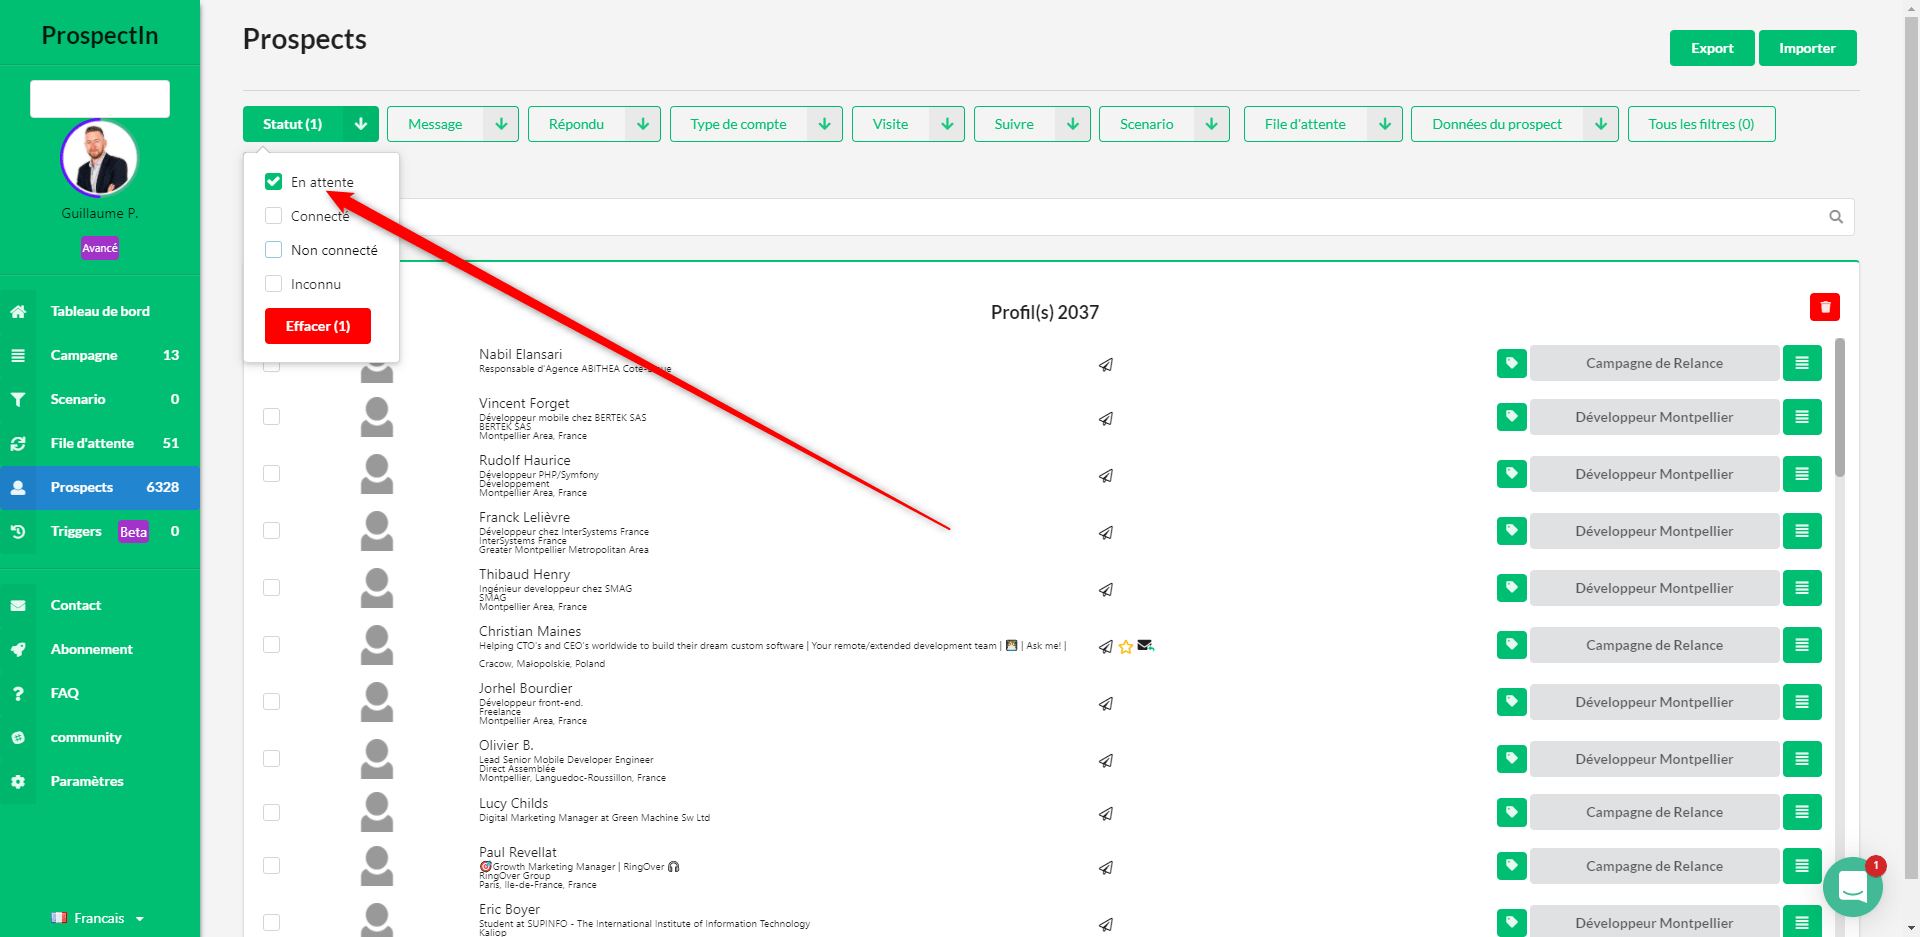
- Export the results in as a CSV file.
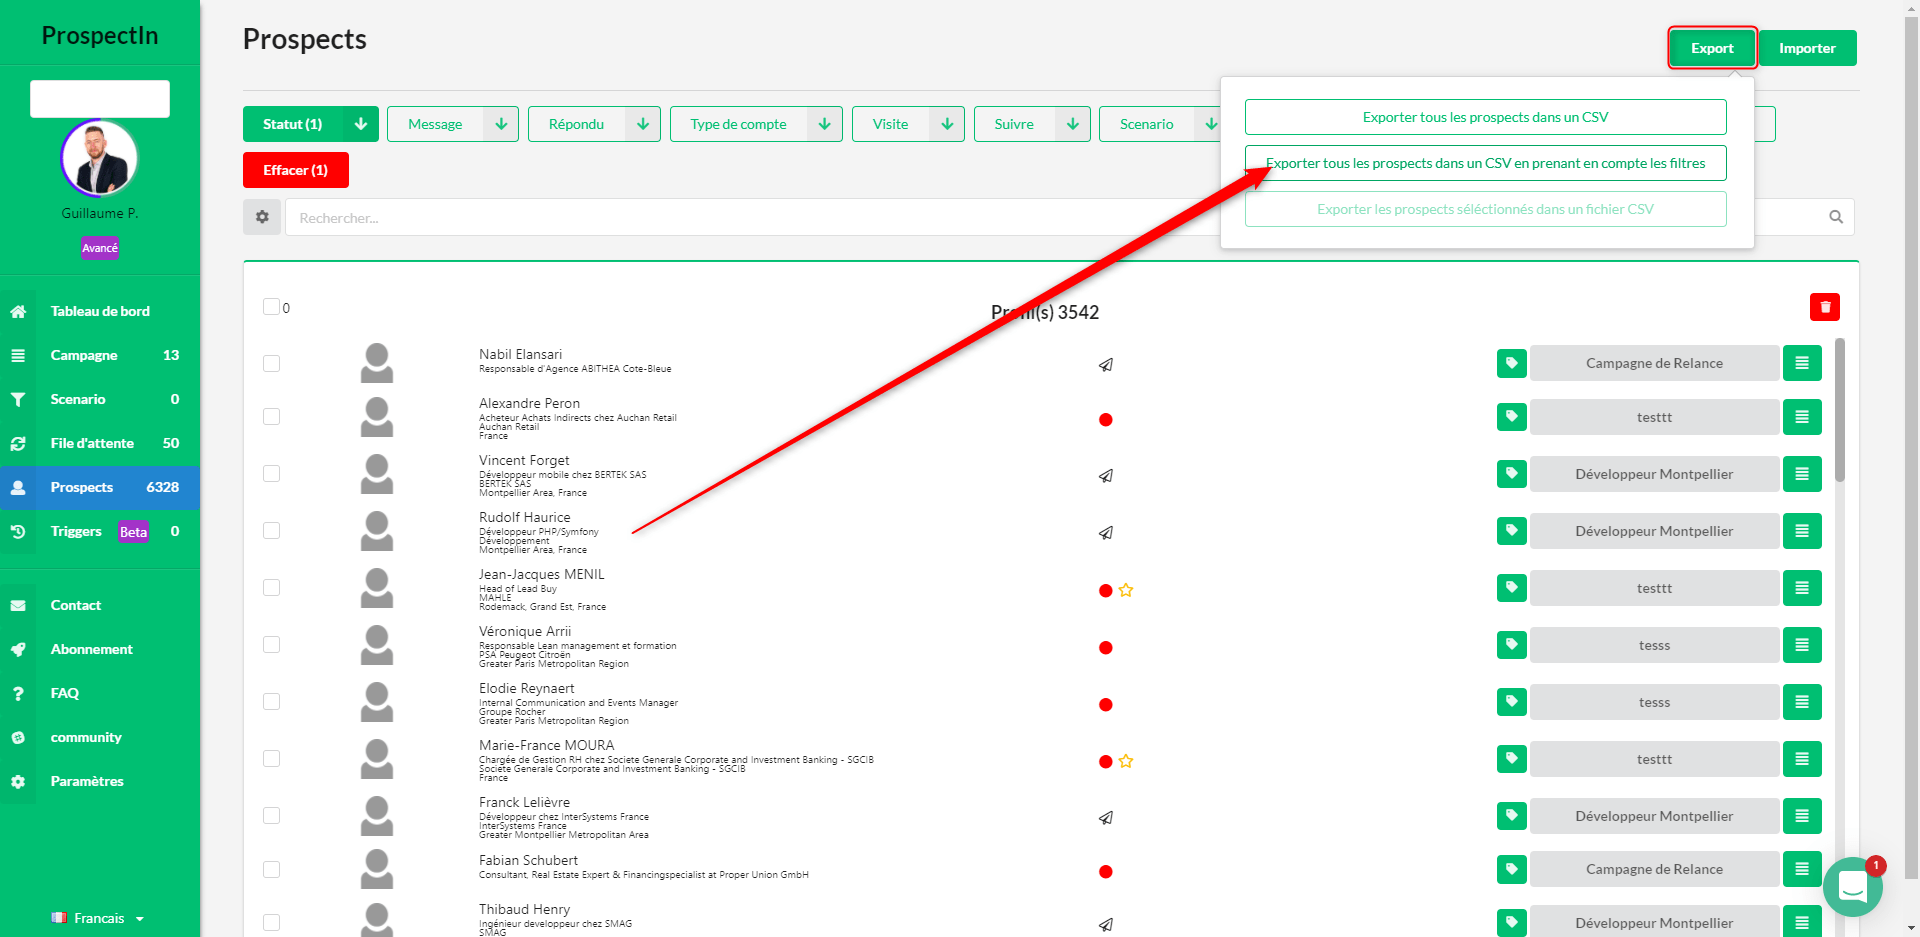
You will then get a CSV file containing valuable information (surname/first name/company) of prospects who have not accepted your connection request on LinkedIn. To access more info, simply go on Hunter!
Get the email addresses of my prospects
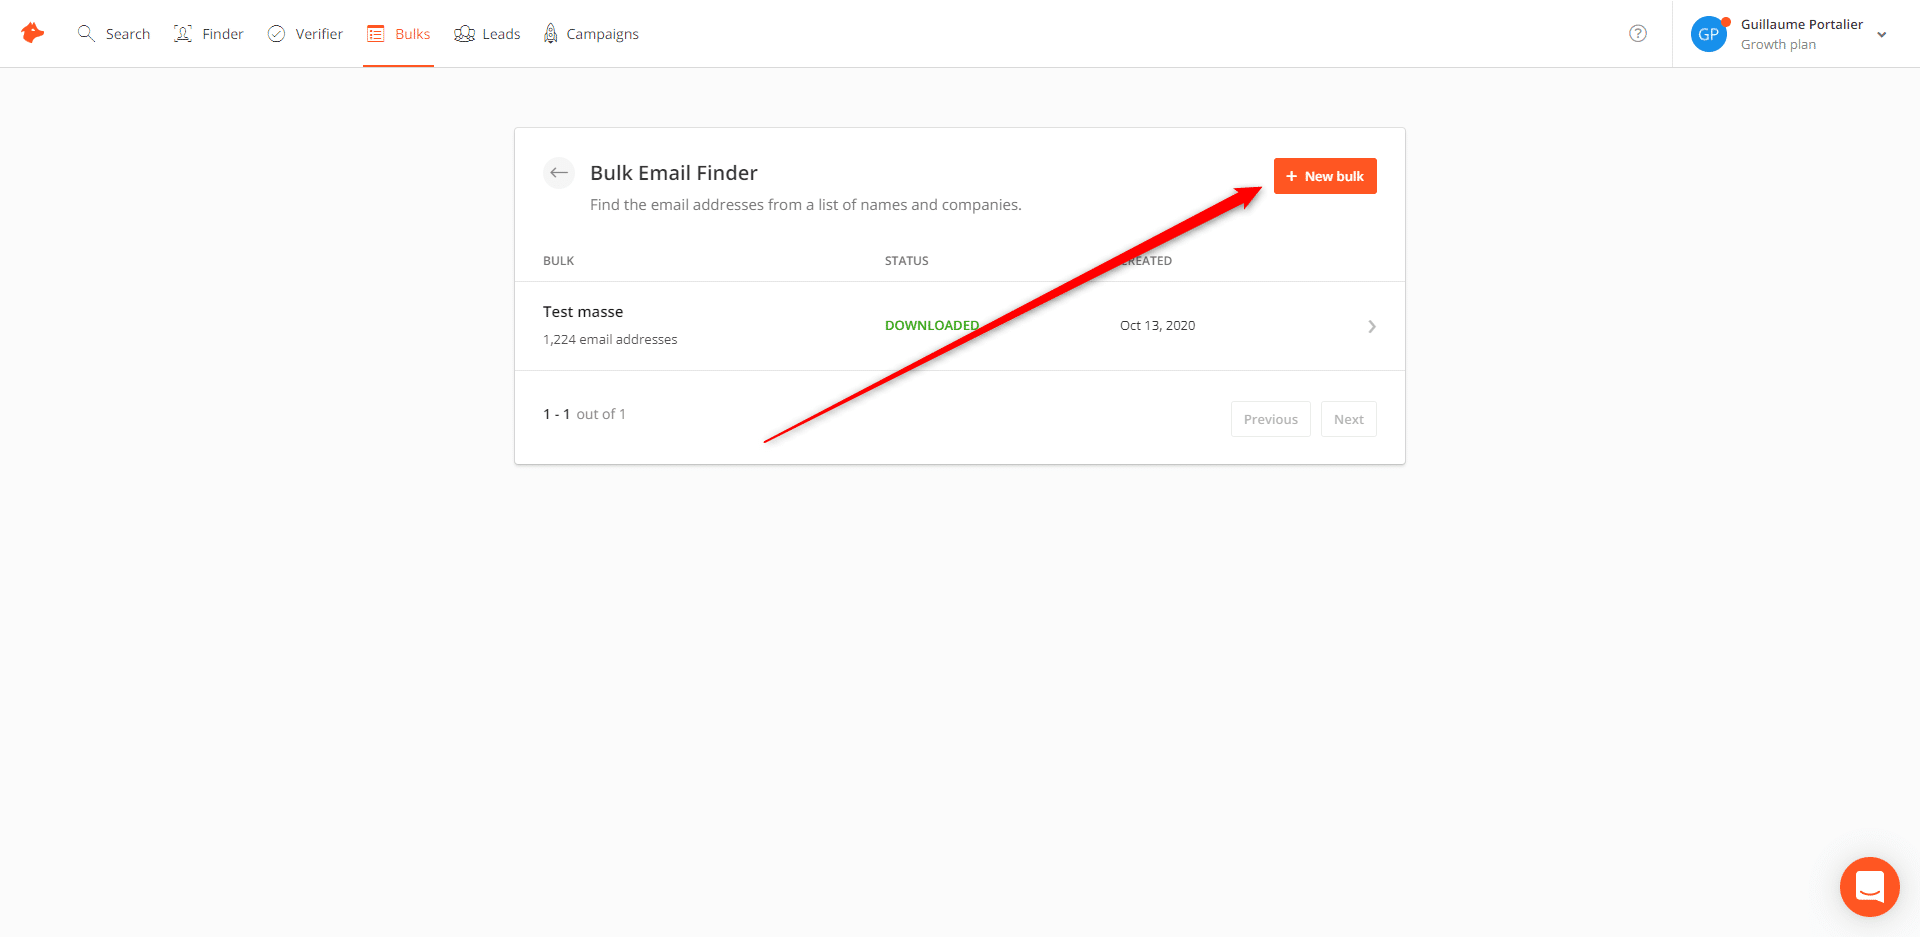
- Create an account on Hunter and click on “Bulks” and then “Email Finder”;

- Click on “New Bulk”;
- Give your list a name, and then upload the file that you have just downloaded with ProspectIn
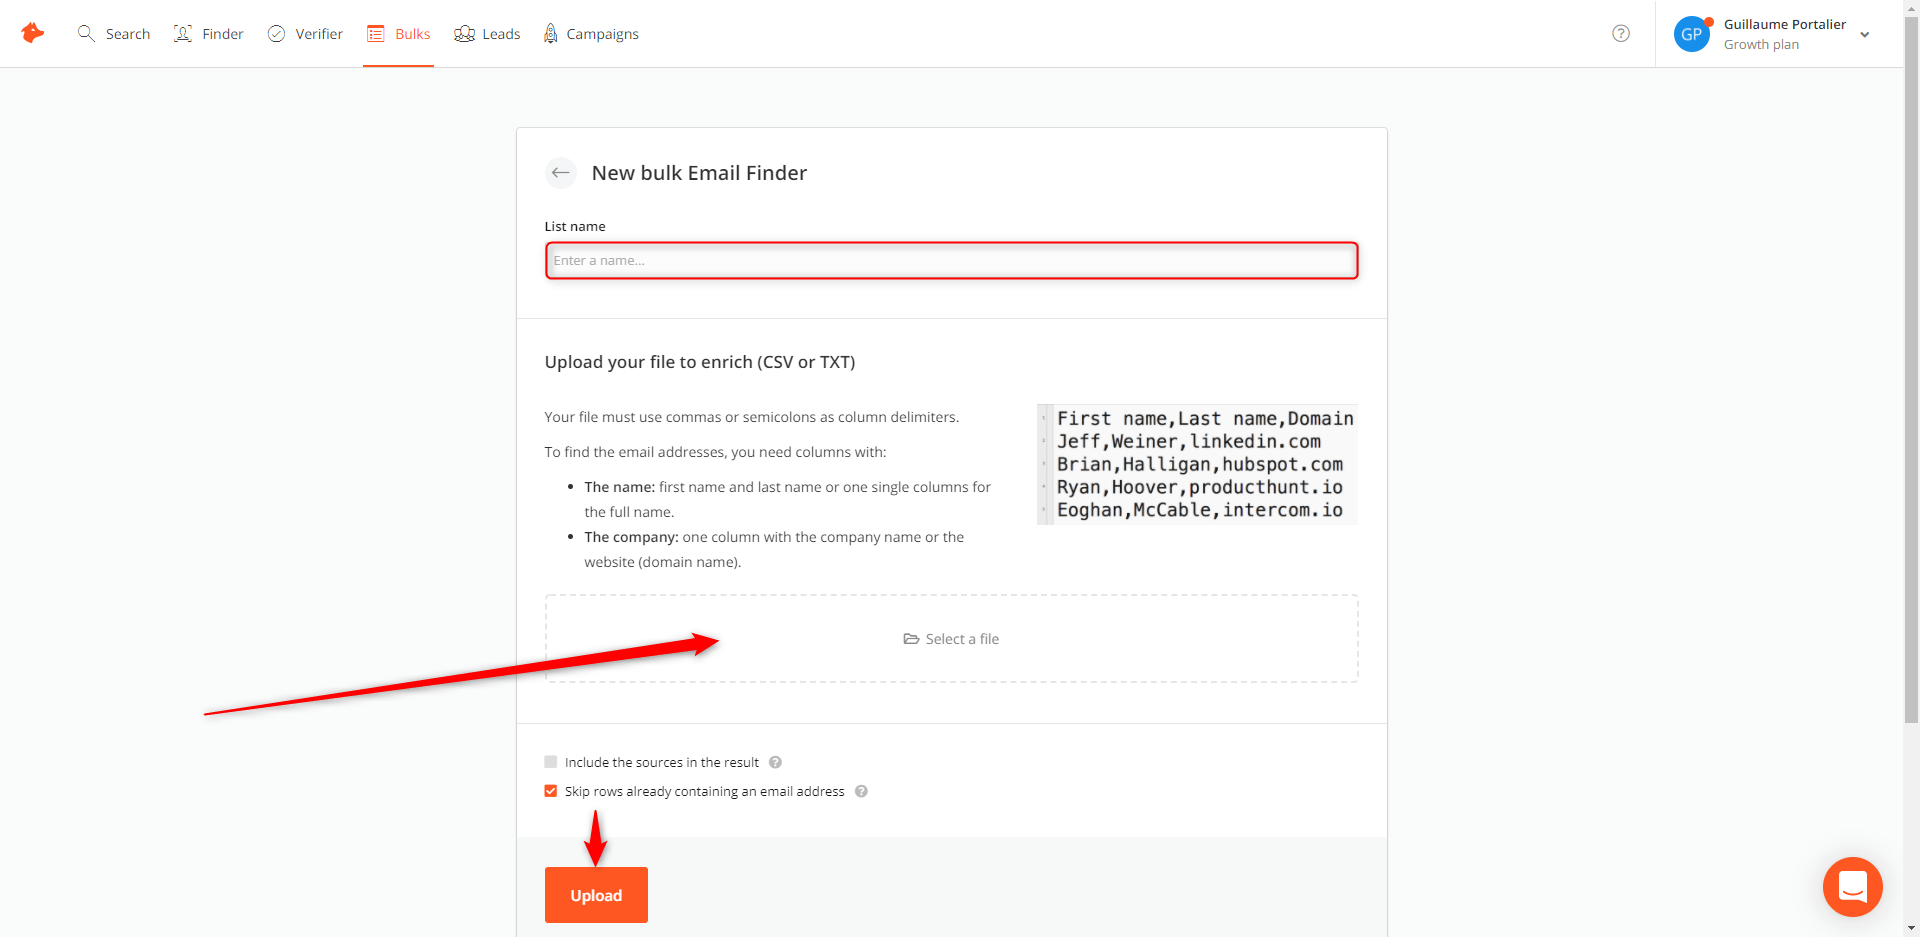
- After a few seconds, you can retrieve the file containing the email addresses of your prospects to contact. All you have to do is click on “download”. ✅
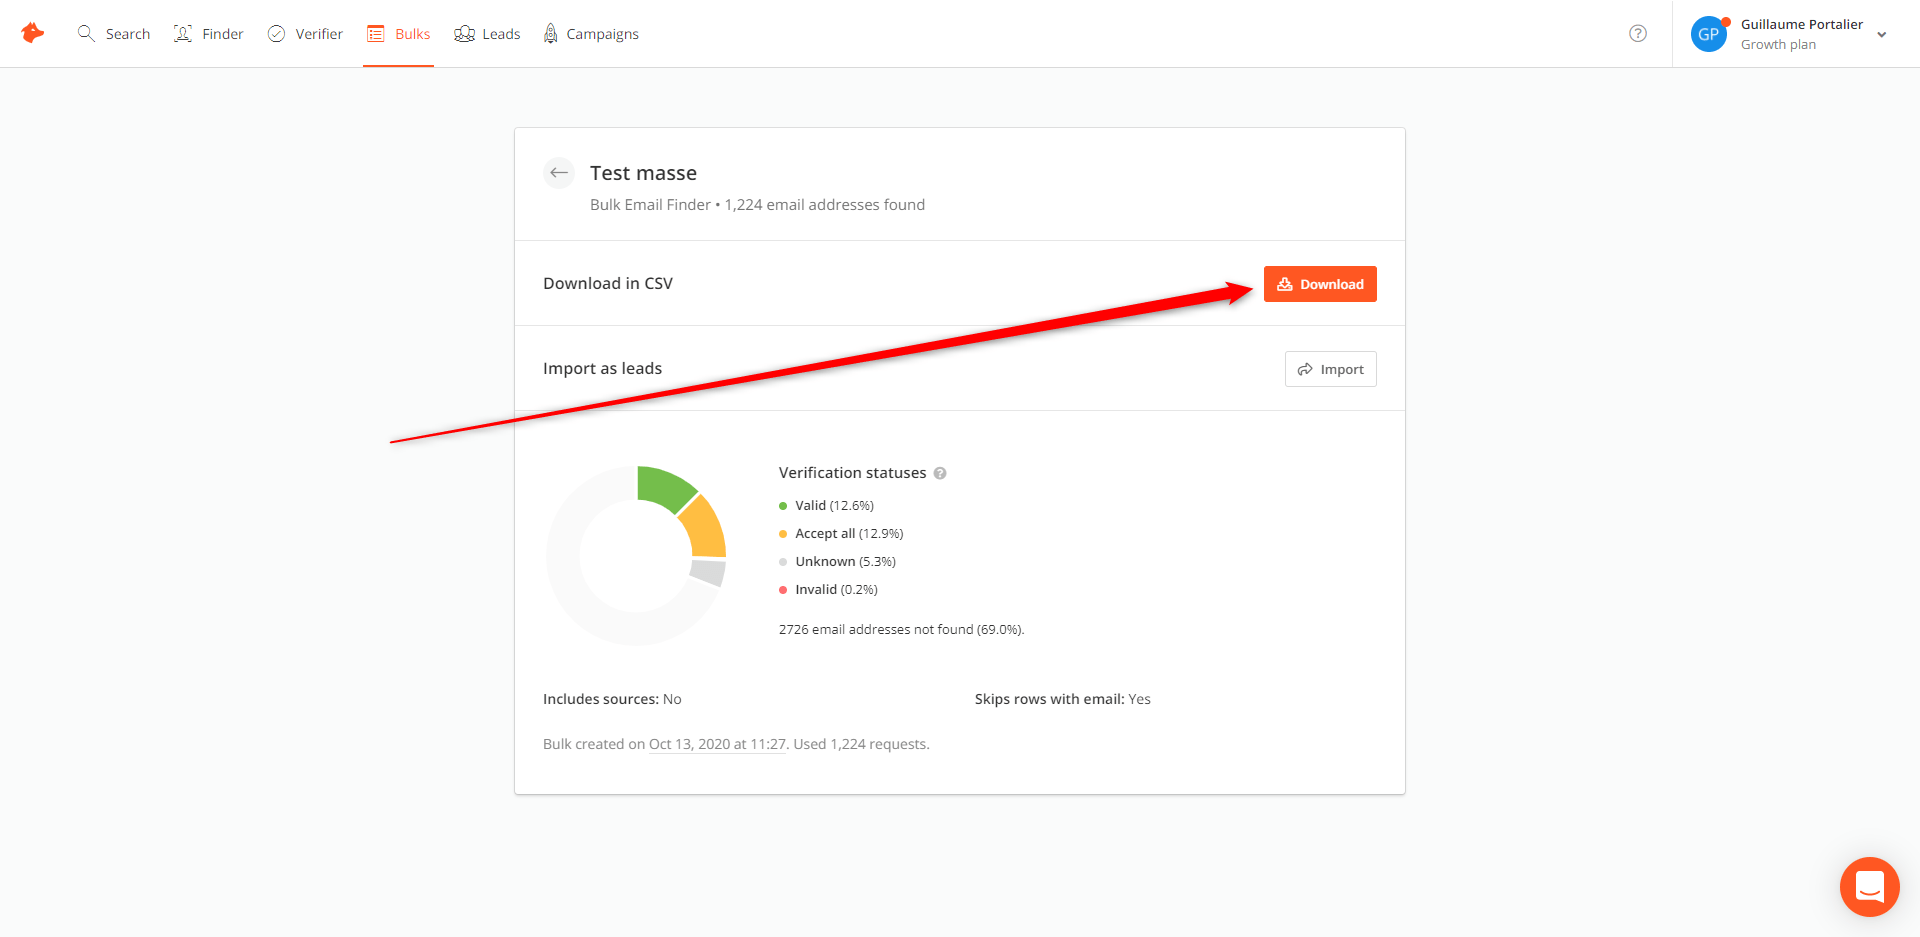
It’s unlikely the tool will recover 100% of your prospects’ email address. In general you can expect around 30% of verified emails – which is already huge! The free version of Hunter allows you to retrieve 50 emails per month. The various paid plans can allow you to retrieve up to 30,000 emails per month. It’s up to you to see which offer suits you best. Now that you have retrieved your prospects’ email addresses, all that’s left to do is contact them. ? I hope this tutorial helped guide you through the process!
Now that you have collected the emails of your prospects, all you have to do is to contact them. But you don’t stop there when you can get qualified contacts, do you?
Yes, we still have some tips to give you. At ProspectIn we’re a bit like the Marie Poppins of budding growth hackers after all??
And this time we’re pulling 3 growth hacking techniques out of the bag that we’ve tested and that are working!
Retrieve followers from a LinkedIn page
Imagine you could retrieve all the subscribed profiles of a page on LinkedIn, then contact them in a personalized way.
Utilising our small hack, it’s now possible. So let’s go ! ?
Why target profiles subscribed to a LinkedIn page?
For me, there are two types of information about a prospect. “Static” information and “behavioral” information.
Static information is that provided directly by the user. In the case of LinkedIn this is the prospect’s name, first name, position and company etc.
Behavioral information corresponds to actions performed by the user that doesn’t actually add data to their profile. Examples include; commenting on a post, following a hashtag or… subscribing to a page. ?
“Behavioral” data is often more precise because they allow a prospect to be qualified. Unlikely static information voluntarily provided a long time ago, this information is based on dynamic and current behavior. Concretely, what the user wants on LinkedIn and what they’re trying to get out of the platform.
This is also the information that targeted ads for most social networks like Facebook are based on.
A few reasons to retrieve profiles subscribed to a LinkedIn page:
- The LinkedIn page belongs to you and you want to contact your base.
- The LinkedIn page is your competitor’s and you want to poach their customers.
- The LinkedIn page corresponds to a center of interest related to your activity, an indirect competitor or you just believe that your customers may be among the subscribers. ??
Obviously, the goal is not just to recover the profiles in question. We will seek to target these (profiles where possible in a personalized way) in order to turn them into leads.
Step 1: Create a fake account
Not-so-long ago, you could directly change your current company on your profile and access all the subscribers on the company. That was before.
Things have now changed, and the process is a bit longer and doesn’t scale as well. But it is still possible and quite simple. To start you have to create a fake account. In order to avoid LinkedIn being suspicious, we recommend following our tutorial on how to manage several LinkedIn accounts on the same computer.
Step 1.1: Launch a Chrome session
To have several accounts on the same PC and not share cookies between accounts (LinkedIn doesn’t like that too much), you will need to launch a second Chrome session.
Step 1.2 Create a Gmail account (optional)
If you have an email account that isn’t linked to a LinkedIN account, now is the time to make the most of it. If you don’t have an email account spare, you will have to create a new email. A Gmail account takes 3 minutes and gets the job done!
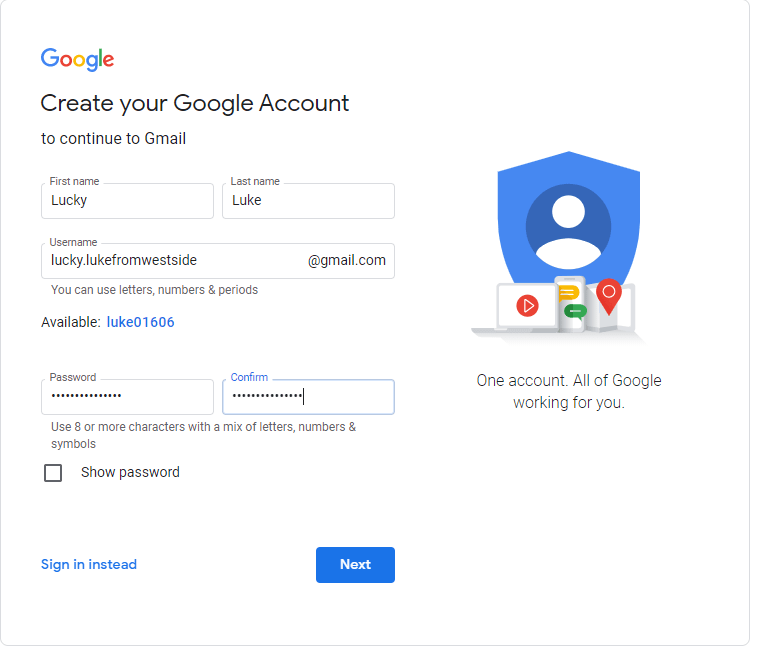
Your email address and the info you put doesn’t really matter. If LinkedIn ever asks for a number and you’ve not exceeded the number of LinkedIn accounts that can be linked to one number, you can enter yours. If you’ve alreday created a bunch of fake accounts, and have used the same number several times for each one, you’re out of luck, and you’ll just have to find another number to use ?
Step 1.3: Create the fake account on LinkedIn
Go to the LinkedIn signup page. If you have a Gmail account, you can sign up to LinkedIn directly using your Google login details. If you made an account with a different email provider, you will probably have to enter your info.
If you’re only going to use this account for the purpose of this tutorial, you don’t have to give to much thought to the accout. Create any identity and get going.
Once you’ve created you account, you may be asked to complete a Captcha verification. If LinkedIn asks you to complete a Captcha verification, do it. Firstly, because you are indeed a human (I think), and secondly, because you don’t really have a choice in the matter.
Once you’ve completed that, LinkedIn might ask you to fill in some other info. We can’t go into detail on these as these next steps may vary from one user to another. This is because LinkedIn is constantly doing A/B onboarding tests. But basically, whatever you get asked should be straightforward.
Eventually LinkedIn will ask you for your job. Put in what you want as your job title, then enter the name of the company you want to get subscribers from. Make sure you choose the right page, because you can’t make a mistake. You will have to start over if you make a mistake.
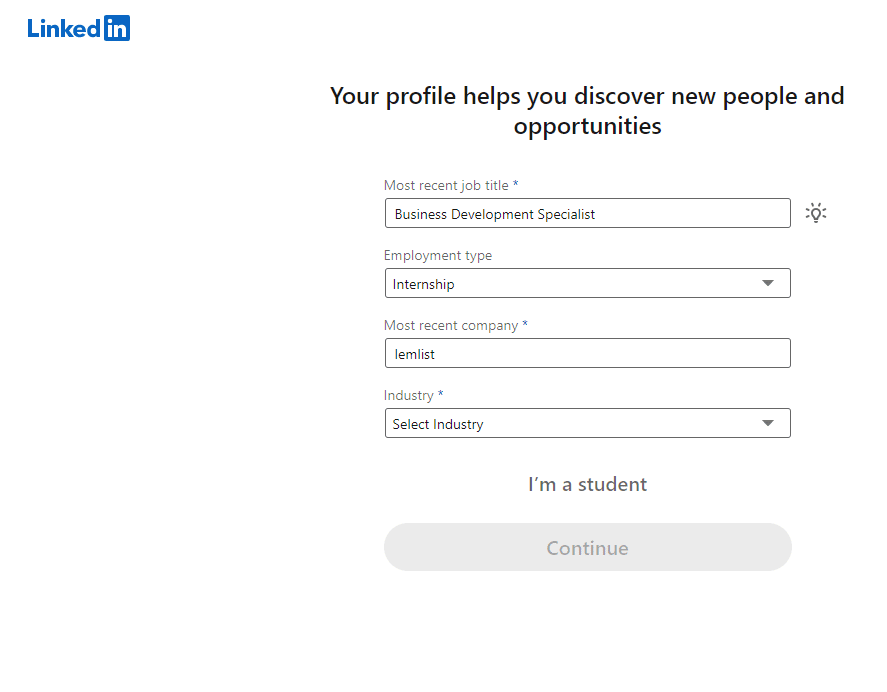
Click continue and follow the indications.
Step 2: Start a Sales Navigator trial
We can’t say it enough: Sales Navigator is key for precise targeting of prospects. Although we’re not focusing on targeting here, we are still going to use Sales Navigator. Actually, in order to filter the subscribers of a page, you need this paid LinkedIn plan. You can click on this link to access a free one-month trial of Sales Navigator.
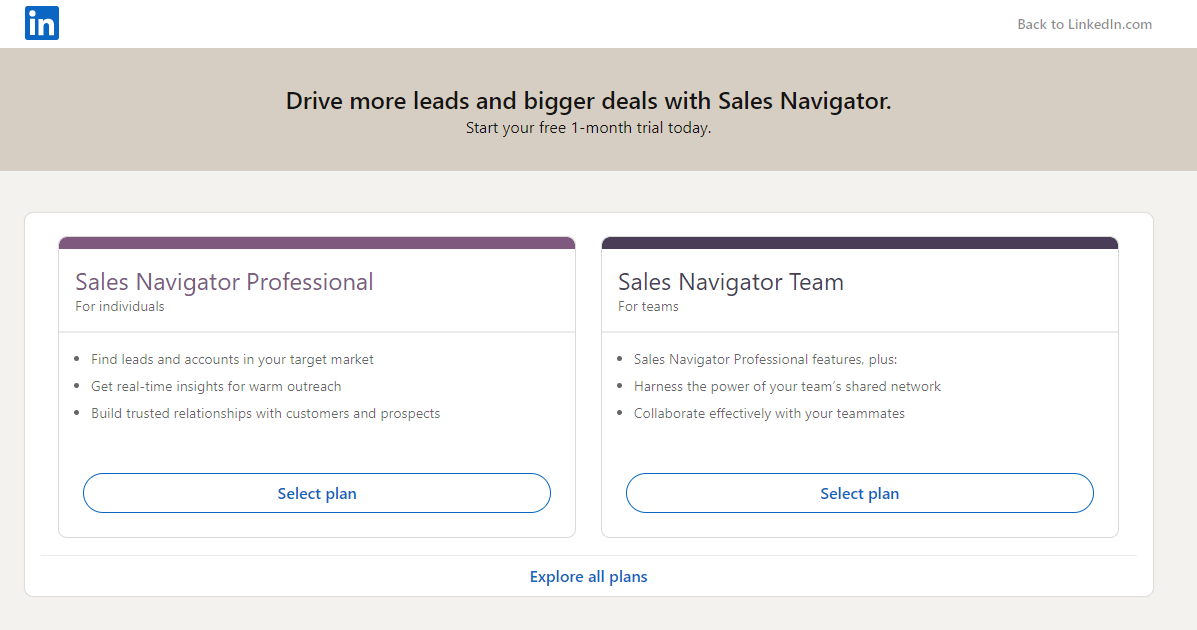
⚠️⚠️ You’ll have to enter your credit card. But don’t worry, we’ll cancel before we get charged. Choose a monthly plan and enter a credit card, then start the free trial.
Step 3: Search from Sales Navigator
1. Go to a Sales Navigator lead search
2. Target the country you want (I recommend categorizing your campaigns by country).
3. Add the filters you want: the beauty of this hack is that you can add an extra layer of customization. Position, company size, time in current position etc, group they are in…
4. Scroll to the right: you’ll have a “These prospects follow your page” tab.
5. Exclude employees. Employees are subscribed to the company page by default. It wouldn’t be very professional to have them in your prospecting loop.
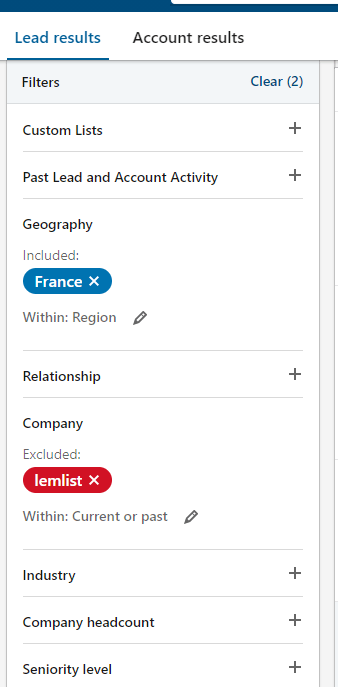
That’s it, you have the list!
Step 3: Export the results
Now that you know how to retrieve the followers of a LinkedIn page, go ahead and export the results to ProspectIn.
Important: wait until the export is finished. ProspectIn will move from page to page but if you go to step 4 before the export has finished, you will end up exporting the wrong profiles.
Get yourself a coffee while ProspectIn is uploading your brand new prospects into the CRM. Maybe an espresso? It won’t take long ☕
Step 4: Terminate your trial period
Once the operation is complete, remember to cancel your Sales Navigator trial period. Go to this link and confirm the cancellation of the trial.
Step 5 (bonus): Extra tips
I suggest you to take a quick look at the list of exported prospects. Do the profiles seem to match the ones you were targeting? Are they relevant? Are there people in the ecosystem who you do not consider influential and would not want to automatically approach?
Doing this doesn’t cost you much but can save you some hassle.
Another tip I would give you is to consider the way you approach the target. I strongly suggest a nurturing approach: offer them high added value content.
In our case, for example, we could use an approach like
“Hey {{firstname}}, I saw that you were following Lemlist on LinkedIn. I love their business model and their product. ?I just wrote the article “Cold emailing or LinkedIn prospecting? Which one to choose to find customers?”I took a lot of inspiration from the content produced by Lemlist and would love to hear your thoughts on it.”
Phantombuster: How to target the clients of your competitors
Being able to directly target your competitors customers and users is a dream, right? In this article, I’ll introduce you to a small “hack”. We’ll show you how we used Phantombuster to target users and customers of our competitors, and how you can do so too ? Tools and platforms used:
- Facebook,
- LinkedIn,
- ProspectIn,
- Phantombuster.
It is not uncommon for some companies to create Facebook groups to build their community and interact with it. The idea of this hack is to find a Facebook group including competitor’s users, extract the group members, and find their LinkedIn profile through Phantombuster and contact them via ProspectIn. ? In our case, we started with a Facebook group of one of our competitors: Dux-Soup.
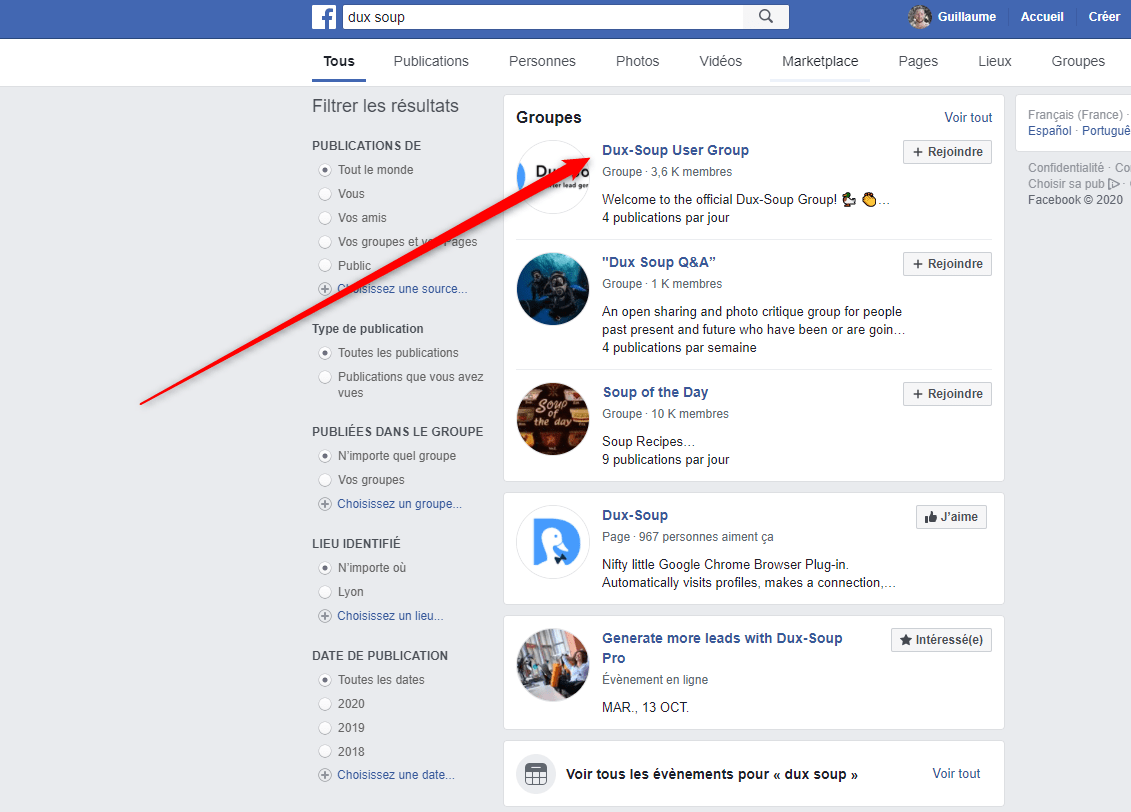
How do I find my competitor’s Facebook group?
By searching for keywords on Facebook directly, quite simply. It sounds silly but there is a real chance that you will run into it. However, this technique has one major drawback: you will only find groups that are publicly visible. Another tip is to subscribe to your competitors’ newsletters and create an account on their platform/site/application. You will then enter the loop of their drip campaign emails and it is possible that they will directly invite you to join their Facebook group. In our case, we took one of our main competitors (Dux-Soup) and we simply searched for “Dux-Soup” on Facebook. We immediately came across the community group:
Extract group members with Phantombuster
Once you have found your competitor’s Facebook group, you need to retrieve information about the people who make up the group. If you are motivated, you can do it manually. If, like us, you are a bit lazy and you like to automate, you have to go through Phantombuster. Phantombuster is a tool that allows you to perform a large number of automations on various platforms (Facebook, LinkedIn, Twitter, Instagram, Google maps, Pinterest, Quora…). It is an extremely comprehensive tool, but not always easy to use. Don’t panic, I’ll guide you through it step by step. ?
- Start by creating an account here,
- In order to guarantee the security of your Facebook account and your LinkedIn account, you will have to go through a proxy.
Proxy set up
We will use this proxy. You then have to create an account, To do this: Click on “sign up” then select the $ 10 plan, 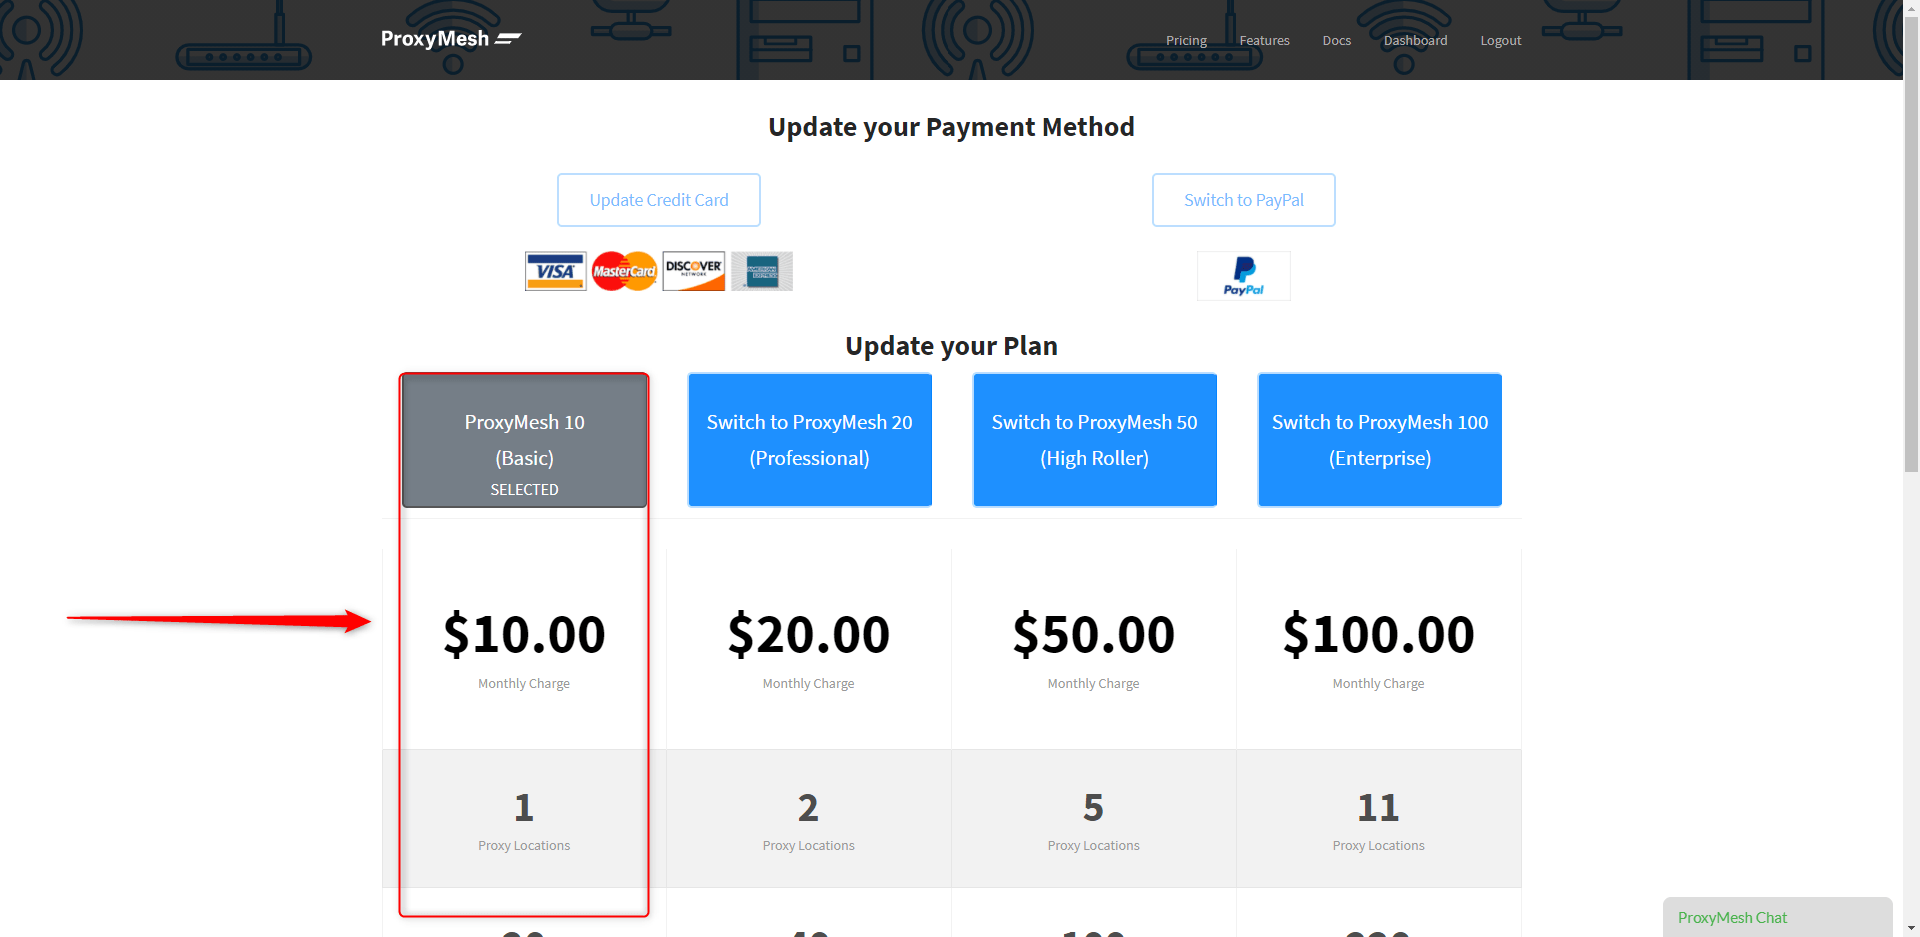
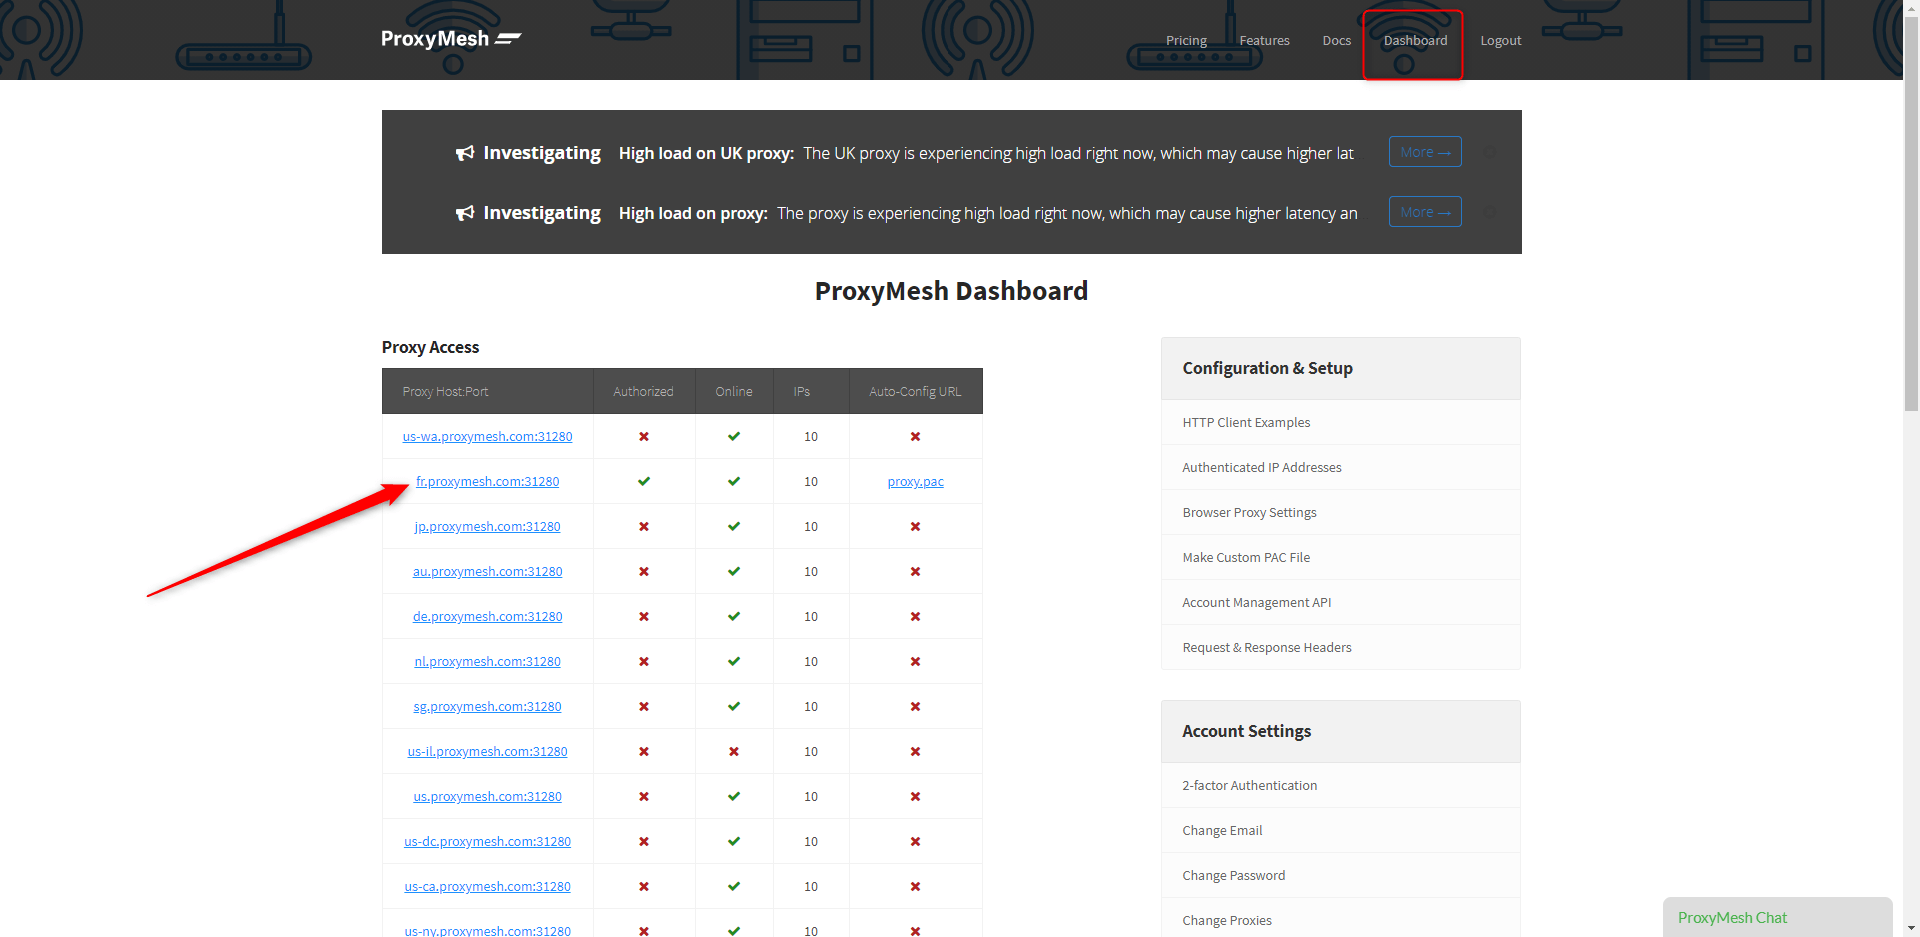
- Click on the “Dashboard” tab then on the .fr proxy address (fr.proxymesh.com:31280).
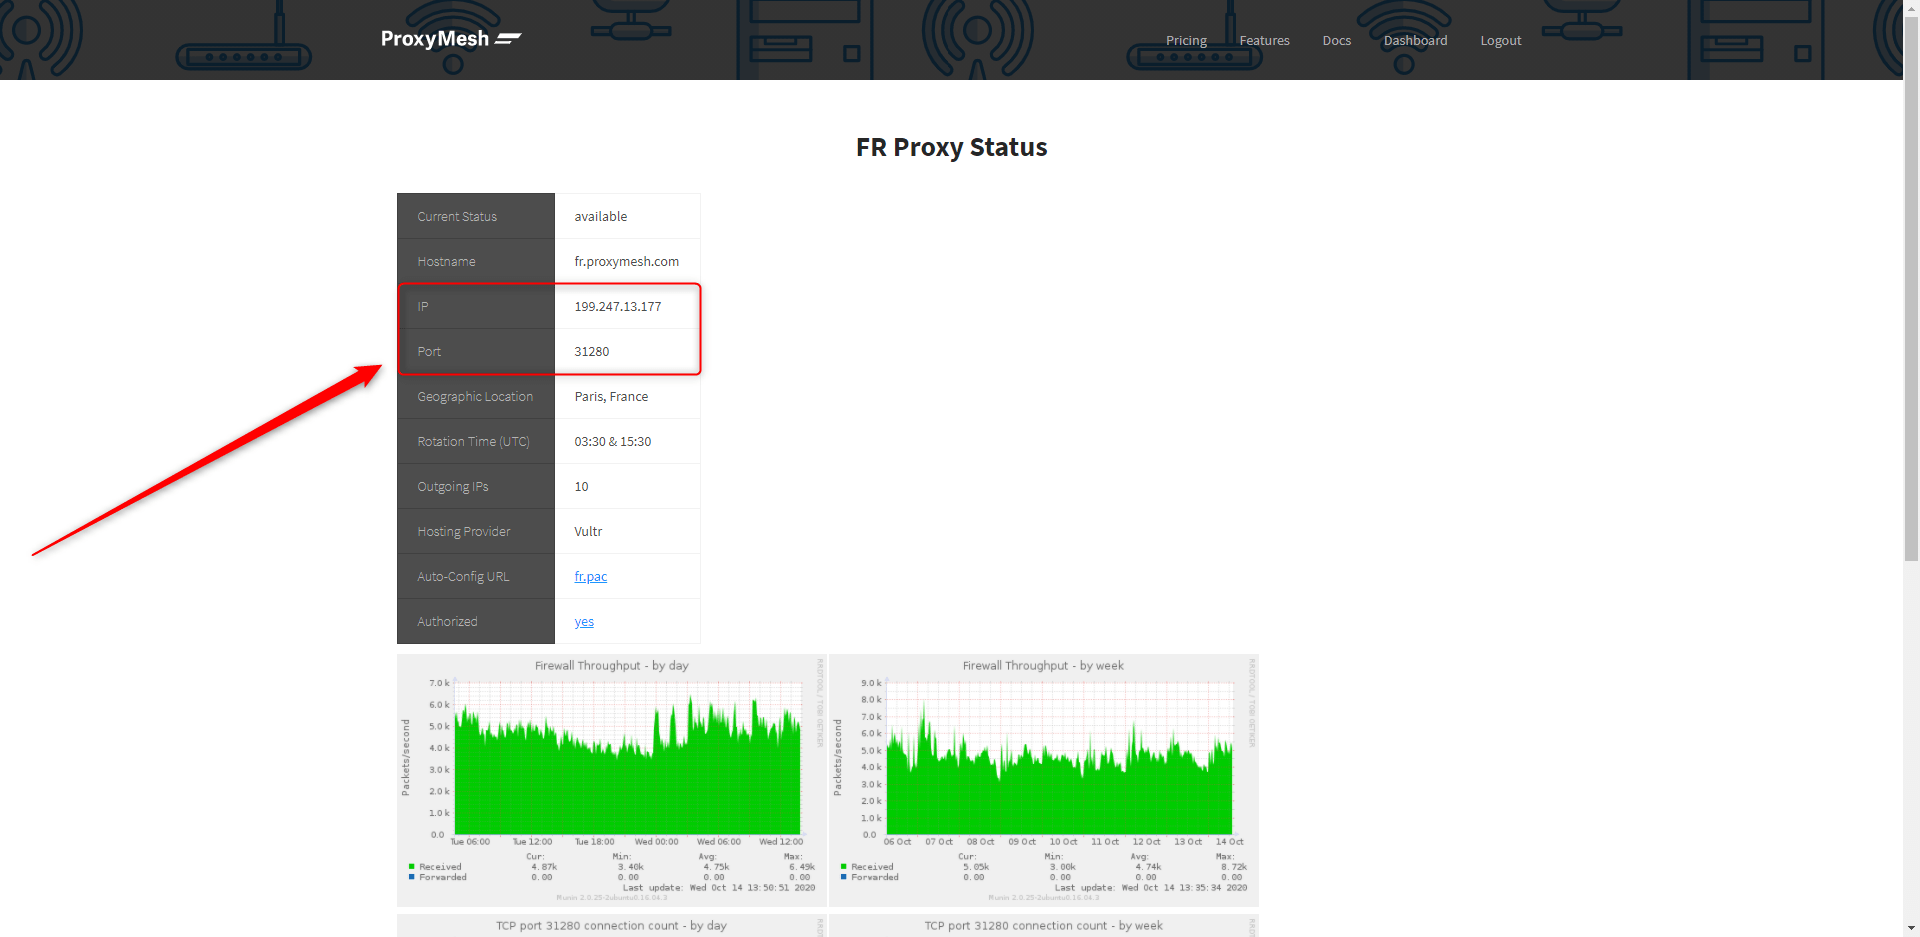
- Copy the IP address as well as the port
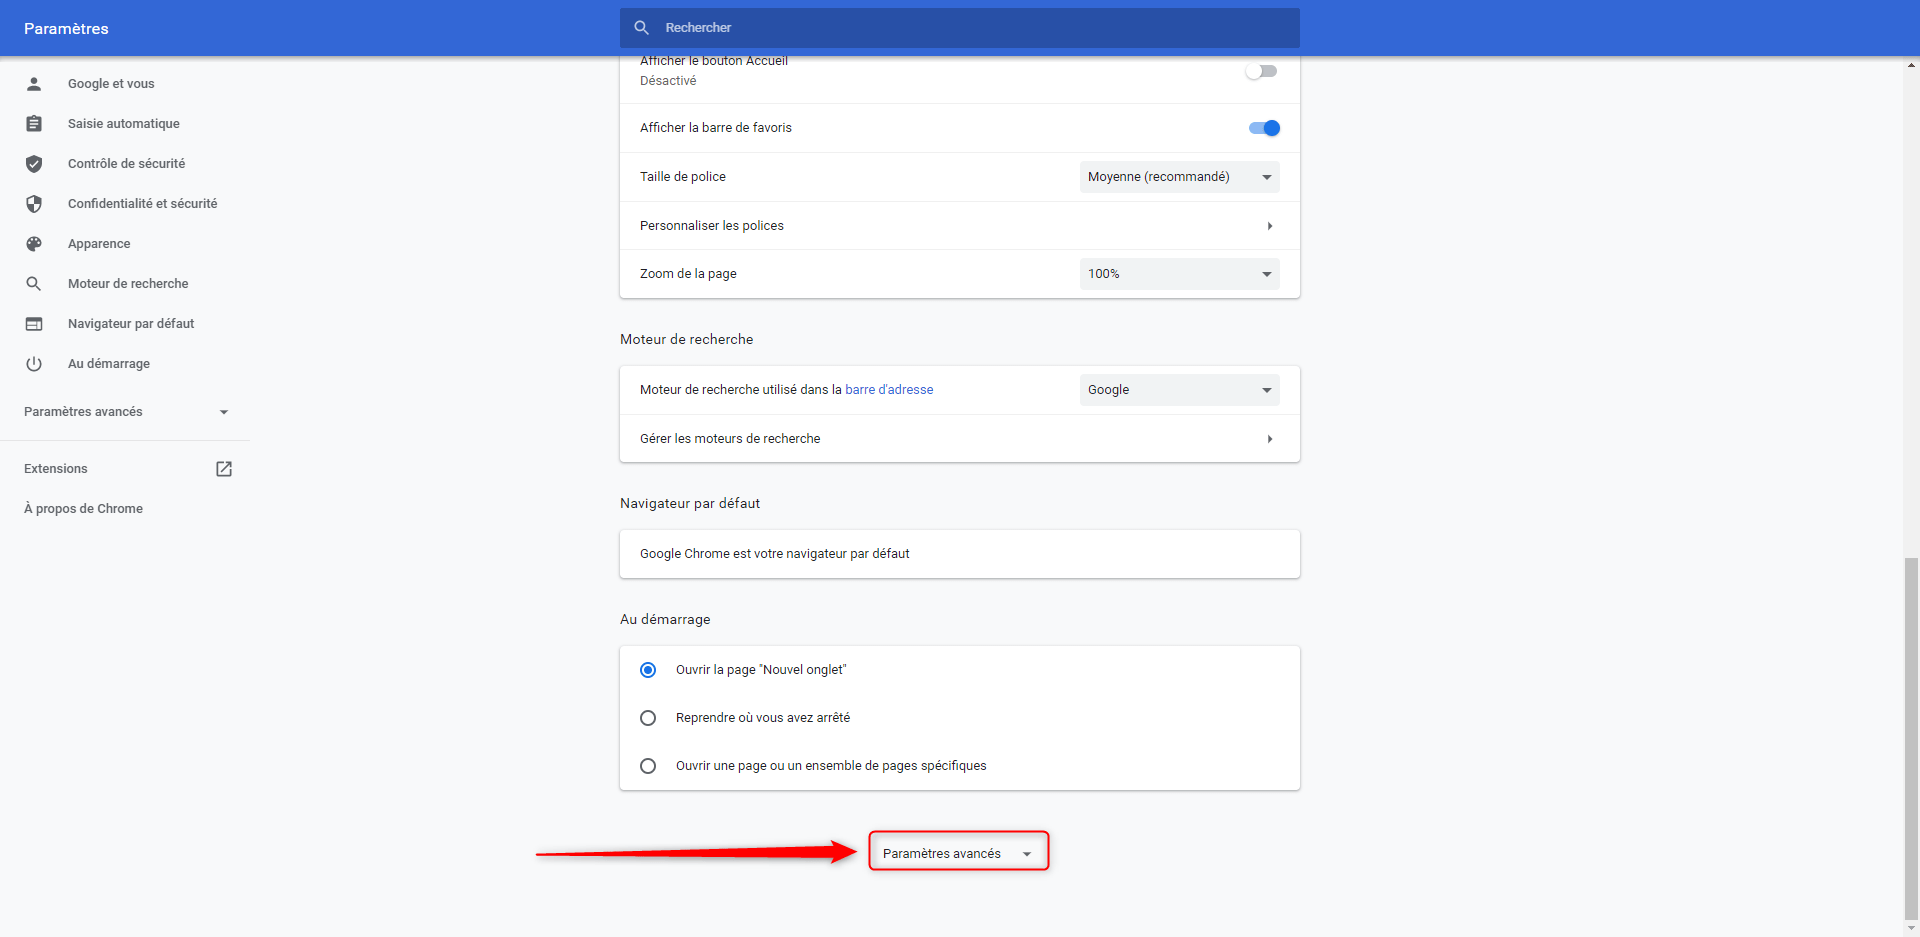
- Then access your proxy settings from Google Chrome > Settings
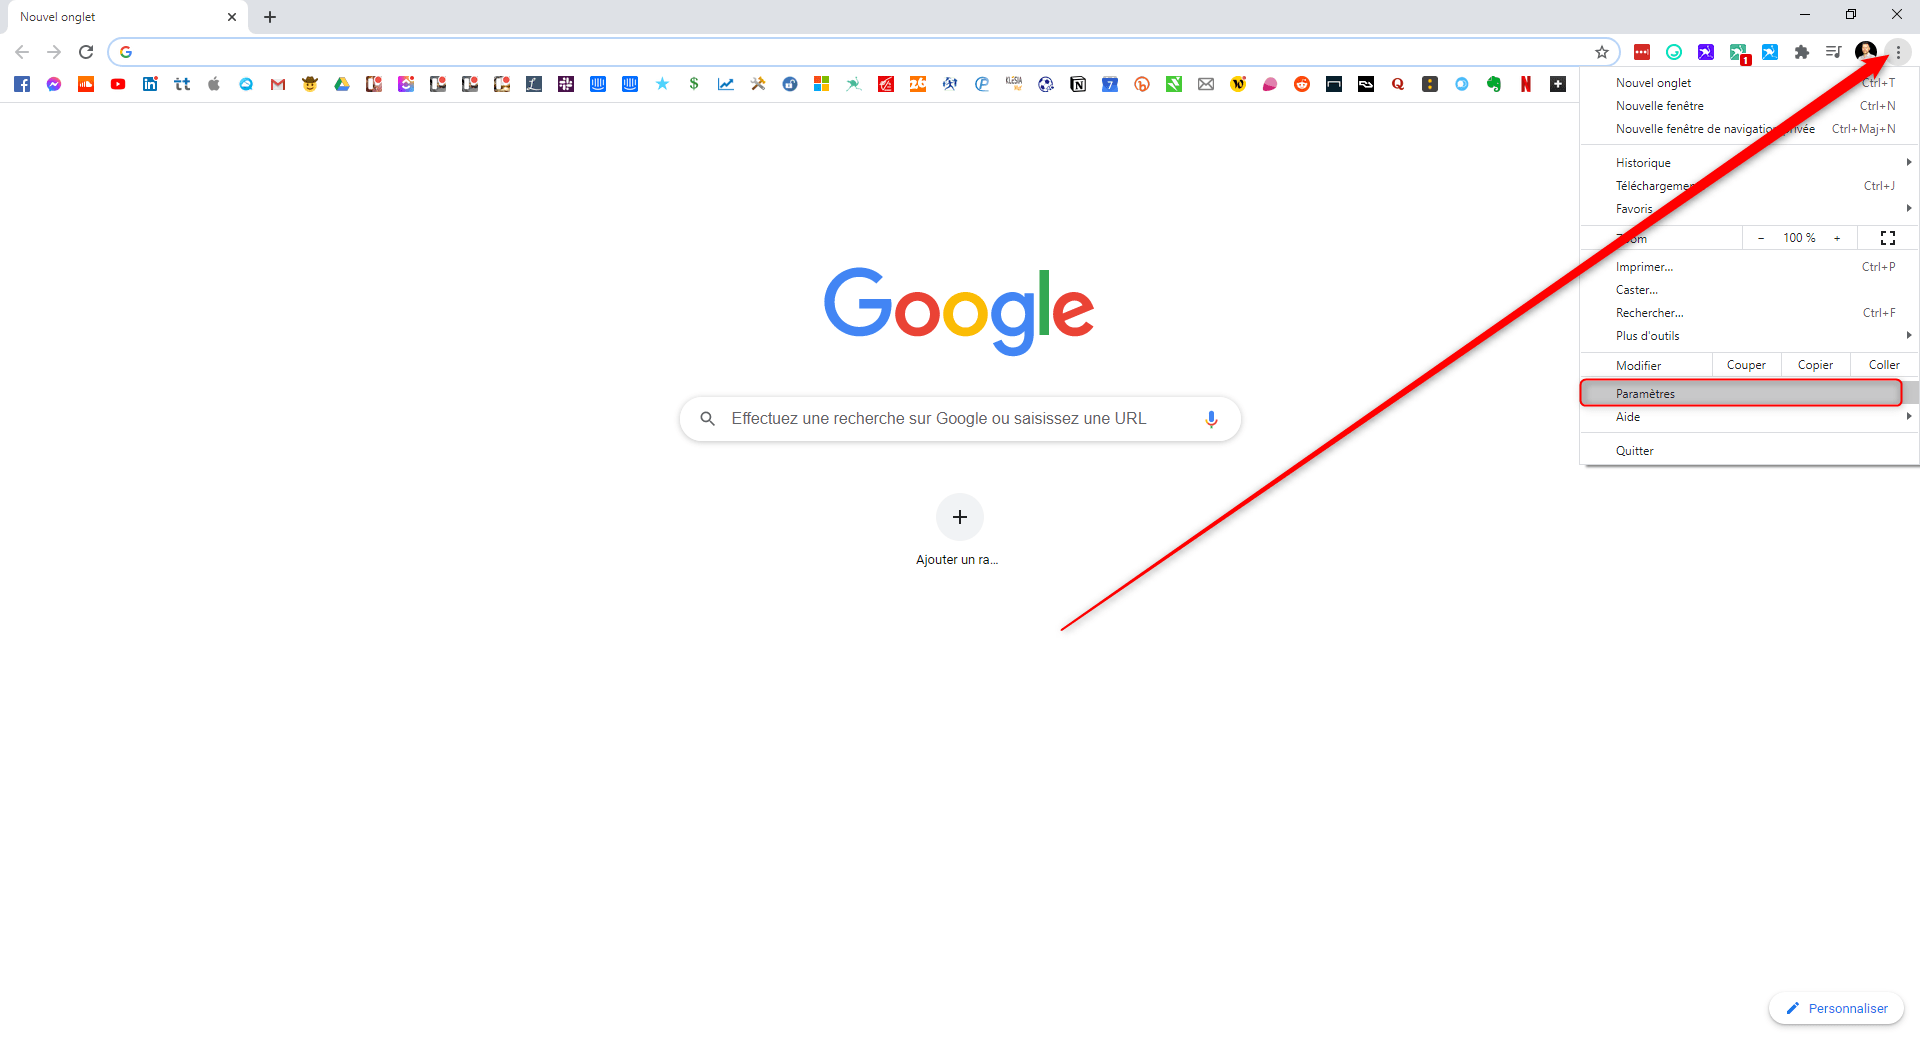
- Advanced settings
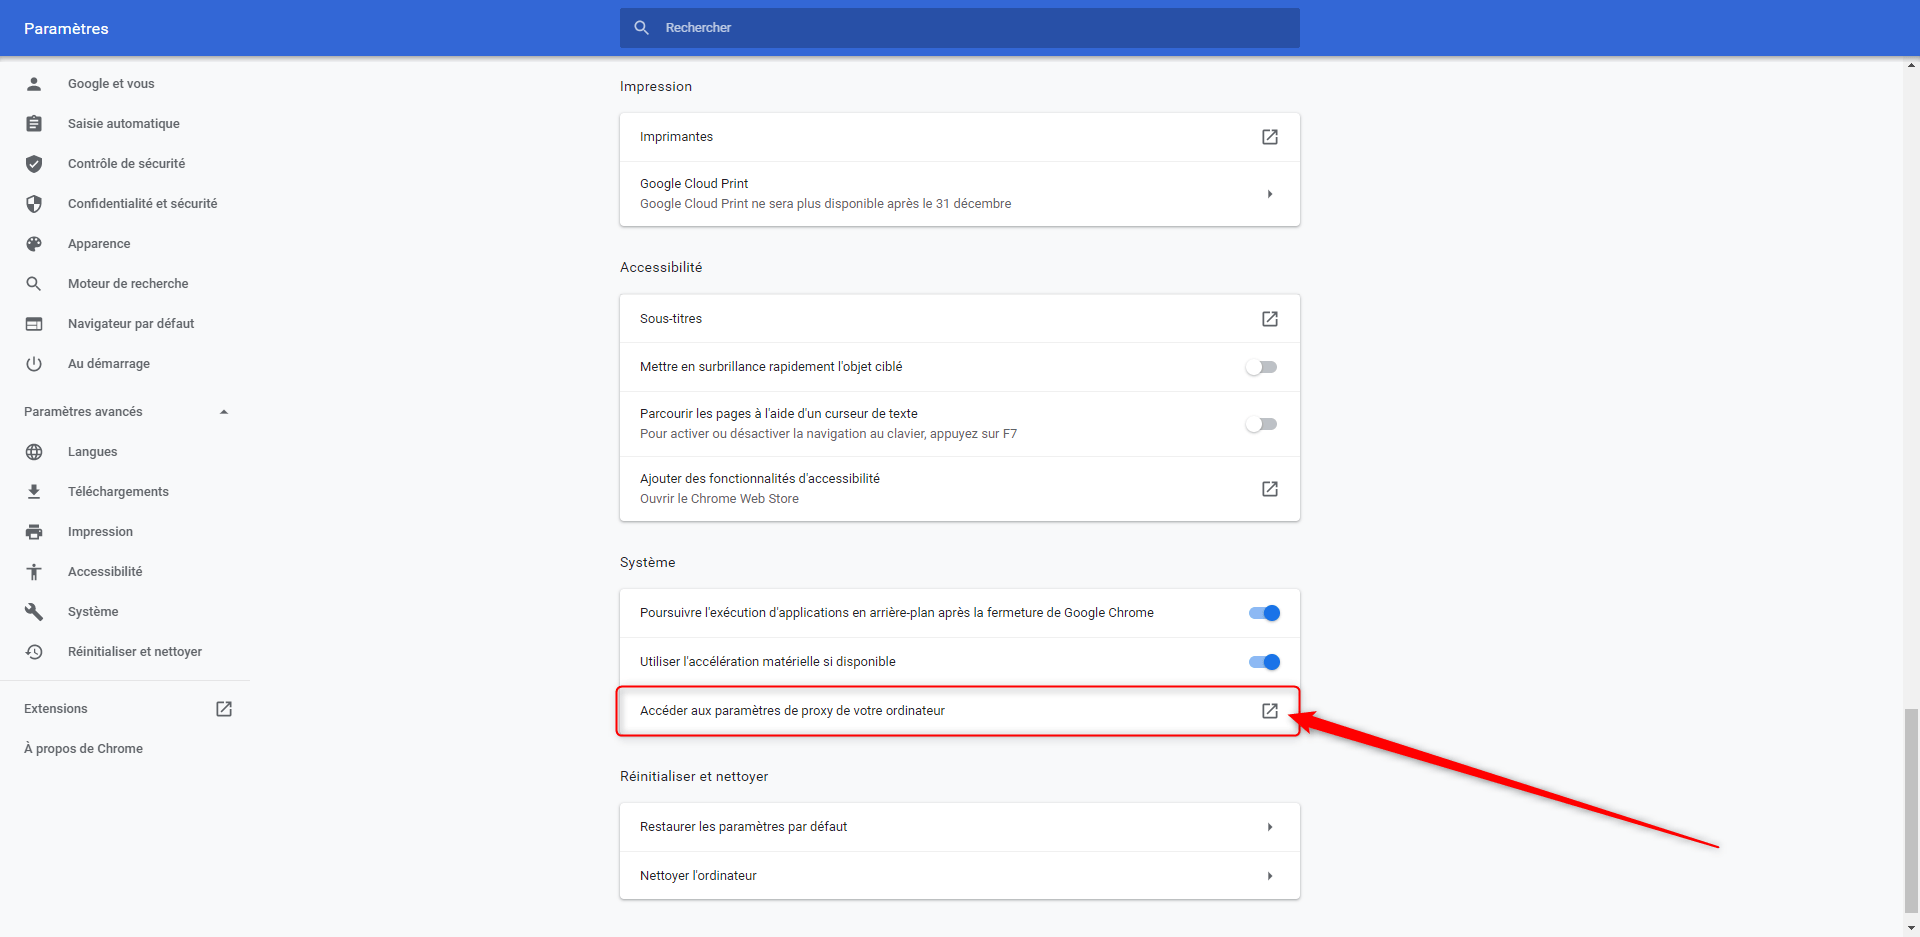
- Access your computer’s proxy settings.
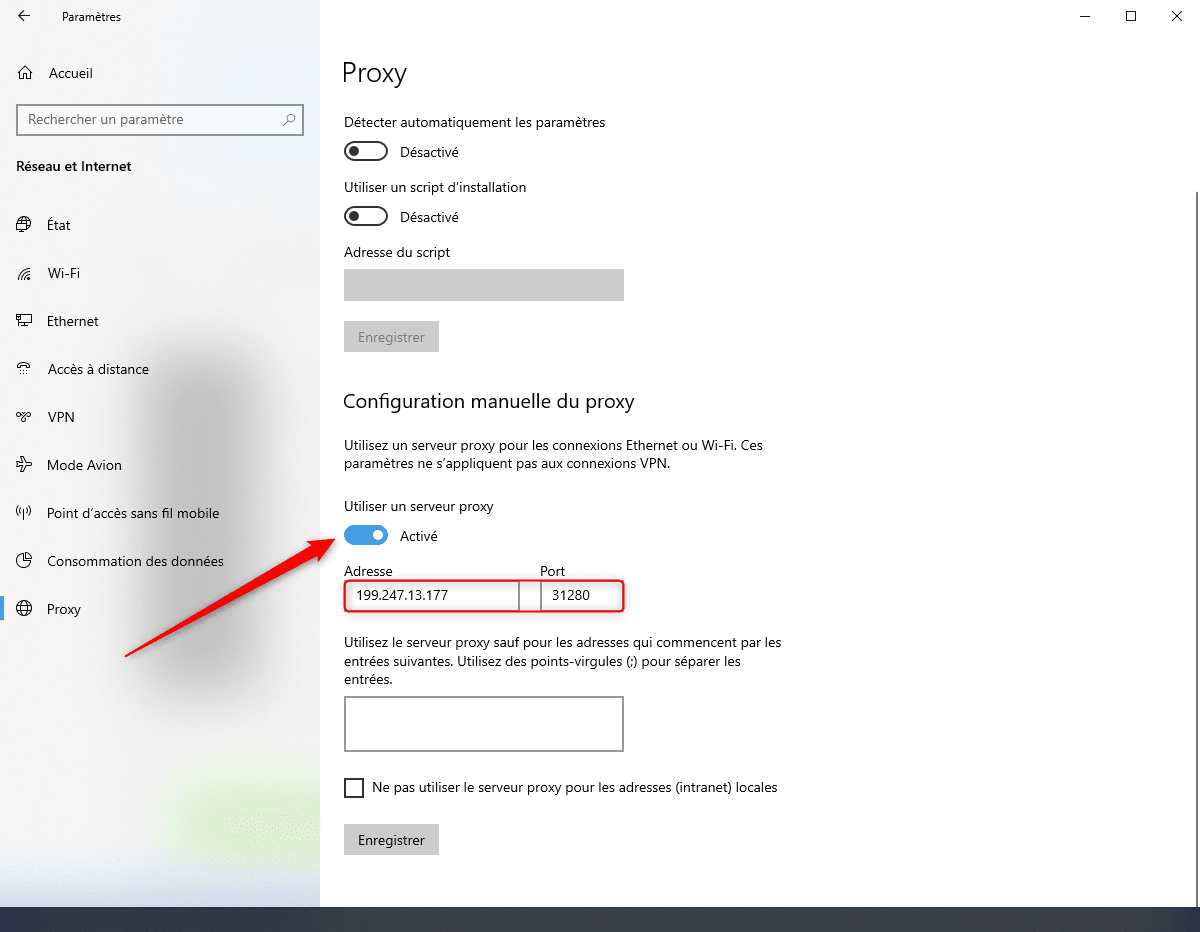
- Activate the option “use a proxy server”,
- Then fill in the “Address” and “Port” fields with the IP address and the port previously copied from the Proxymesh page,
- Then click on “Save”.
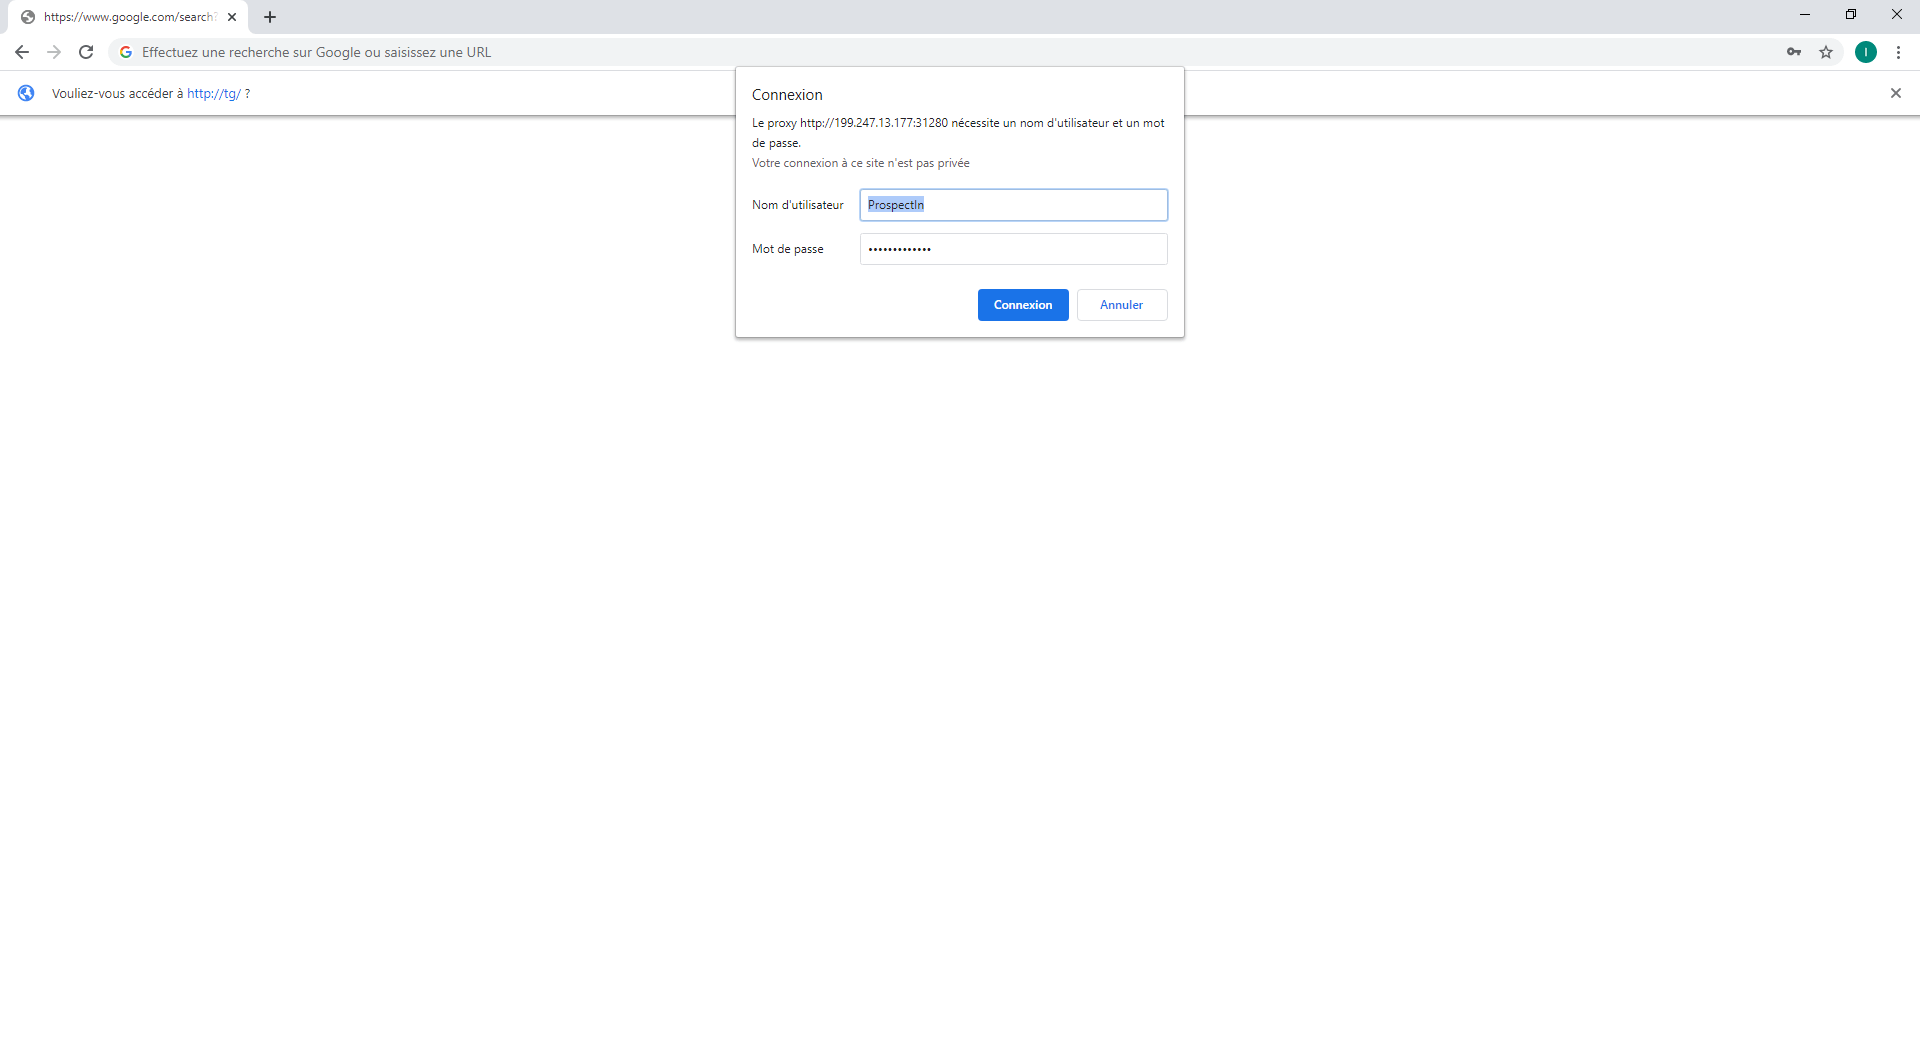
- Open a Google Chrome page. You will be asked for a username and a password.
- Enter your Proxymesh login details, then click on connect.
 Now that you have set up your proxy on Google Chrome, you must set it up on Phantombuster.
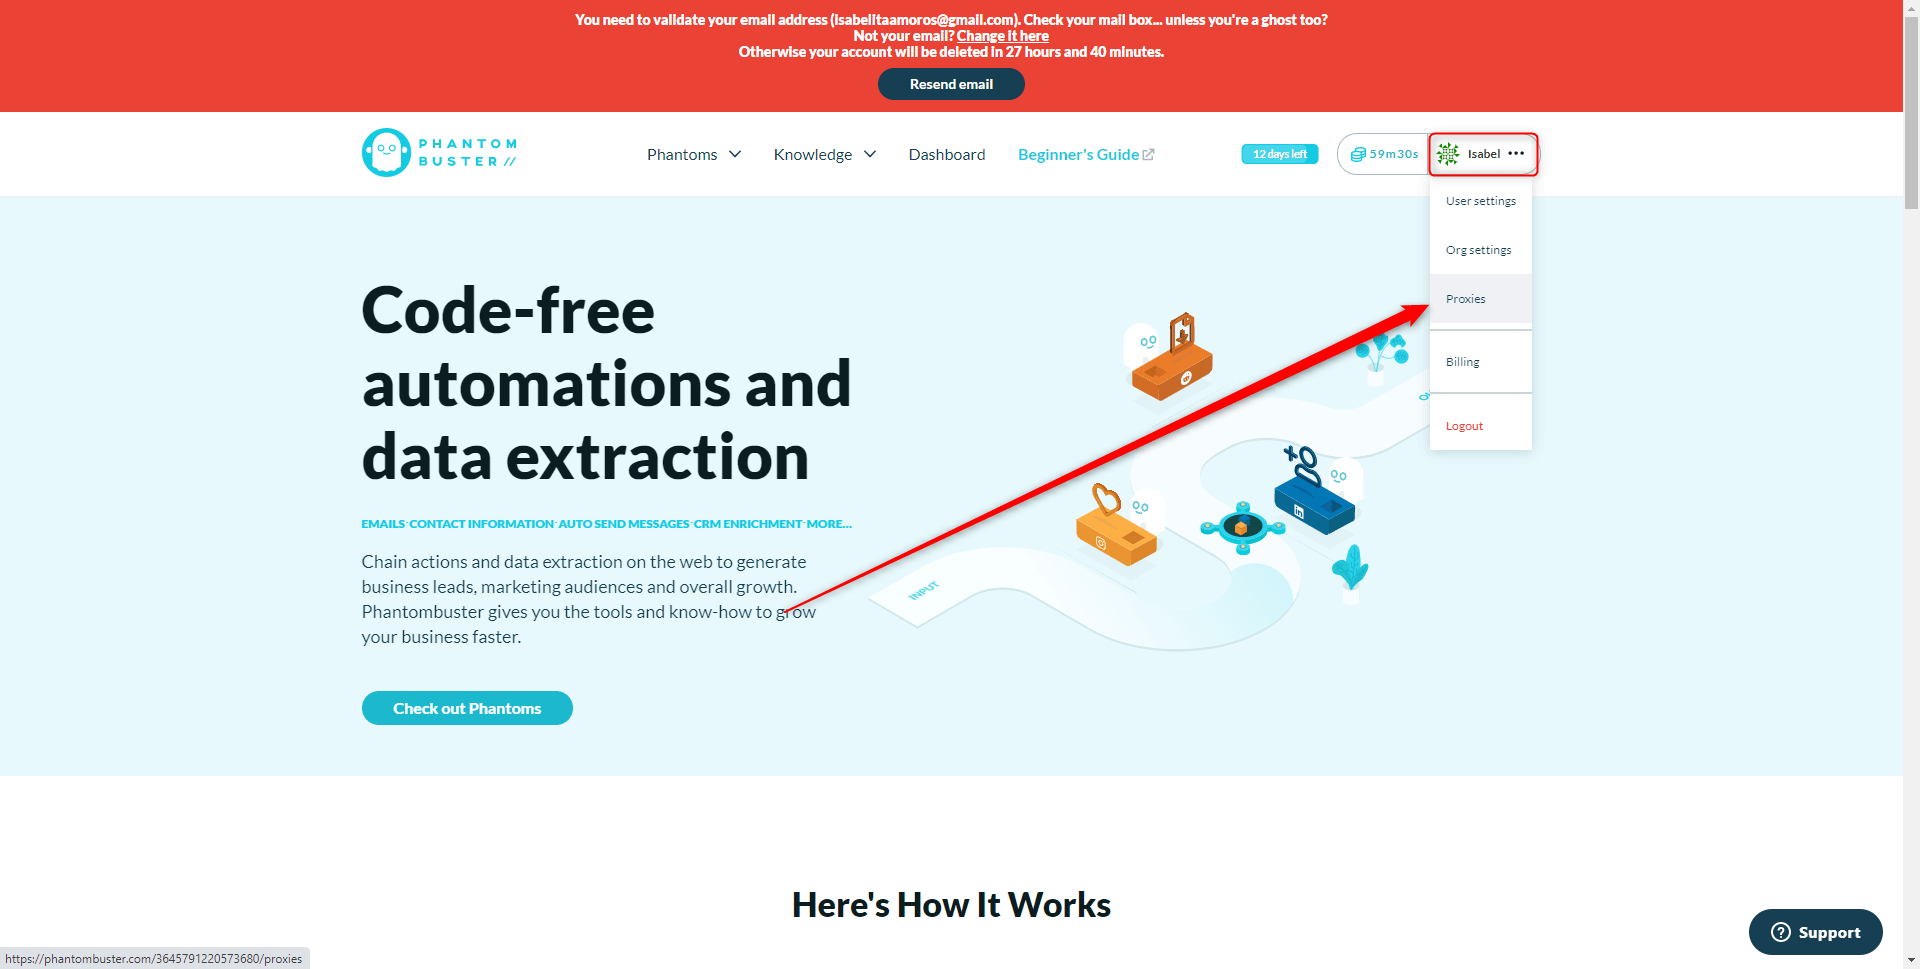
- Click on your account, then on “Proxies”,
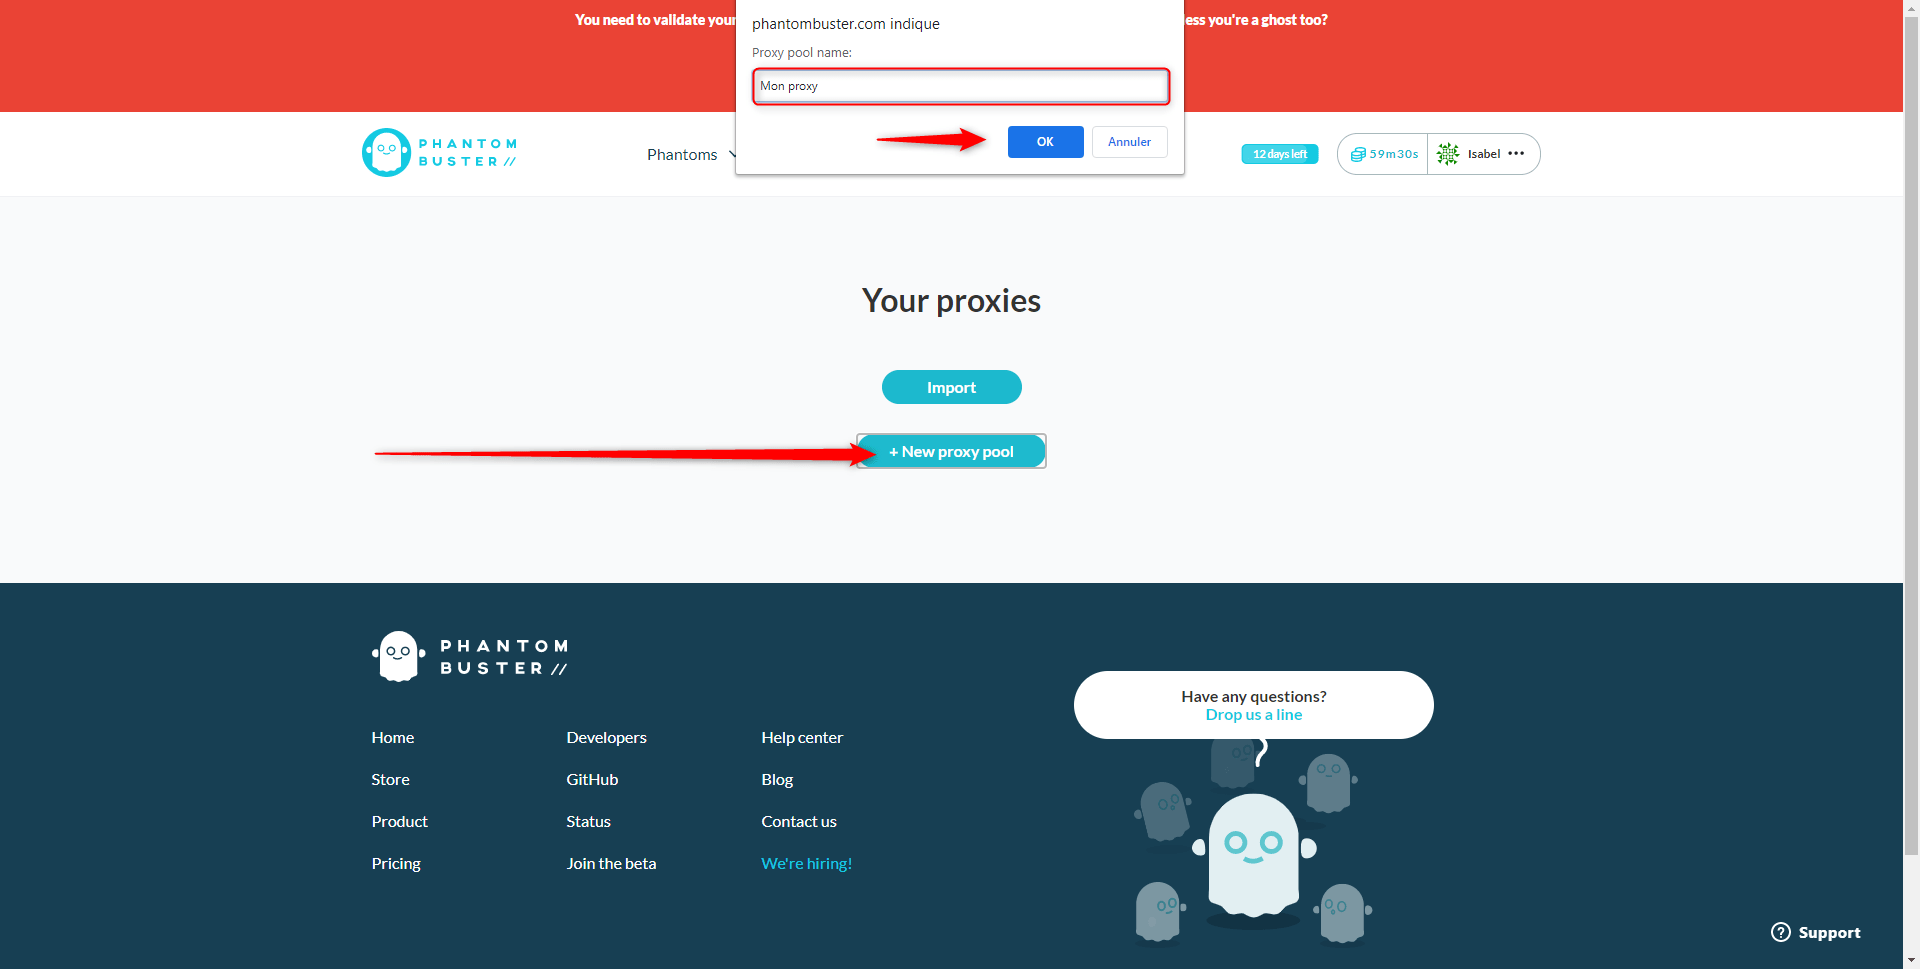
- Click on “+ New proxy pool”,
- Then give your proxy a name such as “My proxy”, then click “OK”.
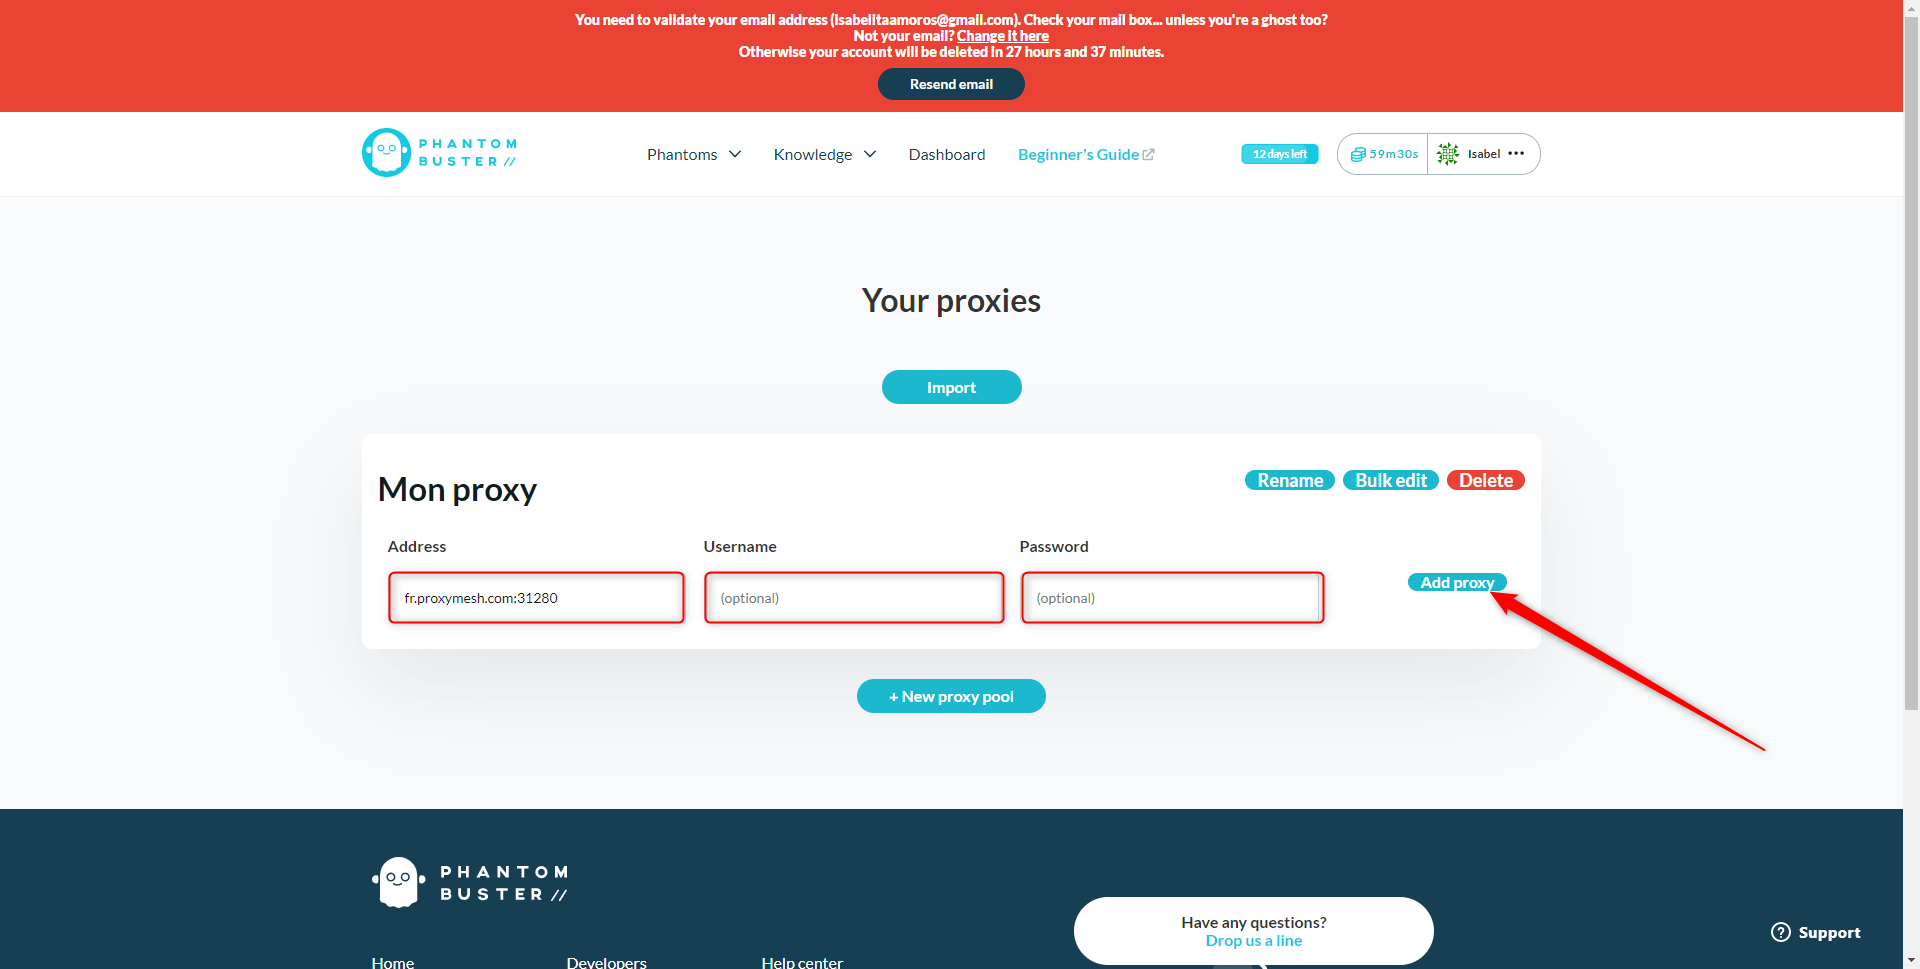
Then fill in the details of your Proxymesh proxy, then click on “add proxy”. Do not forget to fill in the login details of your Proxymesh account.
Now that your proxy is set up, we can move on to extracting data from the Facebook group.
Setting up the extraction of the group’s Facebook profiles
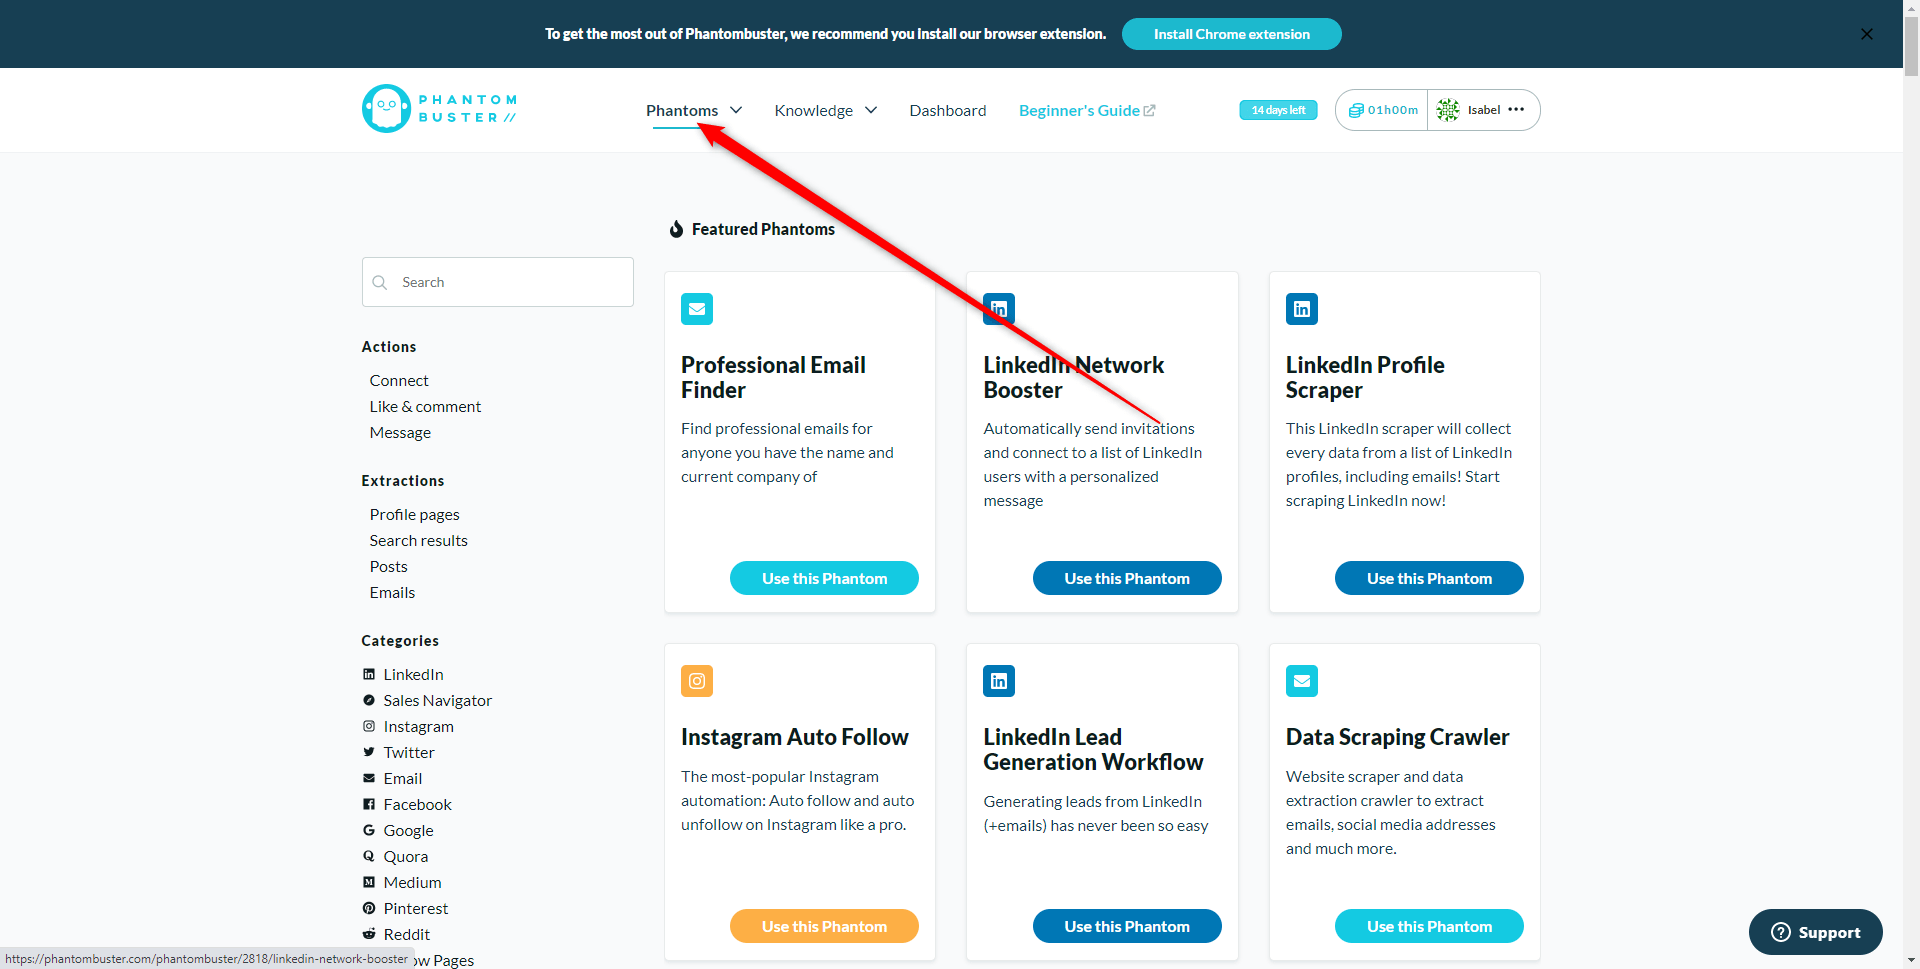
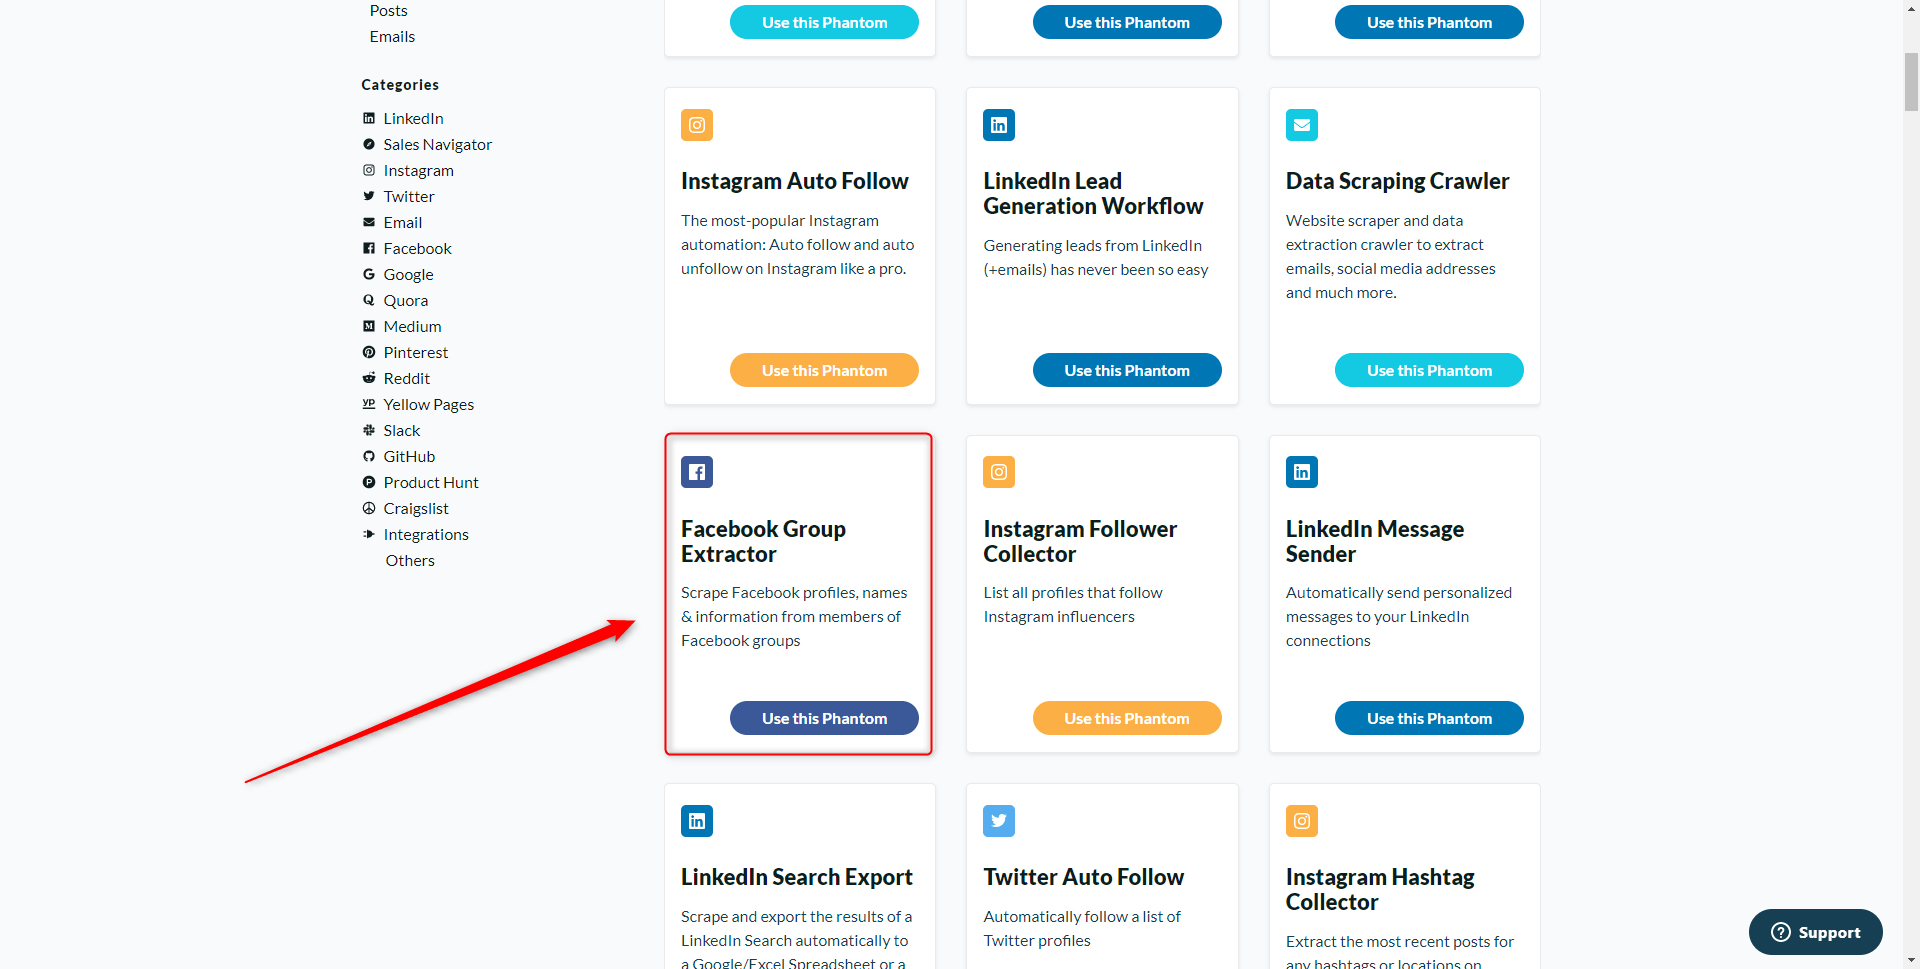
- Select the “Facebook Group Extractor” phantom from the “Phantoms”> “All categories” tab.
- Then install the Chrome Phantombuster extension here
- Click on “Connect to Facebook” to retrieve the information “Session cookie c_user” and “Session cookie xs”,
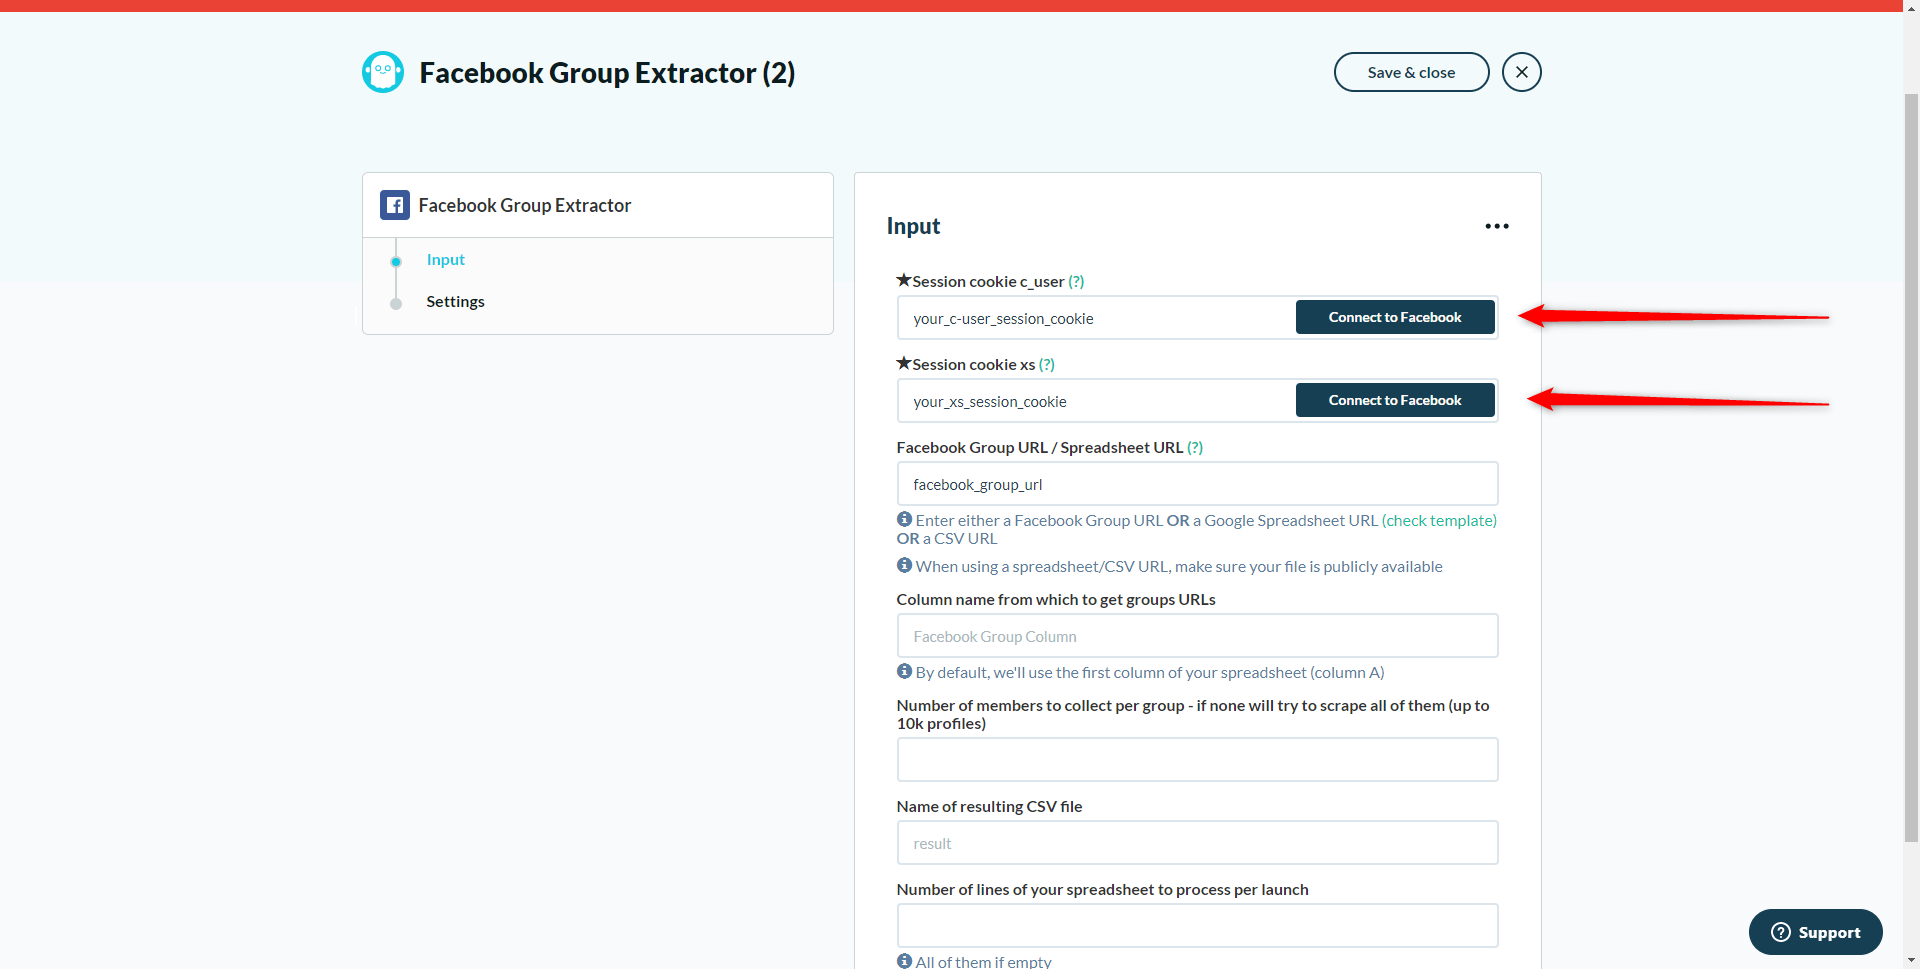
The information will be automatically retrieved.
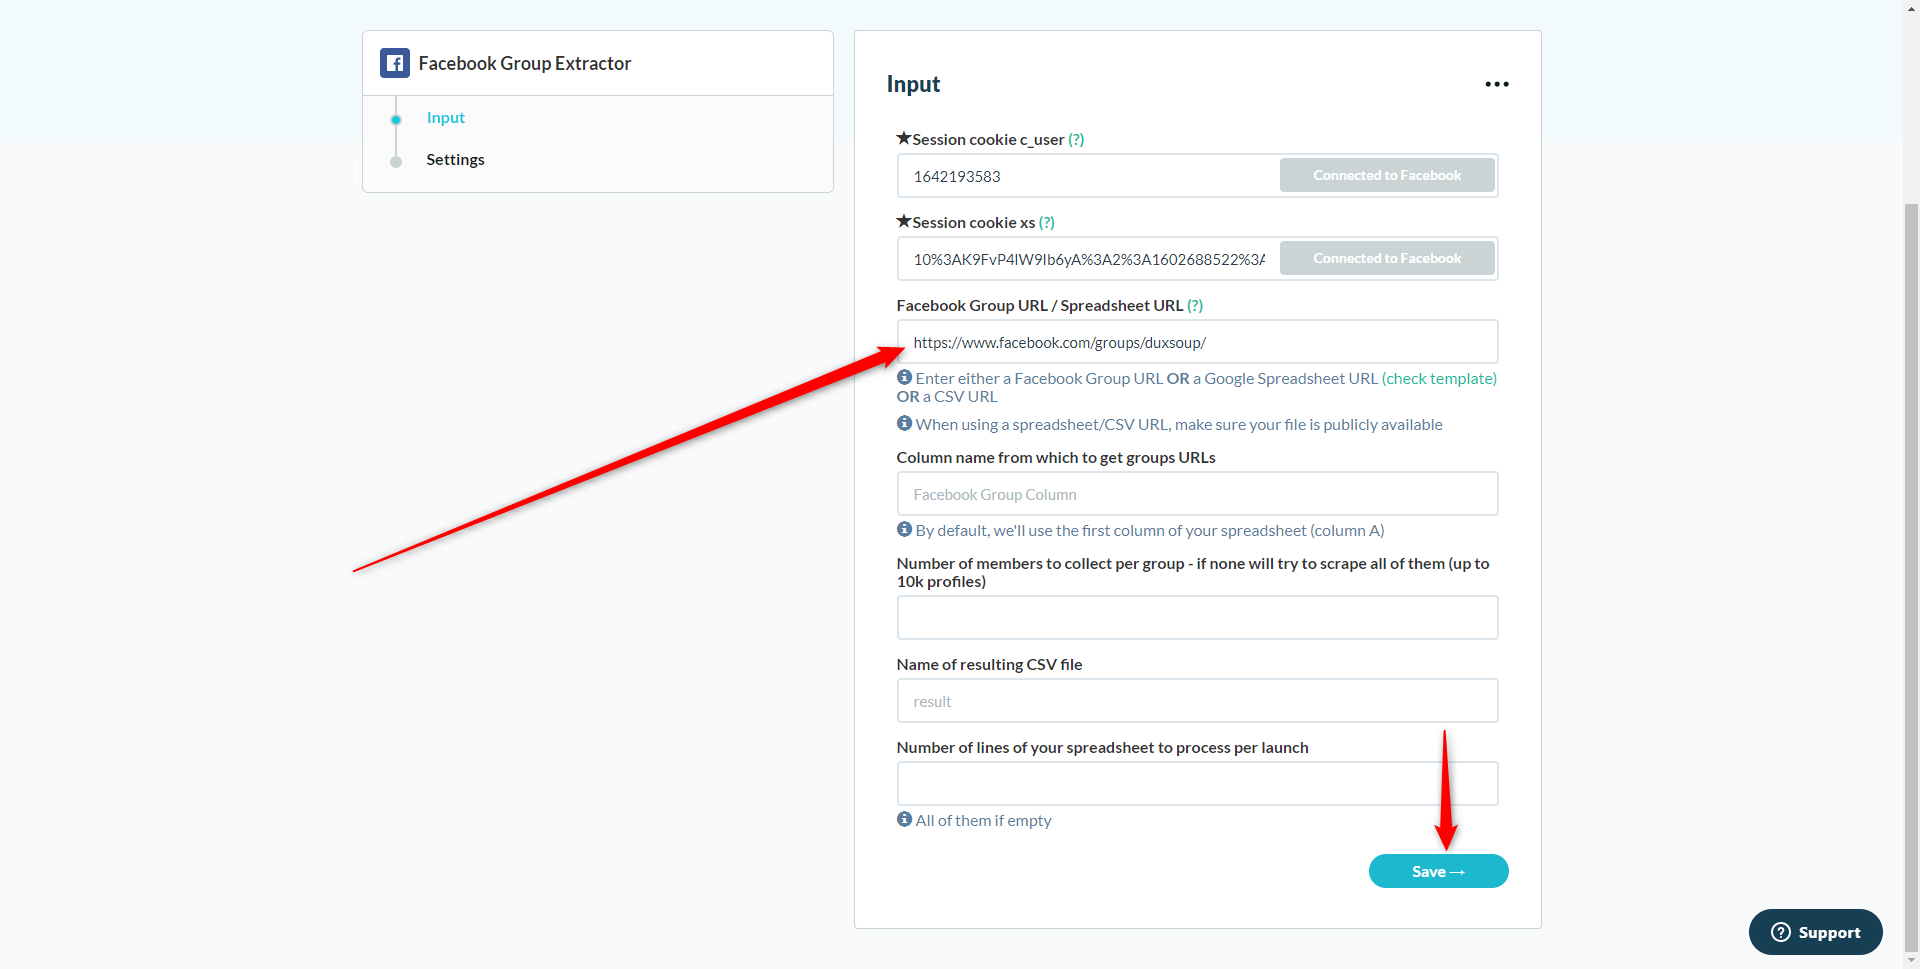
- Then copy/paste the URL of the Facebook group you want to target,
- Then click on “save”.
- On the next page, select Settings “Manually” and Notification “None”,
- Click on “Show advanced settings”.
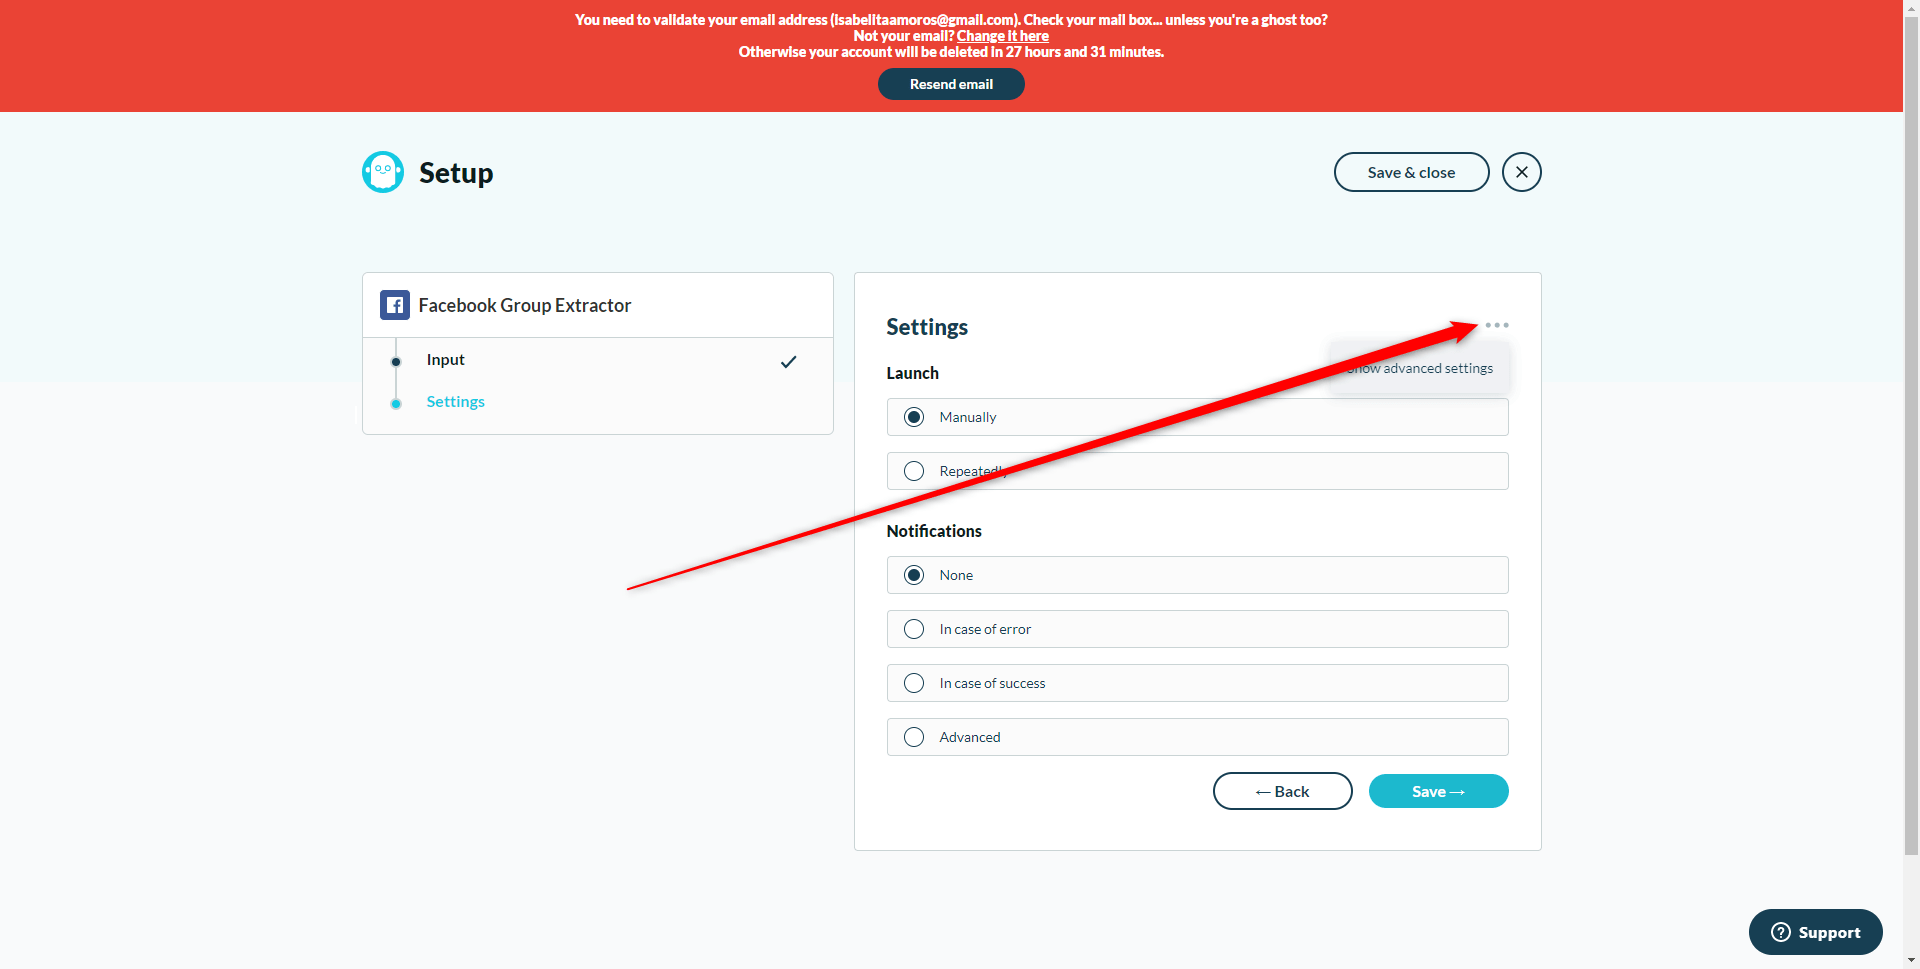
- In “Proxies” choose “Random proxy from pool” then click on “Save”.
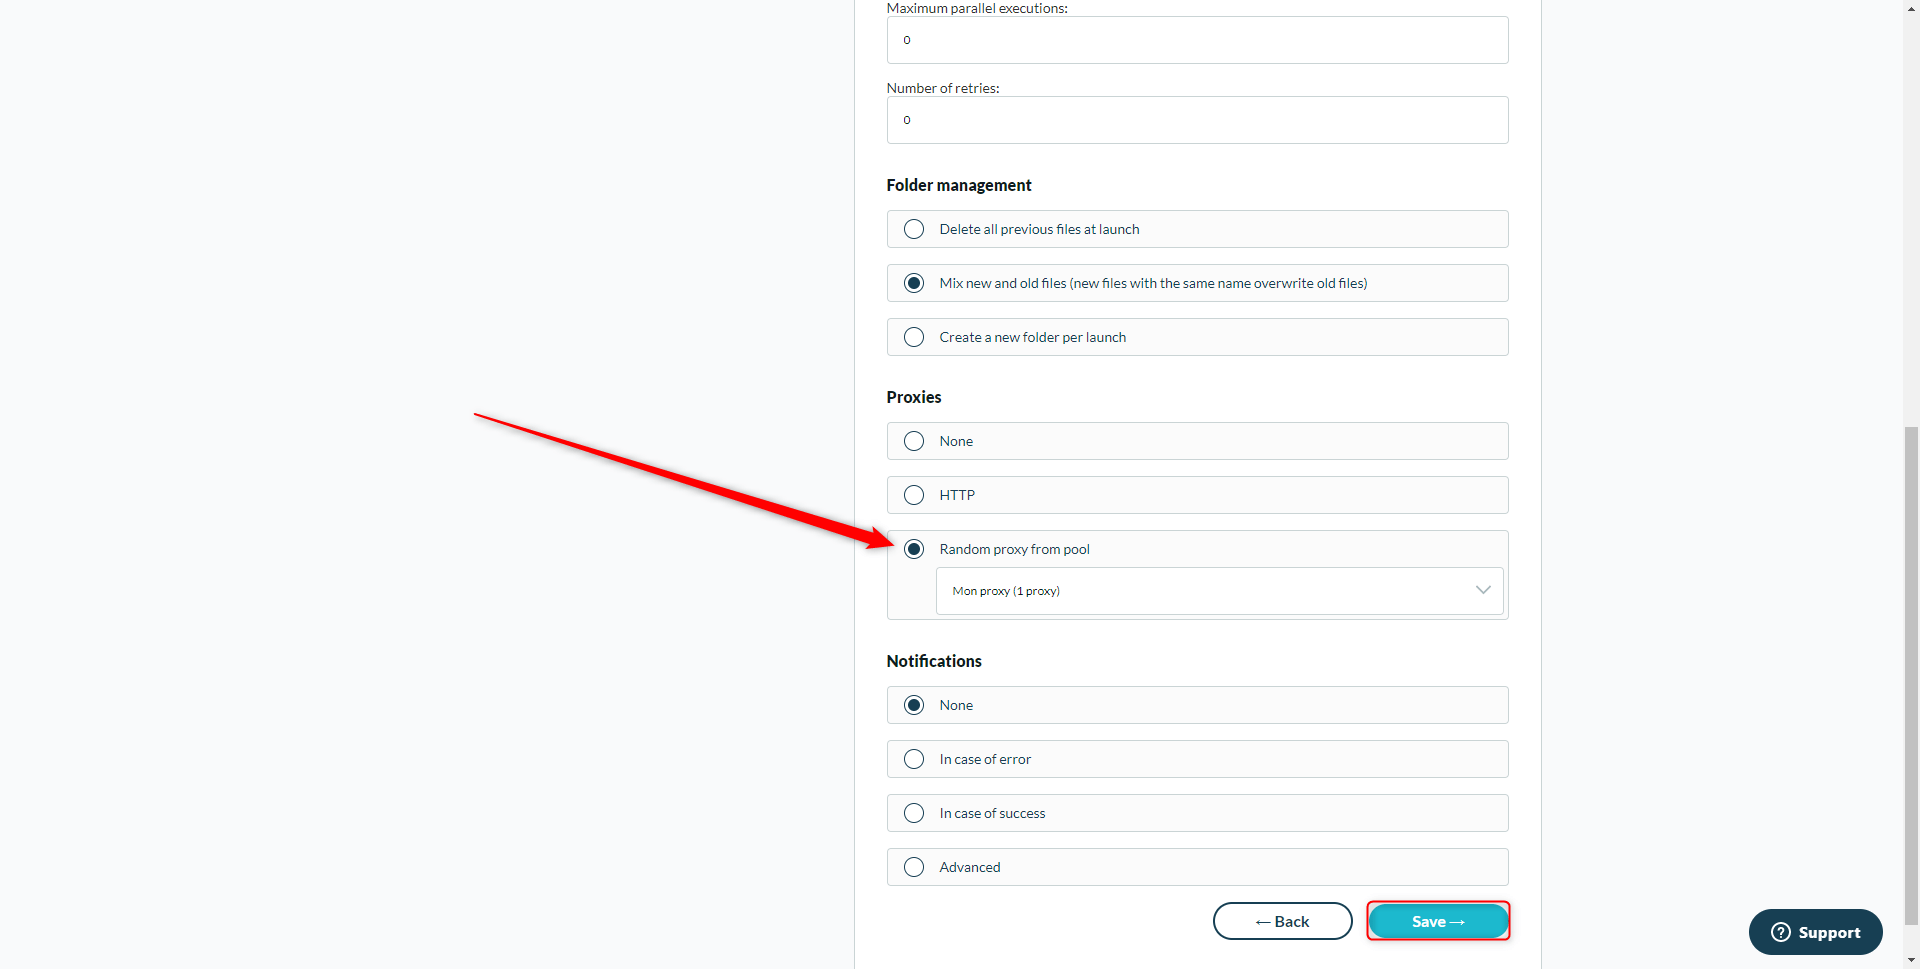
Finally, click on “Launch”. Once your file is ready, you can click on “Download CSVs” To format the data in your CSV file, follow the little GIF below:
You have just extracted all the Facebook profiles of the people in the group. The goal now: find the corresponding LinkedIn profile in order to be able to run an automated prospecting campaign
How to switch from Facebook profile to LinkedIn profile
We will be using a new “Phantom”. This is the “LinkedIn Profile URL Finder” Phantom. 
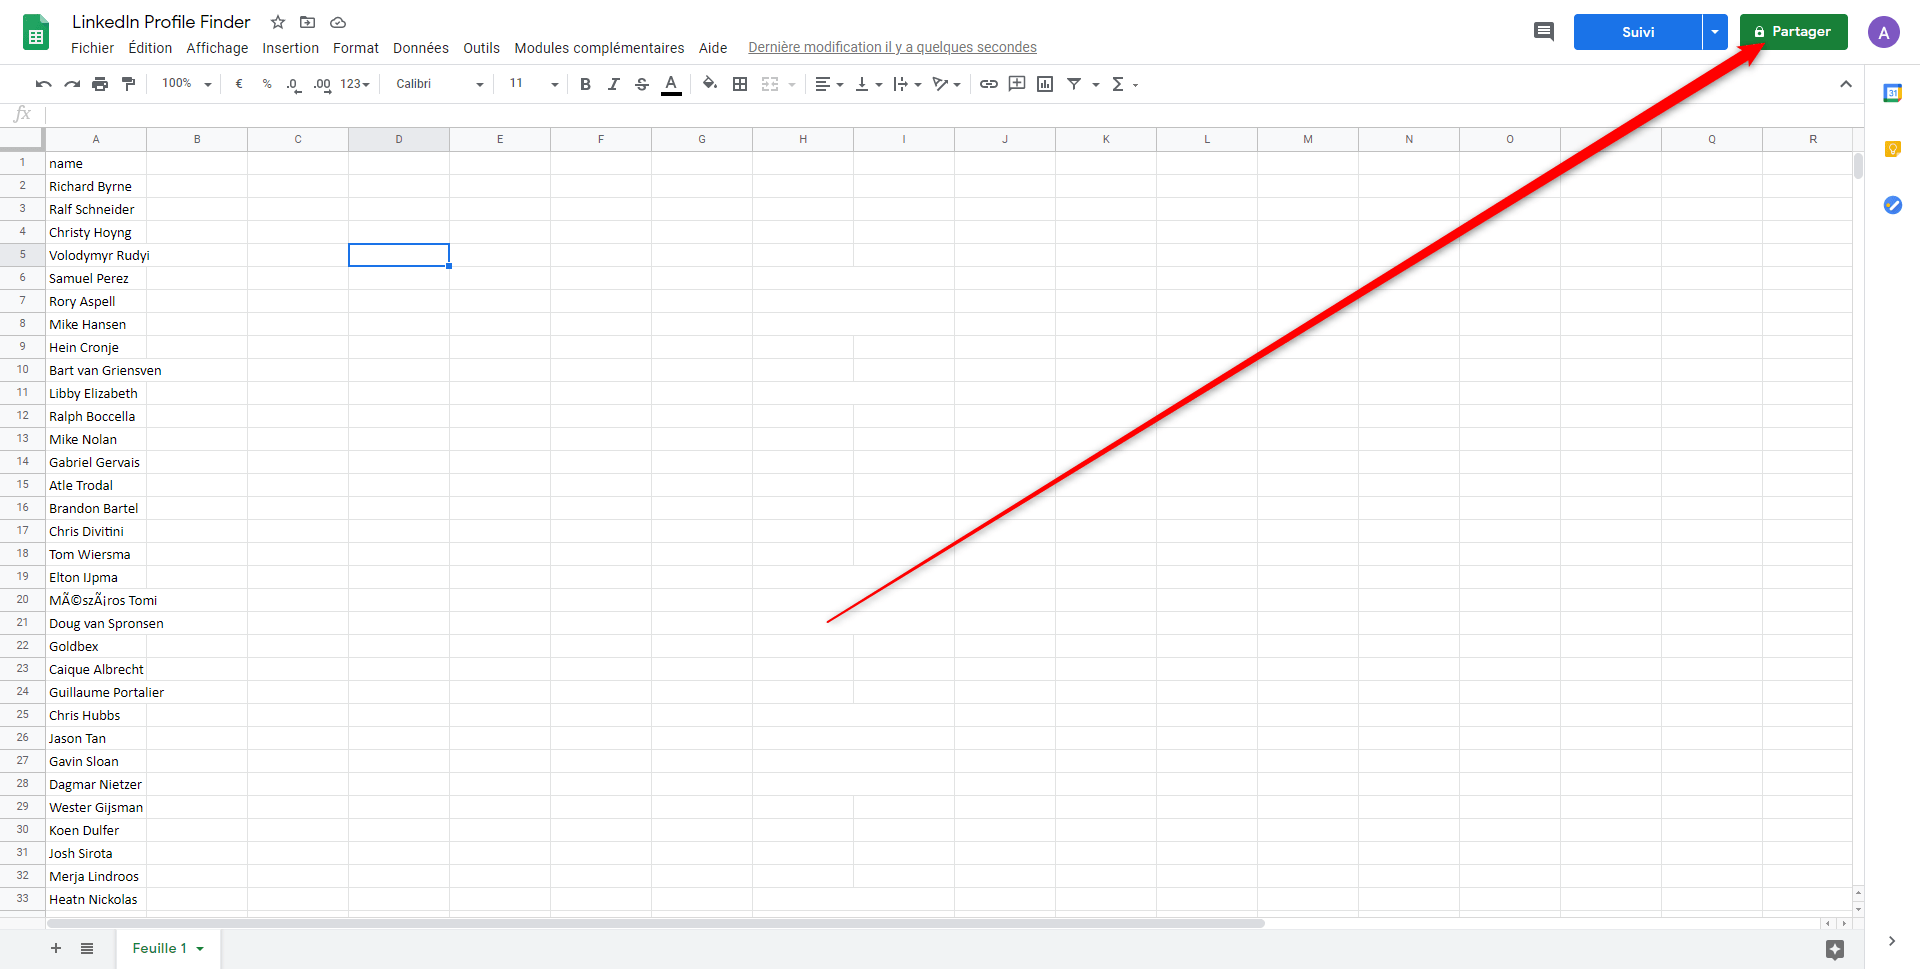
First step: save the results of the CSV previously generated in a Google Sheet
To do this, simply copy/paste the content of column B (containing the first name + last name of your prospects) from your CSV file previously processed into a Google Sheet (in column A).
Step two: set up your Phantom
Copy/paste the URL of your Google Sheet into Phantombuster. Don’t forget to make the file accessible to all linked members.
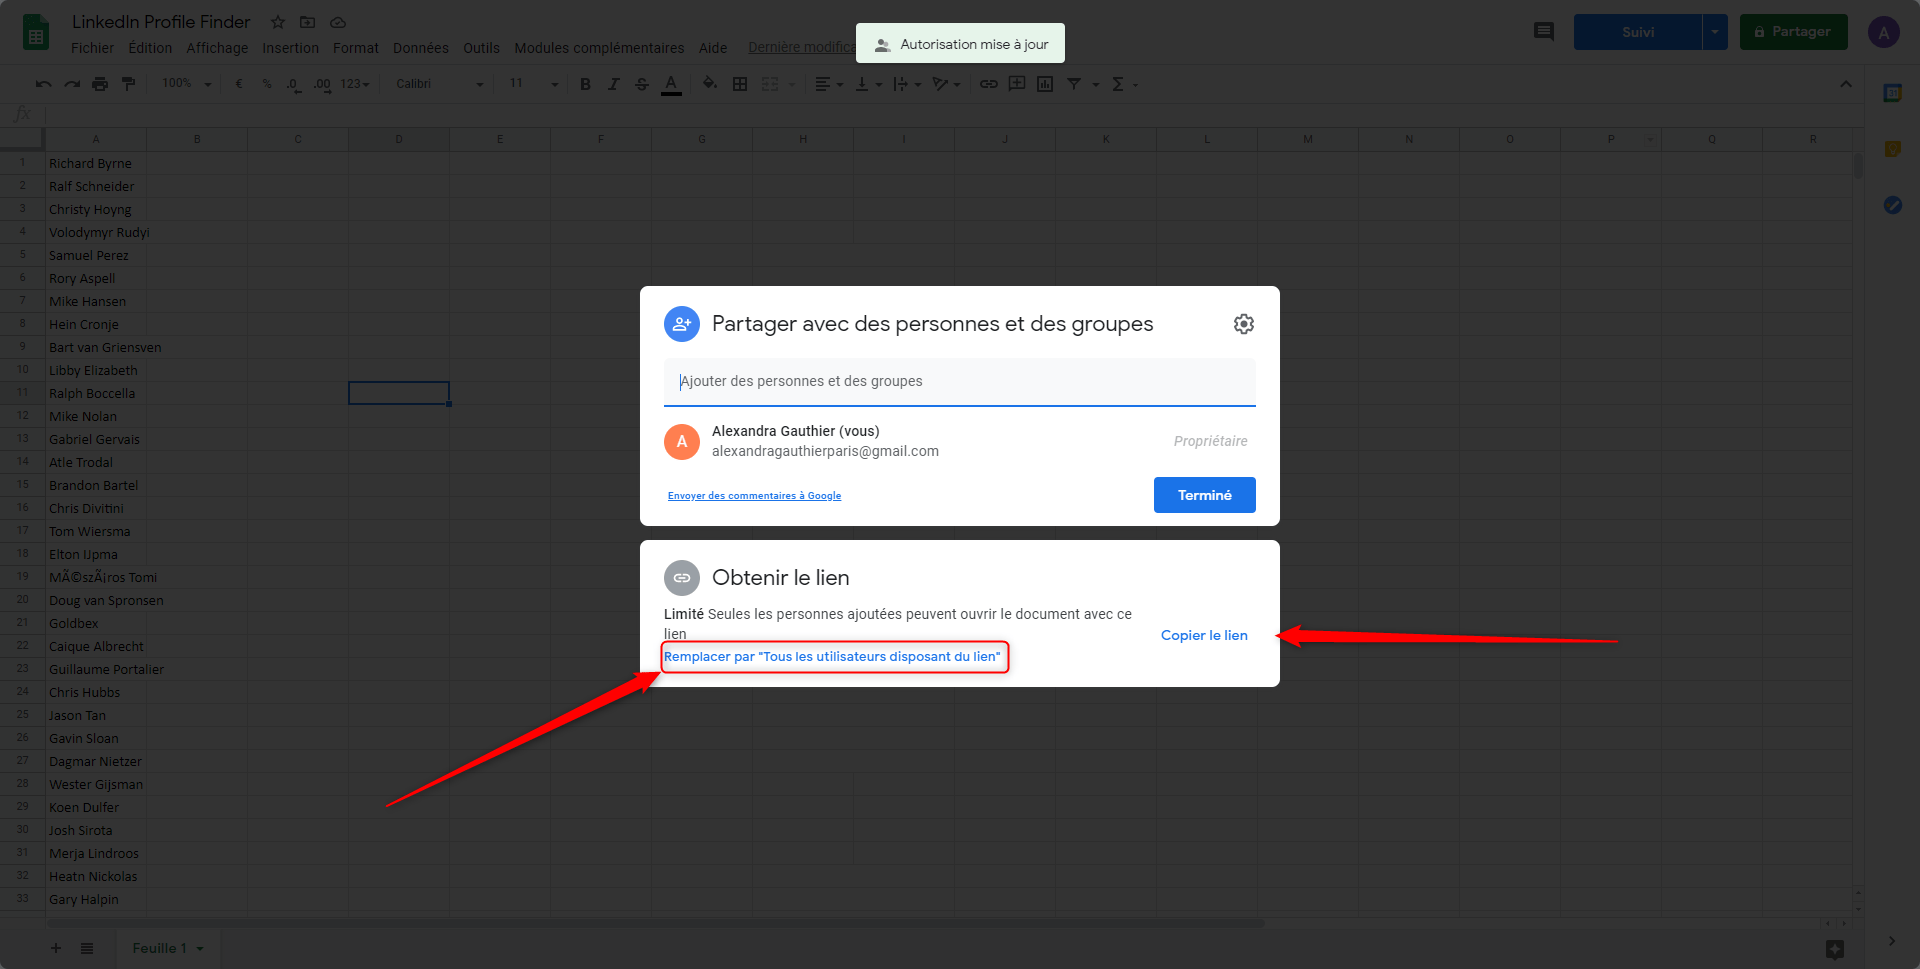
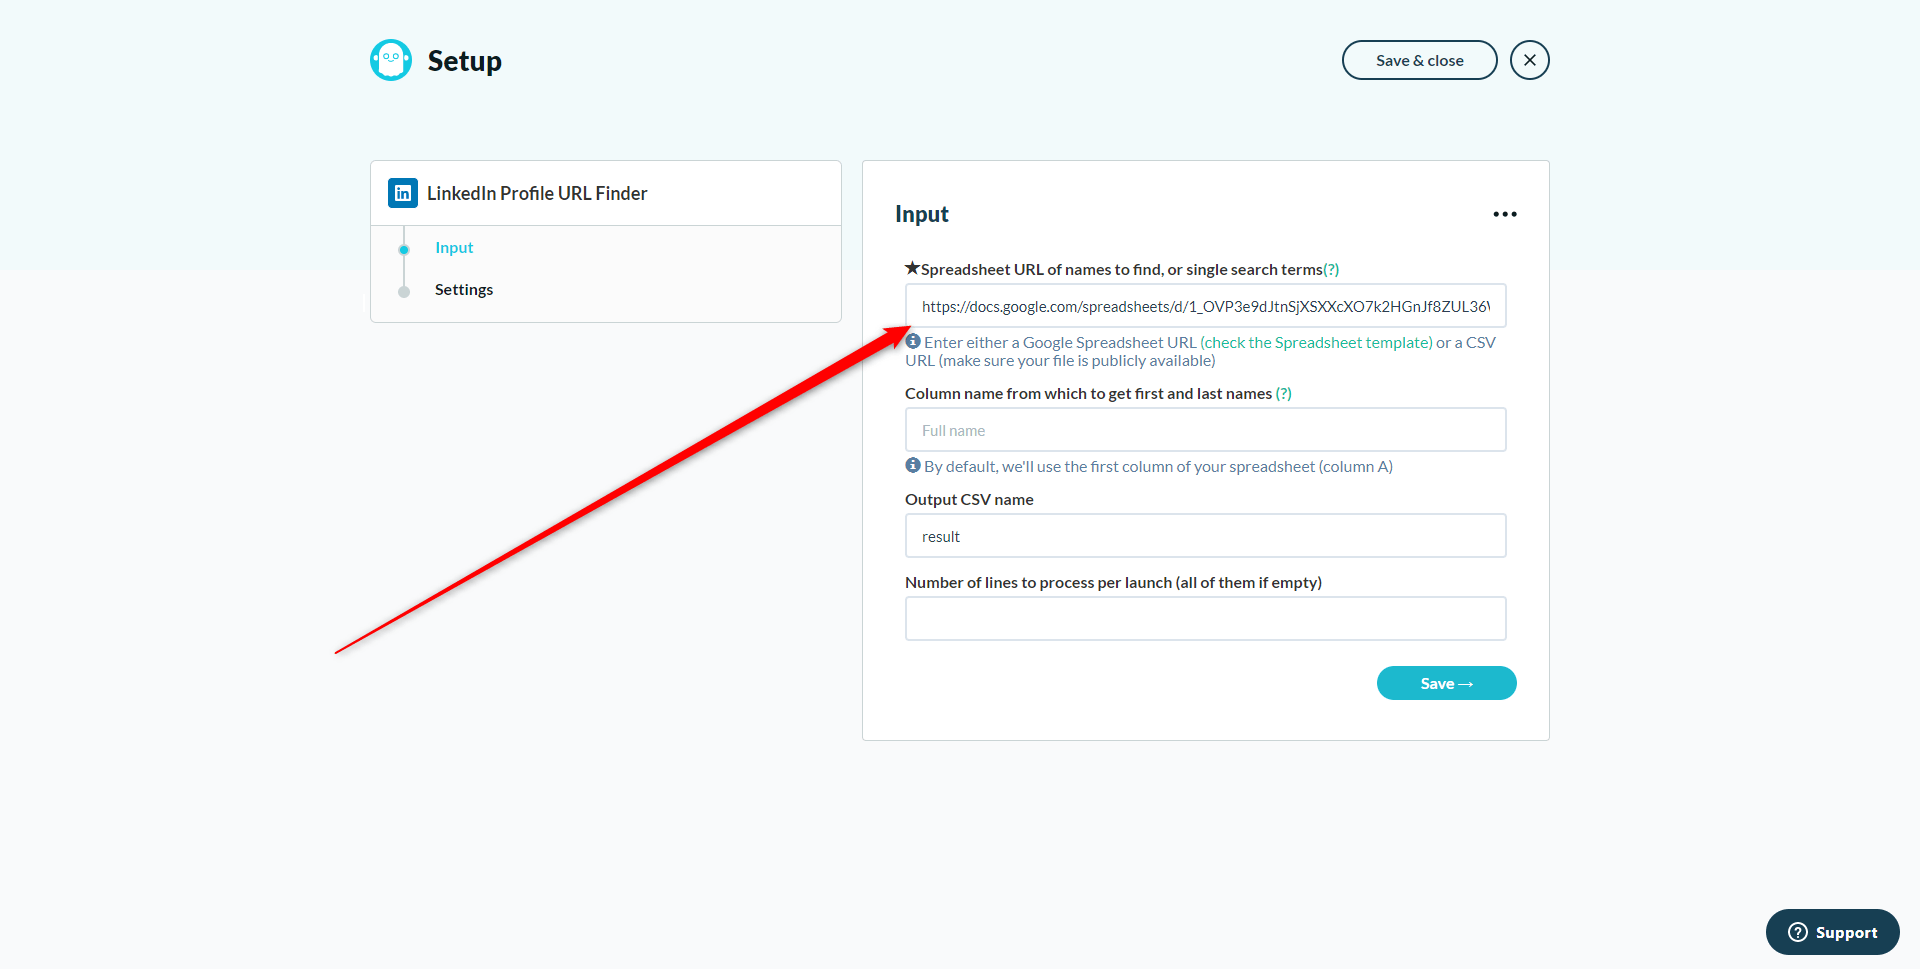
Then click on “Save”. On the next screen, click again on “Save”. Well done, your Phantom is set up, all you have to do is click on “Launch” to run it! Retrieving data will take some time. You can leave the page open and go get yourself a coffee while you wait ?
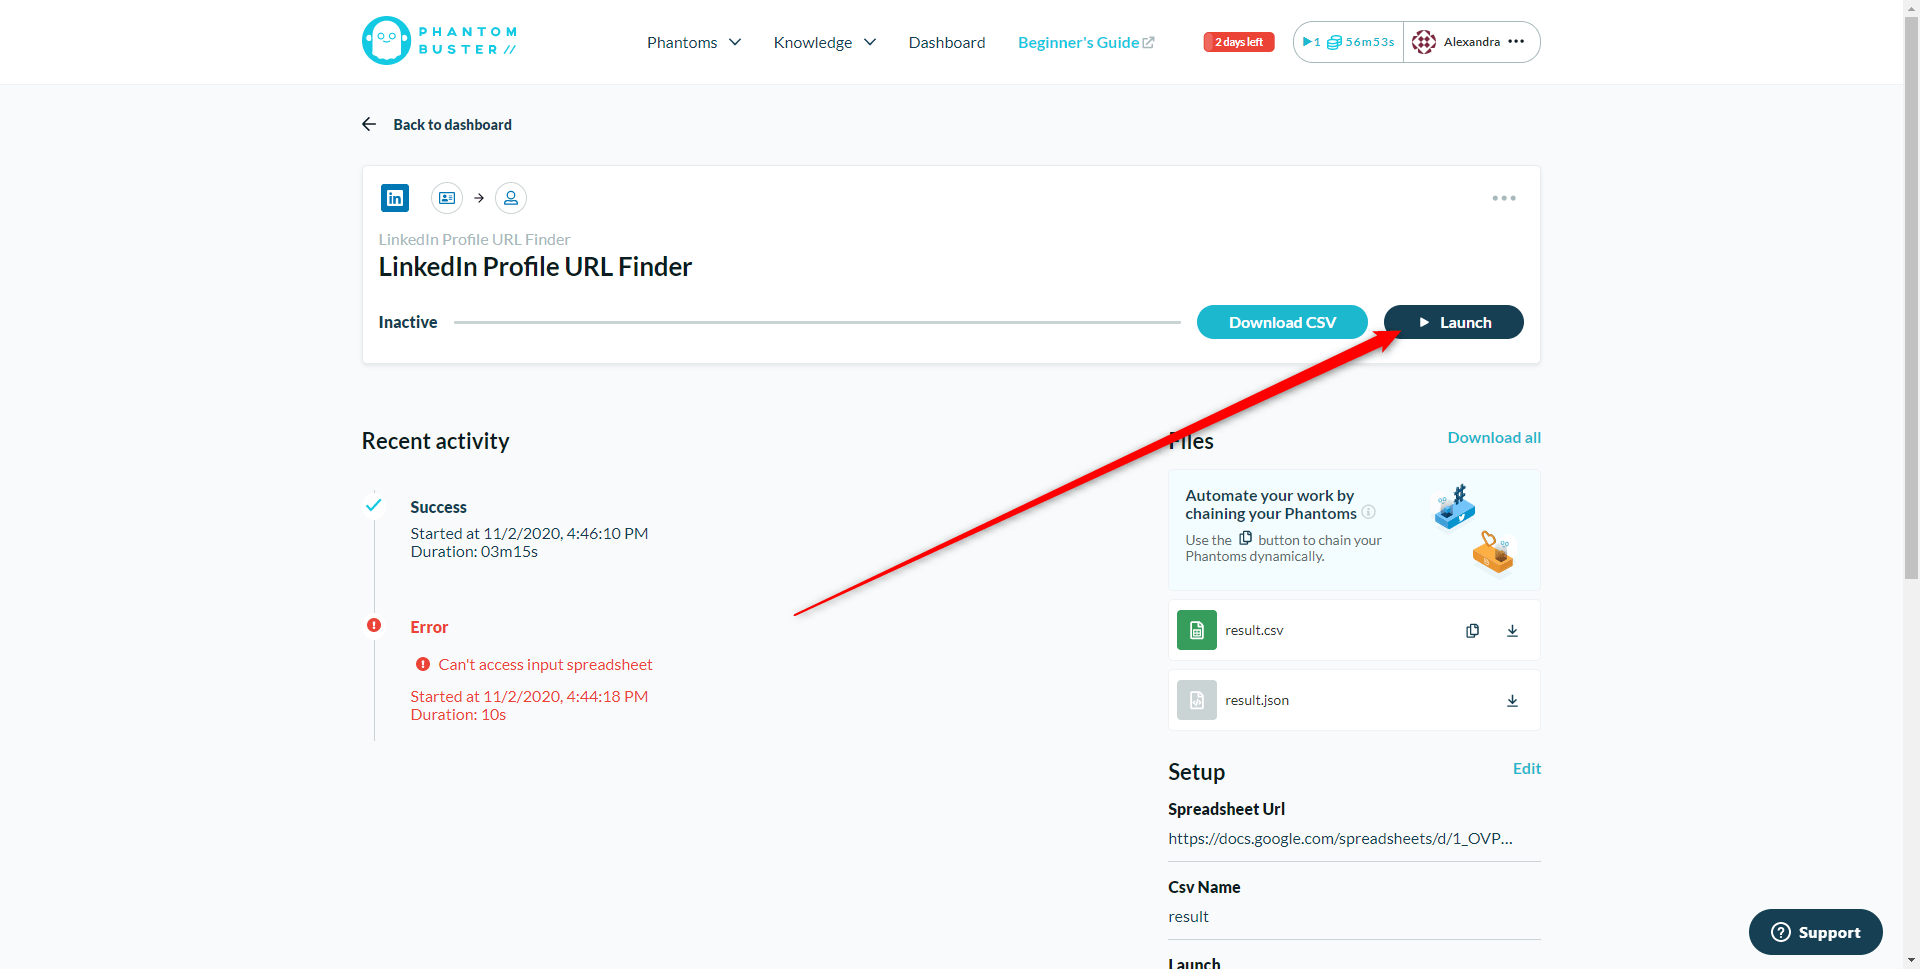
Get the file and launch the campaign on ProspectIn
Final step (finally!): Download the file and launch the campaign on ProspectIn. To do this, simply click on “Download CSV” from Phantombuster.
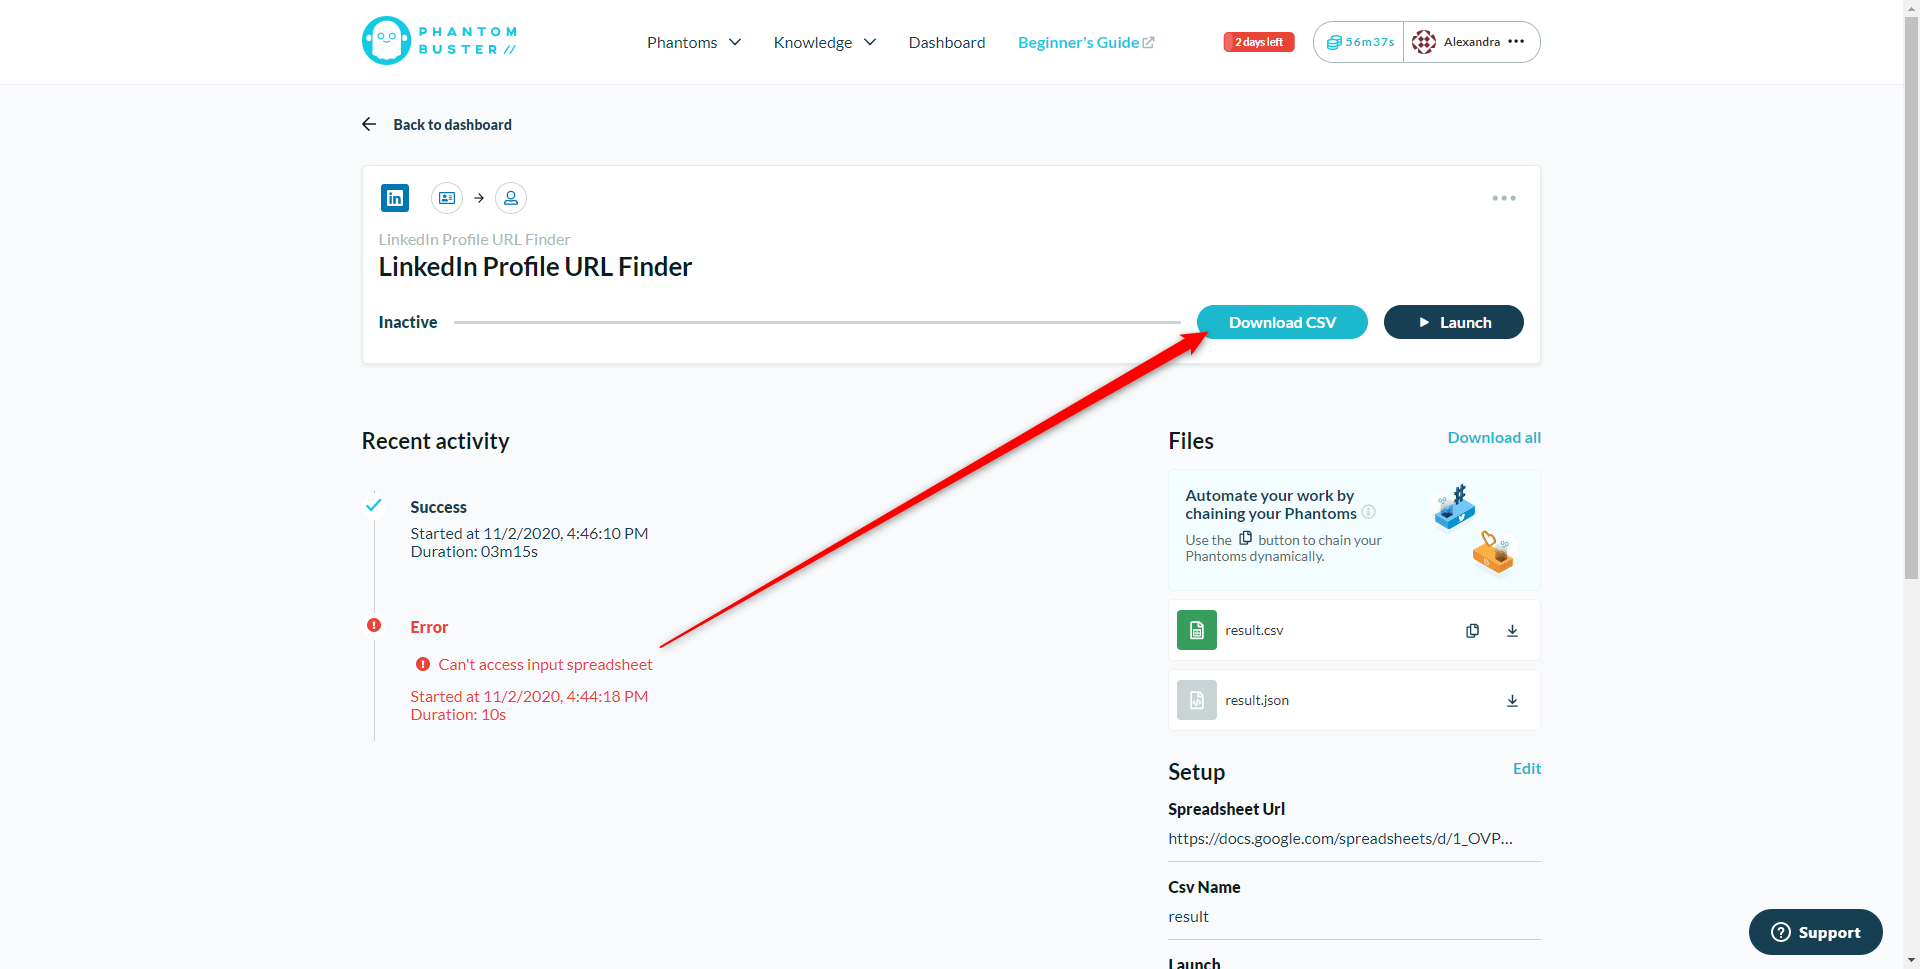
This file will contain the LinkedIn profile URLs of the profiles you just pulled from Facebook. So, you went from the Facebook profile of your prospects to the LinkedIn profile, and now you will be able to contact them? Isn’t that magic? Magic yes, but beware, PhantomBuster will not find 100% of the profiles. Also, there is a possibility that the profiles found do not correspond to the initial Facebook profile. This is what we call false positives. Rest assured, in the vast majority of cases the tool will find the right profiles, and you will be able to launch a LinkedIn prospecting campaign using ProspectIn.
Launch your campaign on ProspectIn
To launch the campaign on ProspectIn, nothing could be simpler. Start by importing the previously downloaded CSV file into a new campaign.
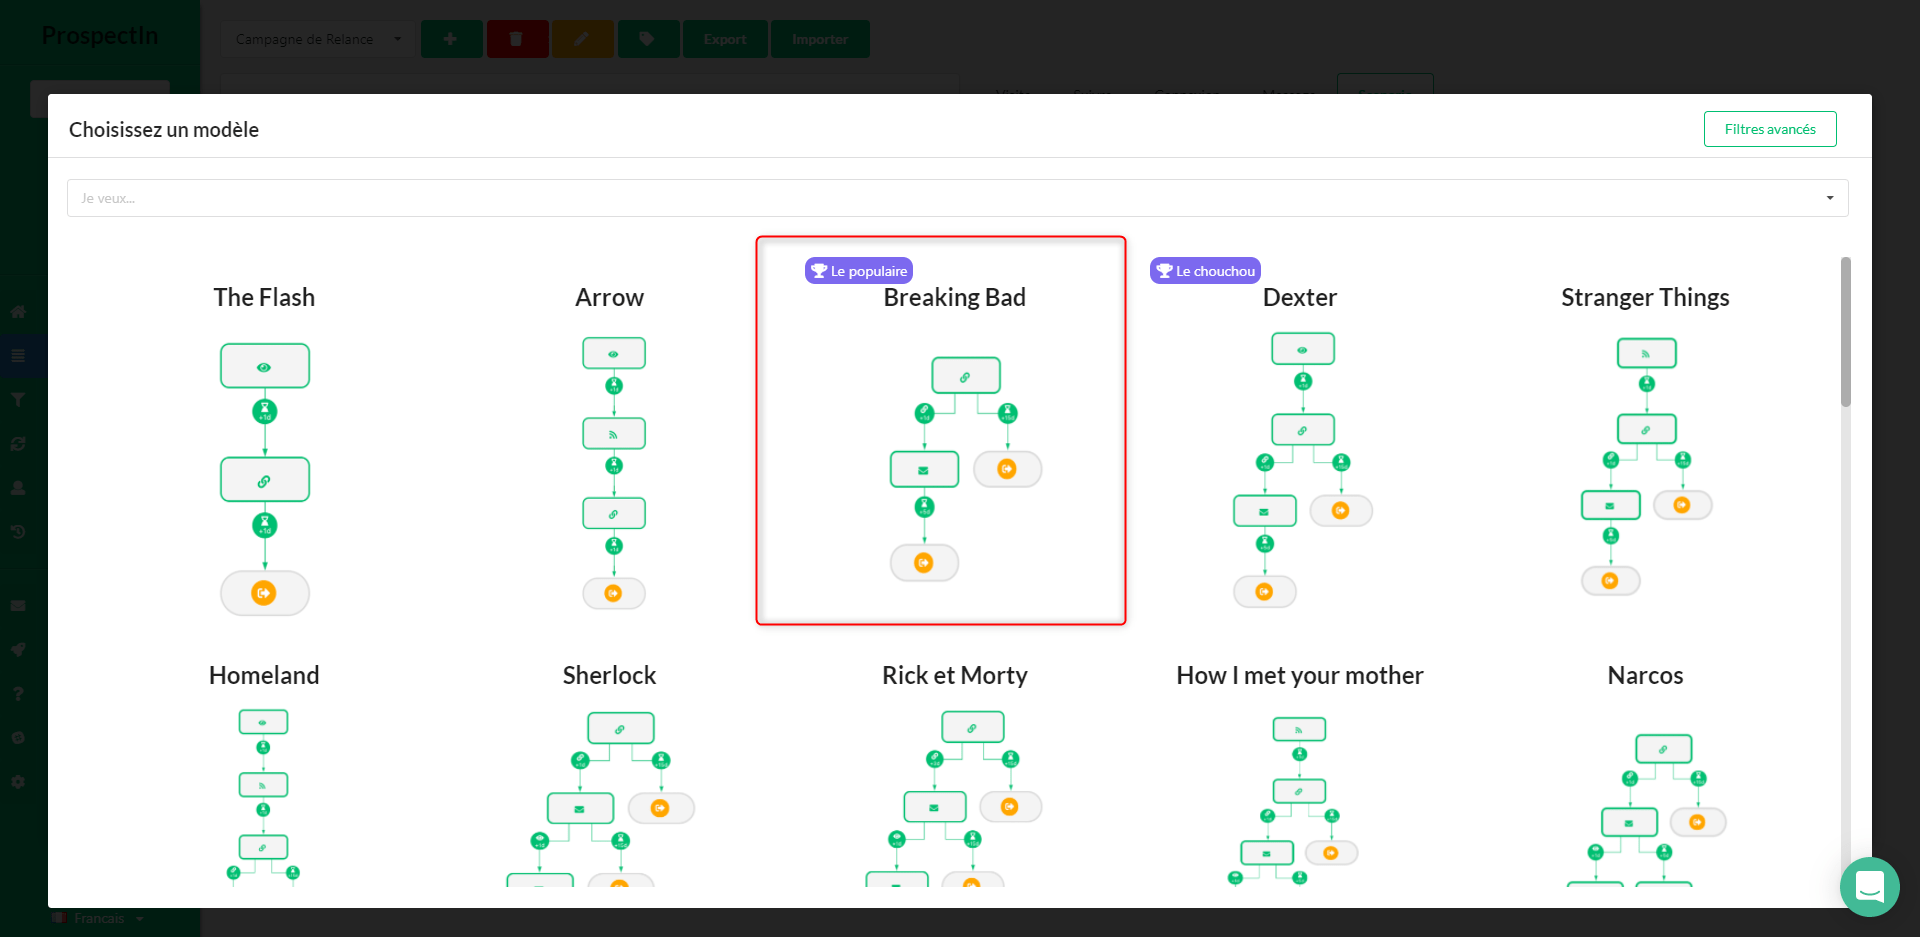
Prospects appear in the Campaign. You must now set up your prospecting Scenario. To do this, click on the “Scenario” tab, then choose a Scenario. For example, you can select the classic “connection” + “message” Scenario which can be found in the famous “Breaking Bad” scenario.
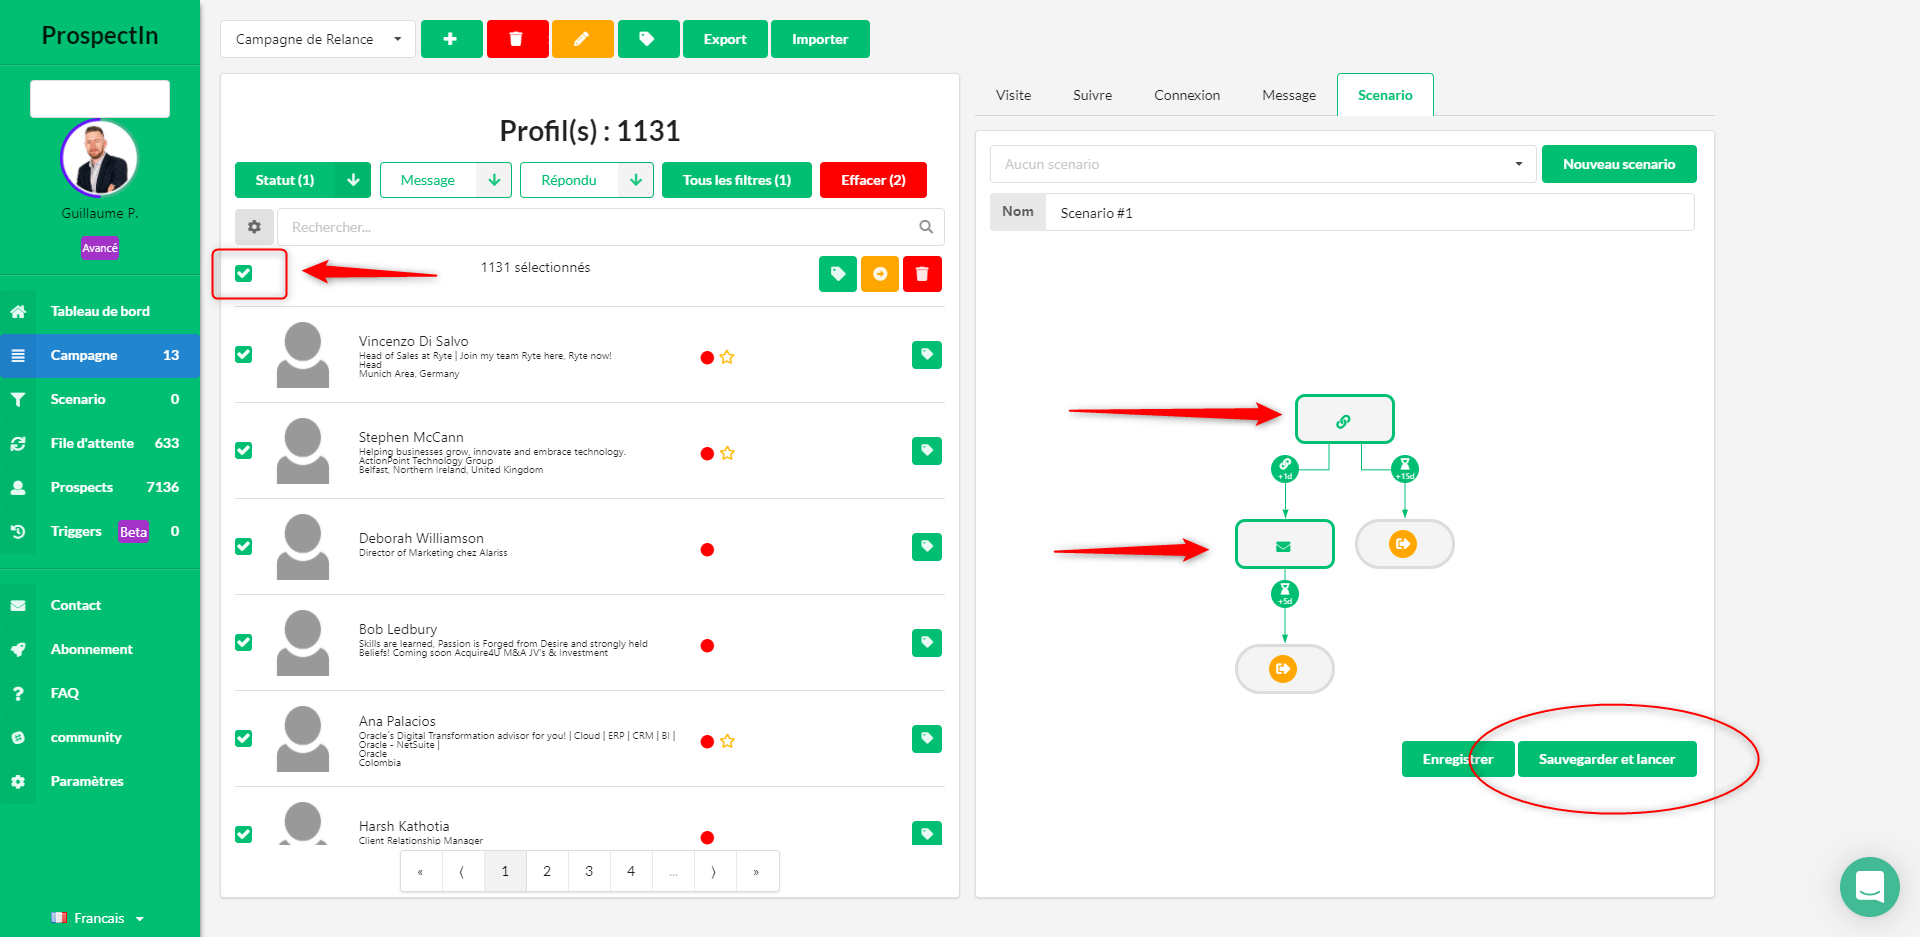
Once the scenario is selected, enter the connection note you want to send (you can also decide to send a connection request without a note by leaving the note empty and clicking save). Then enter the content of the prospecting message you are going to send. Once ready, select the prospects you want to contact, then click on “save and start”.
That’s it! ?
How to retrieve profiles that have commented a LinkedIn post?
Being able to retrieve LinkedIn profiles of people who comment on a post is very useful. Whether it’s for one of your posts where you promised content to people who commented, or you simply want to personalize your prospecting strategy by retrieving a list of the people who commented on someone else’s post. I’m going to show you 3 ways to retrieve the profiles of people who commented on a LinkedIn post.
1. ProspectIn’s Triggers feature
This technique is very useful if the LinkedIn post has just been published. Keep in mind that it will not allow you to retrieve profiles of people who commented on the post before you set it up. In other words, it is not retroactive. However, it is an ideal solution for when you want to retrieve the profiles of people who comment on your LinkedIn post asking you to send them content.
With this method the message will be automatically sent as new comments are posted. No manual action required ?. And even if a prospect comments 2 weeks later, they will receive the promised content. Here is how to set up the retrieval of profiles using this technique: 1. Create your campaign and your associated message or connection request in ProspectIn 2. Create the trigger as shown in this gif:
Tip: Depending on what you want to do, I advise you to create two triggers: one for people you are already connected with and one for people you are not. Essentially, you cannot perform the same actions for both.
Depending on whether you are connected with the individual or not, you have to send an invitation request OR send a message.
2. Retrieve people who have already commented on a LinkedIn post
There are many tools that allow you to do this, like PhantomBuster. Here, I chose a free technique that only takes a few seconds. (Gotta give thanks to Benoit Dubos for sharing this trick with me).
- Find the post in question
- Copy the link and open it in a new tab
3. Scroll until all the comments on the post have been loaded.
4. Open the browser console
5. Copy this small piece of Javascript code into the console and press “Enter” $$(« .comments-post-meta__actor-link »).forEach(a => { console.log(a.href) })
LinkedIn URLs are displayed directly in the console.
6. Copy the URLs and paste them into an Excel workbook.
7. Separate the contents with a “Space” separator.
You will get a list of LinkedIn URLs, ready to import into any tool. 8. (Optional) Save your file in CSV and import it into ProspectIn
3. Retrieve a list of people who liked a LinkedIn post
Yes, getting details of people who liked a post is not exactly the same as getting a list of people who commented on a LinkedIn post. Nonetheless it’s still very useful to get one’s hand on this information. So, now for the how: Similar to previous process, there are different methods to do achieve this. Here I’m going to show you the simplest one, with the use of ProspectIn.
Are there other ways to retrieve a list of profiles that have commented on a LinkedIn post? Absolutely, with tools like PhantomBuster. I’ve simply presented the most straightforward and cost-effective way. Is there a limit to the number of profiles that I can export, or is there a risk? To my knowledge, no. It’s just a matter of recovering profile’s URL’s, so there is no limit and no risk for your LinkedIn account.
Did you enjoy our little magic tricks ? ?
Are you ready to embark on this final stage of your LinkedIn invasion?
You have all the keys in hand to boost your prospecting to the maximum. We know, that knowledge weighs a lot… you’ll be spraining your wrists soon.
That’s why we invite you to share it with your team members, so you can act on all fronts and duplicate your strengths. ?
In this final step, you’ll be told how to go on a full-scale network assault.
[maxbutton id=”7″ ] [maxbutton id=”12″ ]