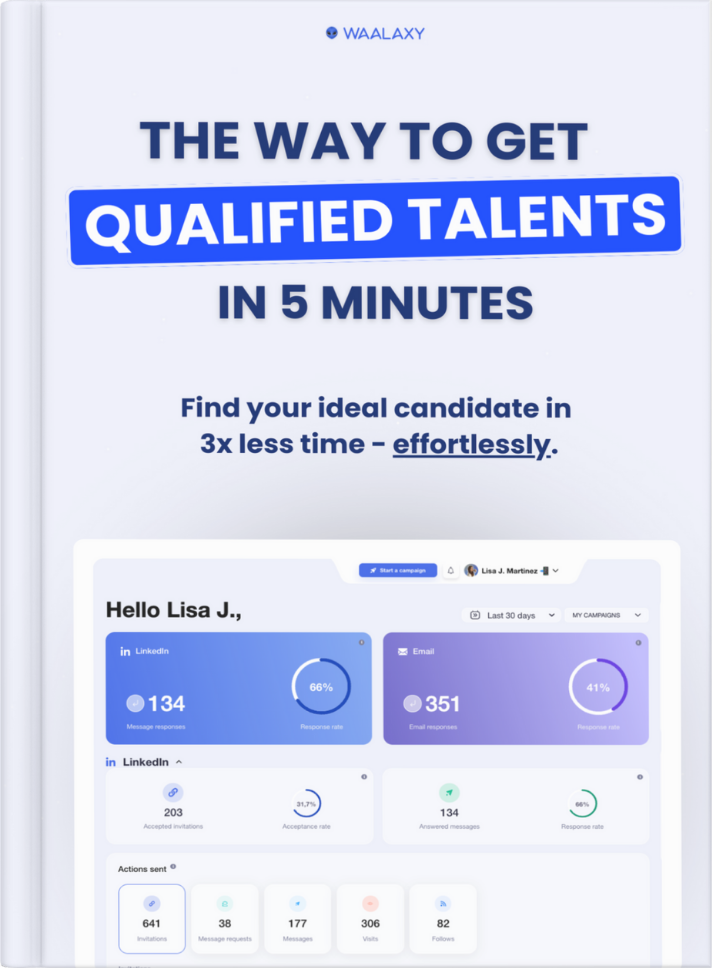
- Finding a prospect’s LinkedIn with their email
- Step 0 – Prerequisites
- Step 1 – Upload your Google Sheet into Integromat
- Step 2 – Connect the data with APIs
- Step 3 – Get a new Google Sheet with the enriched data
- Step 4 – Add the new Google Sheet
- Step 5 – Download your Google Sheet and upload it to Waalaxy
- Step 6 – Prospect for new customers
- Find a prospect’s LinkedIn with a professional email
- Step 2 Bis – Get the LinkedIn Url of the pro prospects
- Crunchbase = THE database for start-ups
- Step 0 – Prerequisites
- Step 1 – Start your search
- Step 2 – Change the view
- Step 3 – It’s a tough code
- Step 4 – Recover the data
- Step 5 – Last piece of code
- Step 6 – Collect the data and gloat
- Step 7 – Use Waalaxy to contact them
- Conclusion of the article
In this Live + Tutorial summary, we’re going to explain how to take your marketing strategy to the next level to prospect for new customers ultra-efficiently. 🔥 Digital prospecting, it may seem complex, especially with APIs, but promise the tuto is ultra-easy to reproduce, just copy and paste. 🤓 At Waalaxy, our strength has been to automatically retrieve the LinkedIn URLs of people who signed up with us, and thus be able to retarget them in campaigns, to keep the link throughout the conversion tunnel. For example, if they’ve downloaded our tool but haven’t used it yet, we can send them a personalized message on LinkedIn saying:
Hey, Hi Kevin, I see you haven’t used Waalaxy since you downloaded the extension, do you need help getting started?
In this way, we were able to boost our sales very quickly and create a real sense of follow-through. In this live, we’ll take it a step further. Thanks to two prospecting experts.

Kevin Dufraisse, founder of @formation-growth-hacking.fr and Toinon Georget, founder of @Waalaxy will explain and show you :
- 1️⃣ How to get even more info about your prospects with Datgma + Integromat
- 2️⃣ How to prospect new customers with the best possible approach by filtering the email base.
- ⚠️ Bonus: How to use Crunchbase, the startup database.
Finding a prospect’s LinkedIn with their email
While Waalaxy helps to find someone’s email through their LinkedIn account, Integromat helps to find a prospect’s LinkedIn through their email. It’s an API. It’s a complicated word that simply means”application software integration.” Basically, it’s a tool that helps software communicate with each other. Let’s take a look together at how to find, qualify, and contact your prospects across different channels. 💥
Find a prospect’s LinkedIn through a personal email
In this first example, we’re going to go find the LinkedIn URL of prospects whose personal email address we only have. 🤙
Step 0 – Prerequisites
In order to perform this Tutorial in the best possible conditions, you need:
- Filter your email base and divide them into business and personal emails. All emails that end with @gmail, @yahoo… are considered personal emails and emails with @companyname are considered pro
- On a Google Sheet, you must isolate the personal email addresses and insert them afterwards (make a list, one line per address).
- Integromat: This is an API, so a tool that allows you to connect several tools together to pass information.
- Visum: With this tool you can find the LinkedIn URL of anyone from an email address.
- Waalaxy: It’s a campaign automation tool + an integrated lead management CRM.
You can download the trial and/or free versions of all these tools, you don’t need to buy anything to perform this tutorial, except for Visum. (59€ monthly). So you have 2 options:
- Follow the tuto for free by following step 2Bis instead of step 2. (Option below) 👀 But as a result, you will need to have the pro email addresses of your prospects.
- Download Visum for 59€ monthly and get started for real! 🚀
Step 1 – Upload your Google Sheet into Integromat
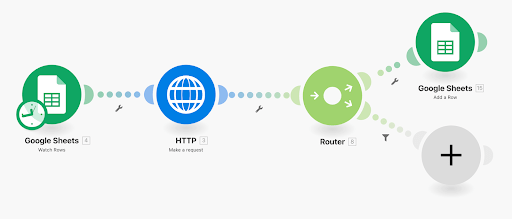
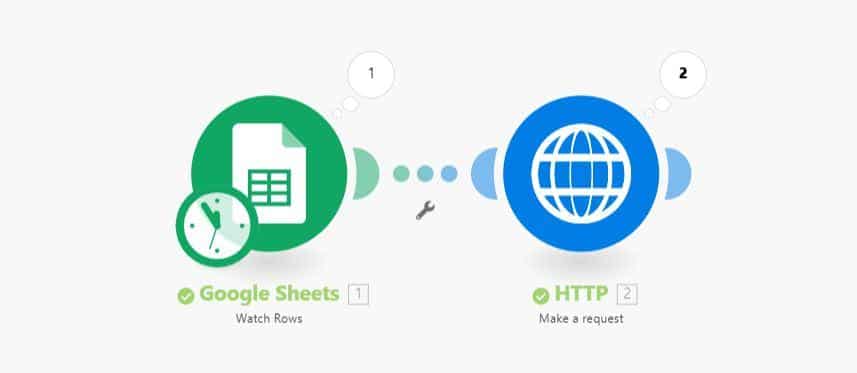
This is what Integromat looks like once you’ve created a scenario. There are hundreds of different combinations, and to start, we’re going to keep it simple. Here’s what your scenario will look like when finished:
What should be on your Google Sheet?
- Sheet 1 : simply the personal email addresses of your contacts.
- Sheet 2: The sheet should remain blank, this is where you will ask to route to send the new data.
How do I get started?
Simply type “Integromat” into your Google search bar, then sign up online. You will be asked for your email address, fill in the information and validate, then go to your mailbox to click on the identification link. Go back to Integromat and you will see a pop-up window.
Create your first scenario.
You validate. 🤙 And there you arrive at the Integromat possibilities field. You should see this appear: 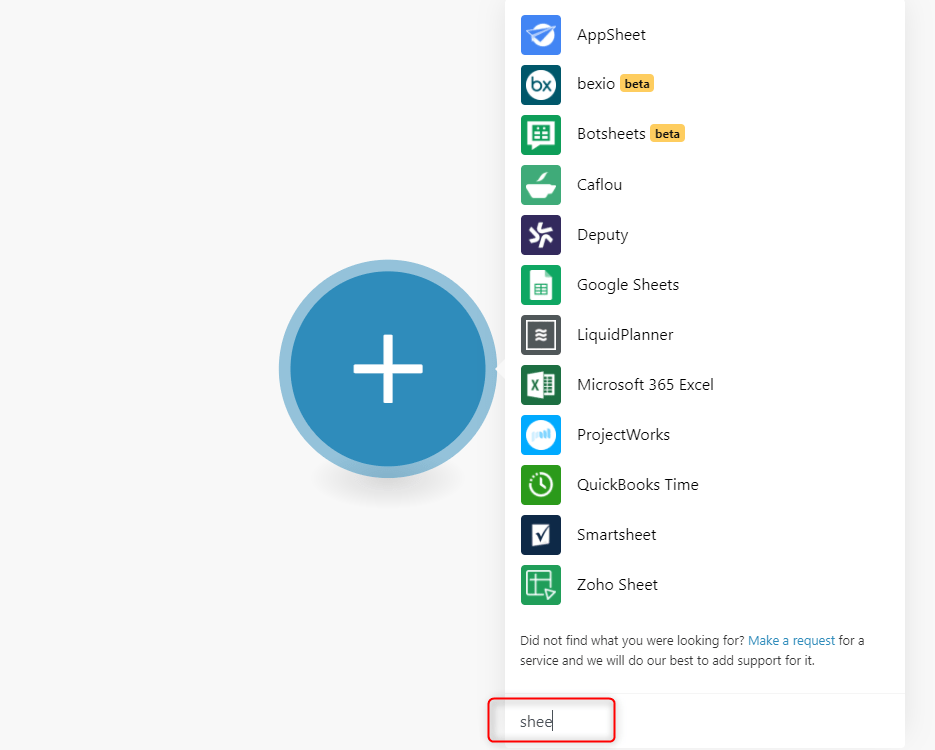
This big button is for creating your scenario, and all the tools you see to your right are the integrations you can add.
But we’re not going to go into too much technical detail, often it’s just complicated words to do simple things while looking smart. 🤓
So in the search bar at the bottom, we’re going to look for the tools we need to create the steps in our scenario. The easiest in technical terms will remain to have a Google Sheet with the personal email addresses of your future clients.
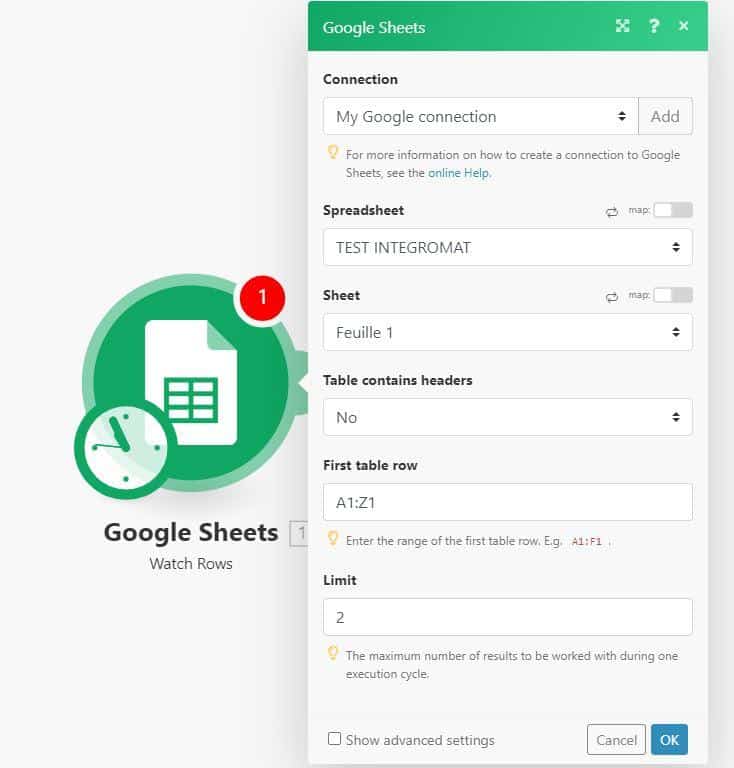
To add your Google Sheet :
- Integromat will ask you to connect your Google account, do it.
- Then you will have a list of all your spreadsheets,
- Select the one that matches,
- Choose the sheet.
- It will ask you “where to start”, click on “All”,
- Does your sheet contain a header? If yes, identify it, it will avoid bugs.
Aparté [But this is not the most convenient either. With this tool you can start from any CRM like Hubspot] Before you move on to step 2, your scenario should look like this:
Step 2 – Connect the data with APIs
On our scenario, we’ll add a second branch.
- In the search bar, look for “HTTP”.
- Click on the query “associate an API”.
- You will be asked which API you want to associate, it is Visum.
- Click on it to see the fields to modify.
EMAIL@DUPROSPECT.COM&cookie=VOIRTUTOVISUM
- Here, apply this snippet of code 👆 then replace “email” with the first variable in your Google Sheet. (In green on this image, this is the modification to make 👇)
The tool will automatically propose an email address, which will be your first variable, click on it and make sure it replaces: EMAIL@DUPROSPECT.COM in your URL.
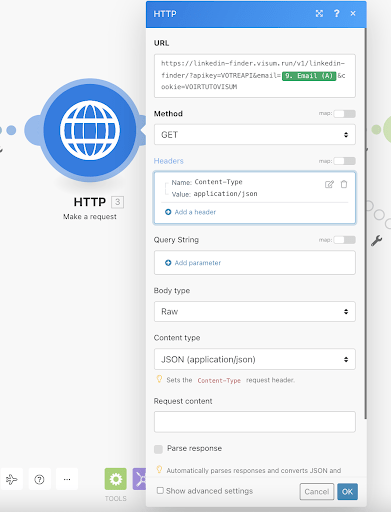
Then, in Headers, add these variables manually:
Content-Type
application/json
- Then click on “PARSE RESPONSE.”
Step 2 is finished. 🥳 Before moving on to step 3, your scenario should look like this: 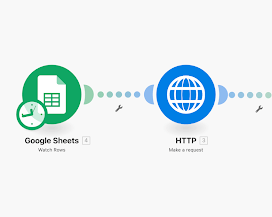
Step 3 – Get a new Google Sheet with the enriched data
We’ll add a third branch to our tree. 🌴
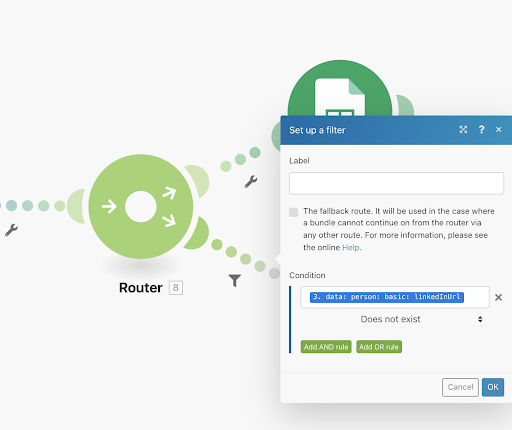
You click on the plus again, and this time you search for “Router”. The Router will run the script and pass the information to the new Google Sheet.
Next, you add a filter, this is a code voucher that will pass the information. Copy this one:
3. data: person: basic: LinkedInUrl
Step 4 – Add the new Google Sheet
This is the fourth and final branch of the tree. 🌳
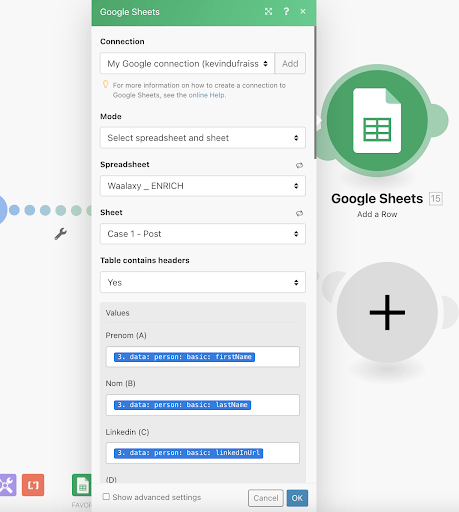
You need to add the same Google sheet as at the beginning, but this time on the empty sheet (sheet 2), which will be automatically filled by the information found by the digital tool.
Click on it to make changes. Here we will indicate to the document what information we want. To do this, we will fill in the “Values”. Fill them in this way:
First name (A)
3. data: person: basic: firstName
Name (B)
3. data: person: basic: lastName
LinkedIn (C)
3. data: person: basic: LinkedInUrl
Then, we will have to launch the machine. 🚂 Click on the “RUN ONCE” button at the bottom right.

Because errors happen…
If you ever see that there is an error, (you will have an error message in red).
- Check all the code snippets you pasted, check if there is a space, a quote, a period, that came in where it was not invited.
- Check if there are any layout problems on your Google Sheet (remember that there should only be email addresses).
- Take a look at what integromat tells you:
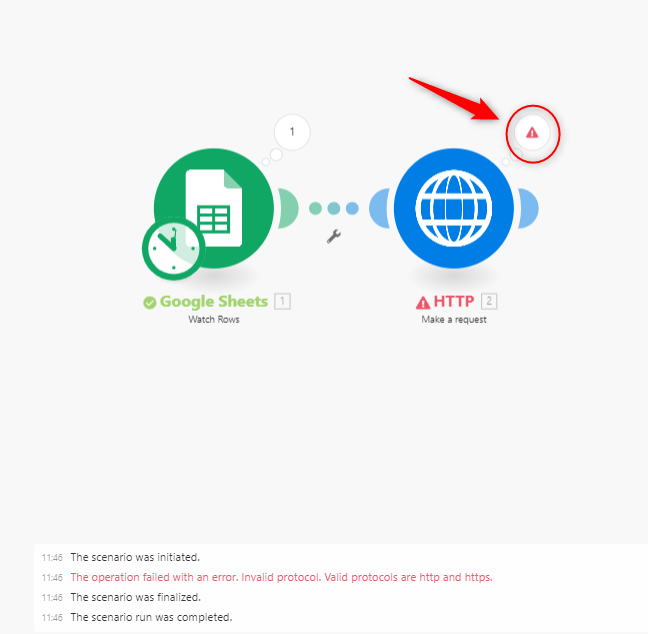
Once you have made your changes, click “Run once” again until you get only valid steps. ✅
Step 5 – Download your Google Sheet and upload it to Waalaxy
Once you have your document ready, simply download Waalaxy, then go directly to : “access the application”.
Go to the leads tab and click on : “import”, on the right side of the screen. There you have several options, it offers you to import via a CSV file. You click on : “browse”, and you download the file. Your file must contain ONLY the URLs of the Linkedin profiles (2500 max).
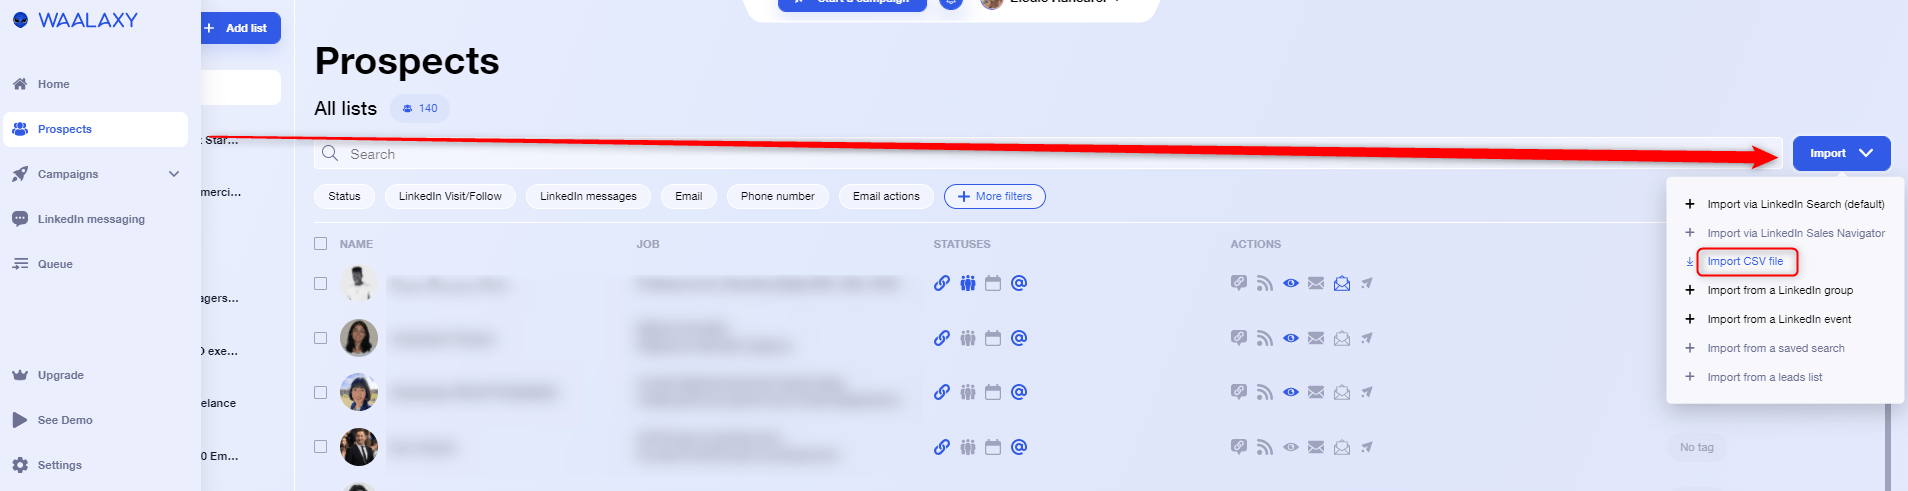
So you can “clean your file” by deleting the email addresses. Waalaxy will automatically find your prospect’s email, if not, you can add it.
Step 6 – Prospect for new customers
Now you have easily retrieved your prospects’ LinkedIn URLs thanks to their email addresses, you can now create a prospecting campaign.
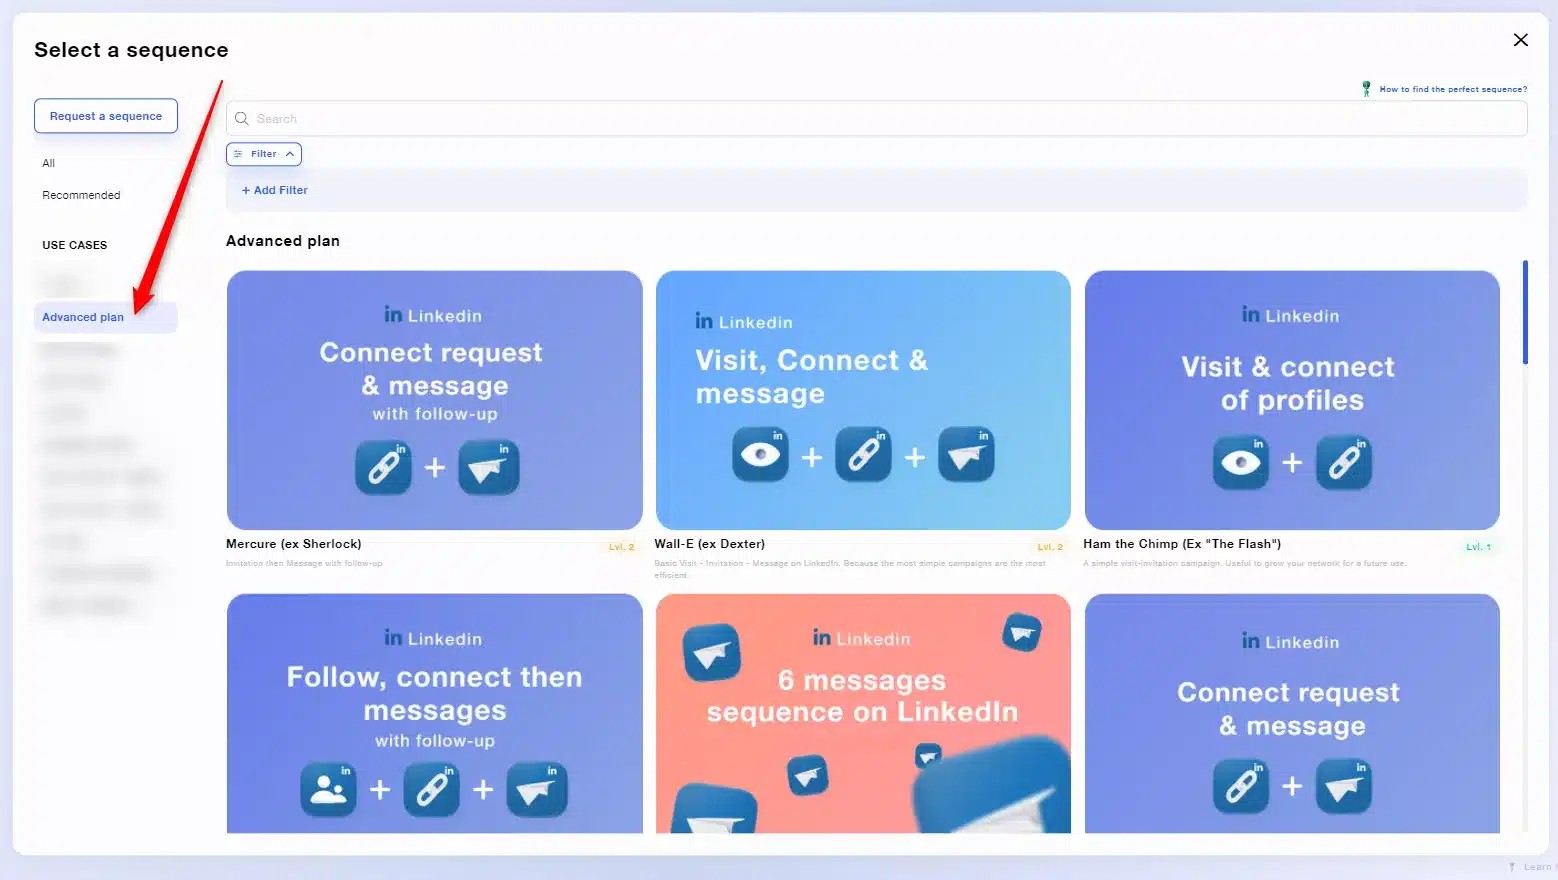
- Click on campaign > create a campaign.
- Choose the sequence that corresponds to your strategy,
- Validate and click on “add leads”,
- There, choose the list you just uploaded in your CRM,
- Write your custom message or messages, and launch. 🚀
 There is a freemium version of Waalaxy with which you can send up to 100 automated LinkedIn messages to your targets, per week! And there you have it, you know everything, it wasn’t that hard right? 🥳
Find a prospect’s LinkedIn with a professional email
To find your prospect’s LinkedIn with a pro email address, you can follow the same steps, we’re just going to change the tool. Instead of using Visum, we’ll start from Datagma.
The scenario configuration will remain the same.

Step 2 Bis – Get the LinkedIn Url of the pro prospects
So, you follow the 6 steps described above, but change step 2 to this one.
Datagma: This is a tool that enriches and qualifies your prospect database, especially with the name of the company they work for.
- You download Datagma the same way you downloaded Visum.
You can register on Datagma for free, the tool will ask you why you are there. 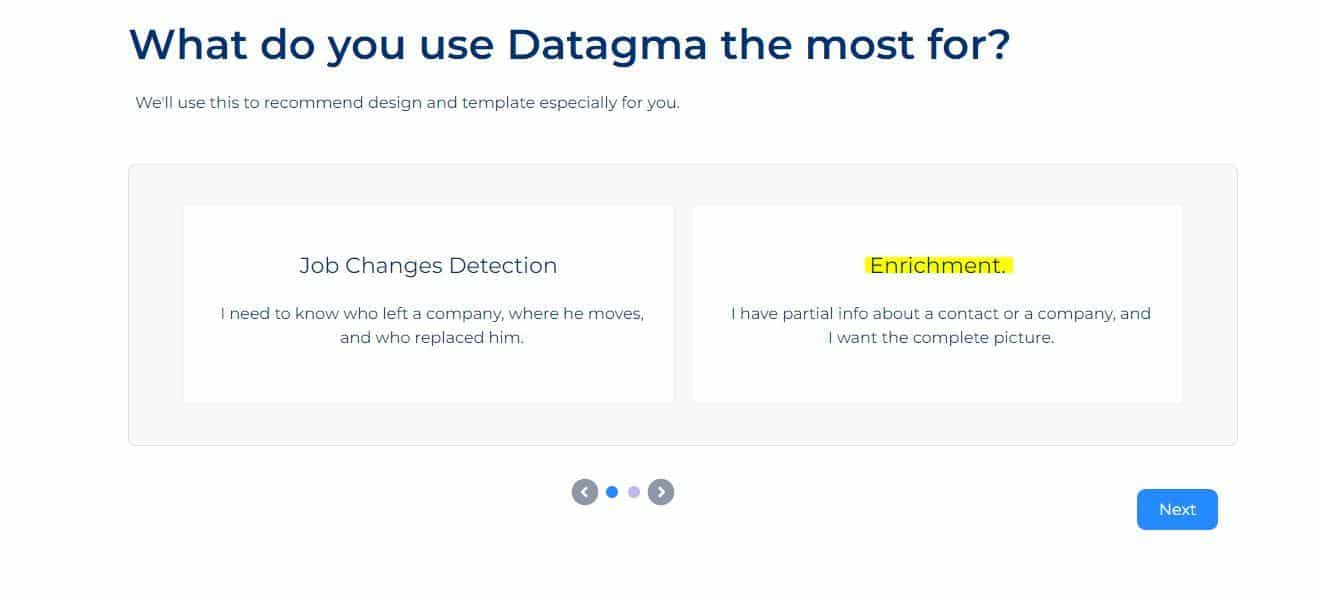
We are there to enrich the information about a prospect.
- Then you click on API, in datagma, following the questions.
- You add an HTTP tab to your scenario.
- There you connect Datagma, and get the API key that the tool will generate.
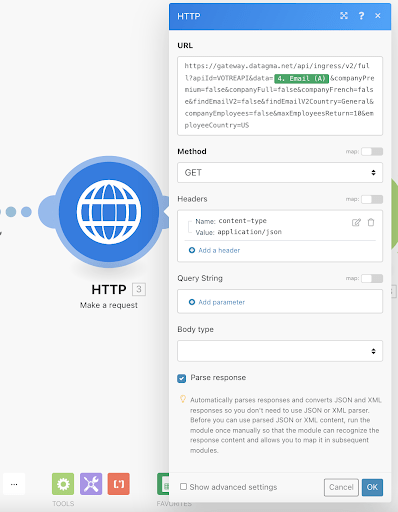
- Then, you go back to Integromat and you copy this piece of code in “URL”:
[Add your API key here]&data=[click on the email address suggested]&companyPremium=false&companyFull=false&companyFrench=false&findEmailV2=false&findEmailV2Country=General&companyEmployees=false&maxEmployeesReturn=10&employeeCountry=US
- Remember to change the API key on the code snippet and delete what I put in green square brackets.
- Then, click on the green email address that the tool offers you (which corresponds to the first address of your Google Sheet). And replace it at the place indicated between brackets.
- Then click on “SUBMIT reply”.
Then repeat step 3 just above to step 6. 🤙
That’s it, this tuto and all these variations are finished. Now let’s move on to another little secret, a nice bonus like we love them. 🎁
Crunchbase = THE database for start-ups
To put it simply, Crunshbase is a platform to find business information about companies (private or public).
Step 0 – Prerequisites
To complete this tuto:
- You need to create an account and start a “pro” version trial, directly on Crunchbase
- Right away: Go to your settings and cancel the free trial.
You are allowed one week trial period, you need to fill in your bank details, but you can subscribe, then delete right away. The information you will find on Crunchbase is about investments and financing, founders, management positions, news and trends…. In short, a lot of very interesting data! This info won’t necessarily be useful to everyone, but if you’re into tech, digital, AI, marketing… Then you’ll like it! For example, :
My goal is to go after the sales people of companies that are raising money, because they are fond of new things and are looking to find new prospects, and I can “pitch” them our solution.
Toinon
Step 1 – Start your search
- Go to Crunchbase, create an account.
- Go to “Seach”, then “Companies”.
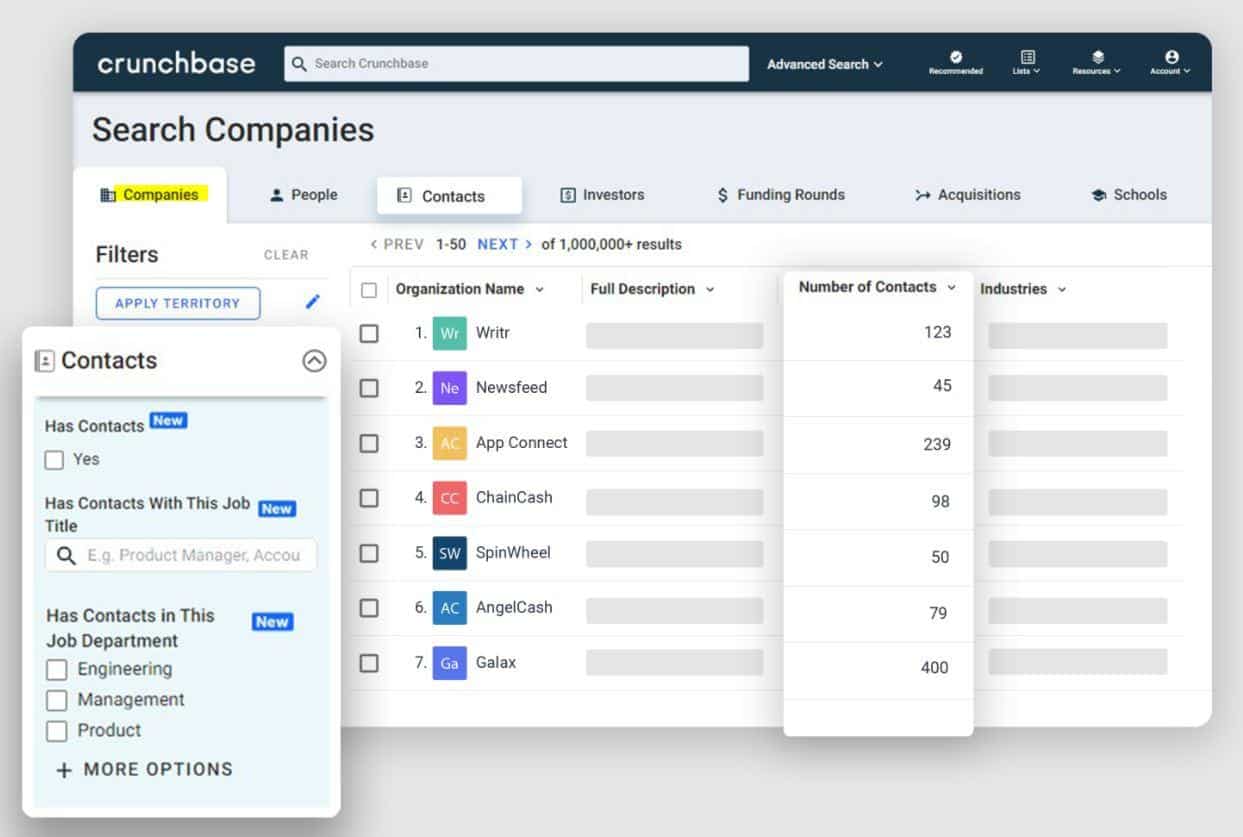
- There, add the filters you are interested in based on your goals. 🎯 For that you have the “filters” tab on the left.
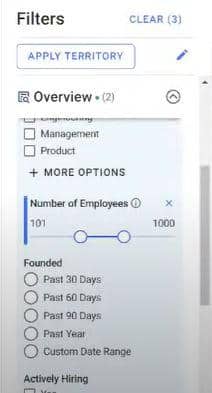
The search is limited to a thousand results, so segment your search. (Add filters that limit the number of results).
The big difference between Crunchbase and LinkedIn is that it is much more specific.
On LinkedIn, when you search for decision makers, the LinkedIn filter is much less effective (about 50% of your search will not be decision makers). Crunchbase is much more effective. 🚀
For example: you can put just in France or just in the US.
Step 2 – Change the view
- Now click on the “edit view” button, remove all the info except the LinkedIn page URL and the prospect‘s name.
To do this, click on all the little boxes and uncheck them as you go along. Normally, you should only have 2 columns left. 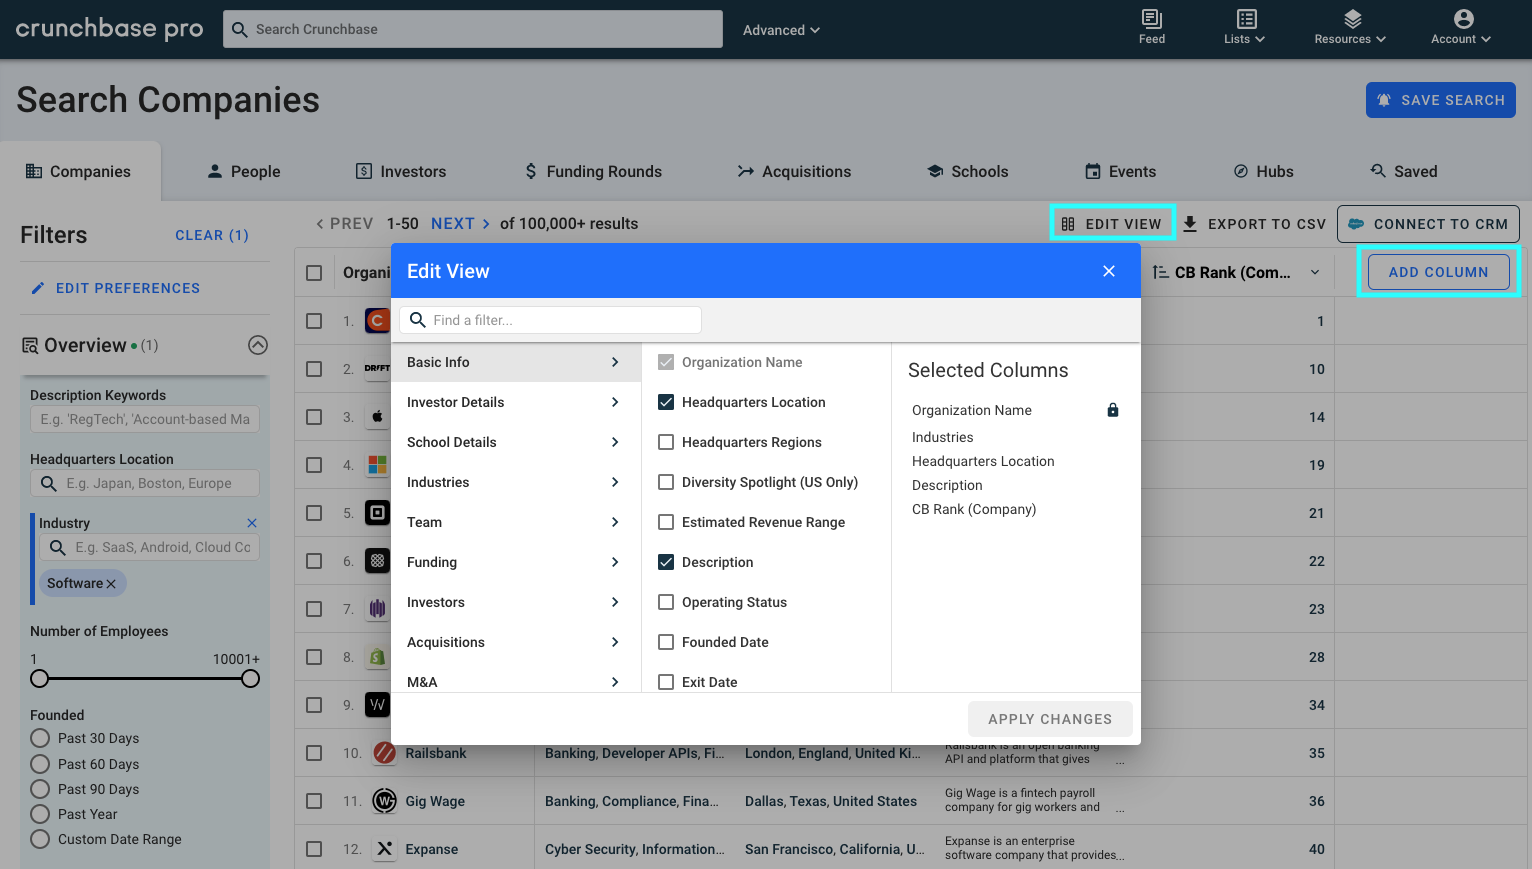
Step 3 – It’s a tough code
Once you are on this search page, we will paste a piece of code.
- Open the console (right click on the page + Inspect).
 Then paste the following code into the console:
let i=0;
let data = []
let button = document.querySelectorAll(« body > chrome > div > mat-sidenav-container > mat-sidenav-content > div > discover > page-layout > div > div > div.advanced-search-container.layout-row > section.results-container > results > div > div > div.cb-background-white.cb-padding-small-vertical.flex-none.layout-column.layout-align-center-stretch.layout-gt-xs-row.layout-align-gt-xs-start-center > div > results-info > h3 > a »)[1];
function myLoop() {
for(let i=2;i<52;i++){
let x = document.querySelectorAll(« body > chrome > div > mat-sidenav-container > mat-sidenav-content > div > discover > page-layout > div > div > div.advanced-search-container.layout-row > section.results-container > results > div > div > div.flex.layout-fill.cb-relative.cb-background-white > sheet-grid > div > div > grid-body > div > grid-row:nth-child(« +i+ ») > grid-cell.column-id-linkedin.ng-star-inserted > div > field-formatter > link-formatter > a »)
if(x[0]){
console.log(x[0].href.trim())
data.push(x[0].href.trim())
}
}
button.click()
setTimeout(function() {
i++;
if ( document.querySelectorAll(« body > chrome > div > mat-sidenav-container > mat-sidenav-content > div > discover > page-layout > div > div > div.advanced-search-container.layout-row > section.results-container > results > div > div > div.cb-background-white.cb-padding-small-vertical.flex-none.layout-column.layout-align-center-stretch.layout-gt-xs-row.layout-align-gt-xs-start-center > div > results-info > h3 > a »)[1].ariaDisabled == ‘false’) {
myLoop();
} else {
console.log(« ——–« )
console.log(data) }
}, 5000)
}
myLoop();
Wait a few seconds.
Step 4 – Recover the data
- Copy the resulting object with all the LinkedIn Urls (right click on the object with lots of red Urls → Copy.)
- Go to a LinkedIn search page,
- We will go back to the console and then to the Network tab.
![]()
- There, we will copy the CSRF token and put it aside. (This is essential for the future, so put it on a note for example).
To find it, just follow the same steps you see here: 
Step 5 – Last piece of code
- Still in your LinkedIn search page, in the console. We will paste a new piece of code.
For this to work, you’ll need to customize 2 little things:
- Replace the value‘ajax:-4941982001146658730’: by the csrf token obtained.
- Replace the [ ] with the copy object from the Crunchbase console. (Only for the [] in green, not the others.
const csrf = ‘ajax:-4941982001146658730′;
const companies = [];
let companiesName = companies.map(e => e.split(“?”).shift())
companiesName = companiesName.map( (e) => { if(e.charAt(e.length – 1)===”/”){let arr= e.split(“/”) ; return arr[arr.length-2]} else { return e.split(“/”).pop() } })
const ids = [];
let id;
let i=0;
let results=[]
for await (const companyName of companiesName) {
console.log(“loading id of “+companyName)
id=false
if (Number.isInteger(companyName)) {
id = company
} else {
id = await new Promise((resolve) =>
fetch(
{encodeURIComponent(companyName)},
{
headers: {
accept: ‘application/vnd.linkedin.normalized+json+2.1’,
‘accept-language’: ‘en-US,en;q=0.9,fr;q=0.8’,
‘cache-control’: ‘no-cache’,
‘csrf-token’: csrf,
pragma: ‘no-cache’,
‘sec-ch-ua’: ‘”Google Chrome”;v=”95″, “Chromium”;v=”95″, “;Not A Brand”;v=”99″‘,
‘sec-ch-ua-mobile’: ‘?0’,
‘sec-ch-ua-platform’: ‘”macOS”‘,
‘sec-fetch-dest’: ’empty’,
‘sec-fetch-mode’: ‘cors’,
‘sec-fetch-site’: ‘same-origin’,
‘x-li-deco-include-micro-schema’: ‘true’,
‘x-li-lang’: ‘en_US’,
‘x-li-page-instance’: ‘urn:li:page:d_flagship3_company;uxvsOiZFT+i1Gdt7Xj1pfQ==’,
‘x-li-track’:
‘{“clientVersion”:”1.9.5787″,”mpVersion”:”1.9.5787″,”osName”:”web”,”timezoneOffset”:2,”timezone”:”Europe/Paris”,”deviceFormFactor”:”DESKTOP”,”mpName”:”voyager-web”,”displayDensity”:1,”displayWidth”:1920,”displayHeight”:1080}’,
‘x-restli-protocol-version’: ‘2.0.0’,
},
referrer: ‘https://www.linkedin.com/’,
referrerPolicy: ‘strict-origin-when-cross-origin’,
body: null,
method: ‘GET’,
mode: ‘cors’,
credentials: ‘include’,
},
).then((r) => r.json().then((res) => resolve(res.data[‘*elements’][0].split(‘:’).pop()))).catch(() => resolve(false)),
);
}
if(id)
ids.push(‘”‘ + id + ‘”‘);
if(i===200){
//if we have 200 companies, we generate an search url and start over again
i=0
let linkedinSearchURL=”https://www.linkedin.com/search/results/people/?currentCompany=[” + ids.join(‘%2C’) +”%5D”
console.log(linkedinSearchURL);
results.push(linkedinSearchURL)
ids=[]
} else {
i++
}
}
let linkedinSearchURL=”https://www.linkedin.com/search/results/people/?currentCompany=[” + ids.join(‘%2C’)
console.log(linkedinSearchURL);
results.push(linkedinSearchURL)
console.log(results)
Wait a few more minutes.
Step 6 – Collect the data and gloat
Every 200 companies, the tool returns a search URL to copy and paste into your browser. From this search URL, you can apply the filters you want (directly in the standard LinkedIn search or in the search if you have it). Then run the search.
Step 7 – Use Waalaxy to contact them
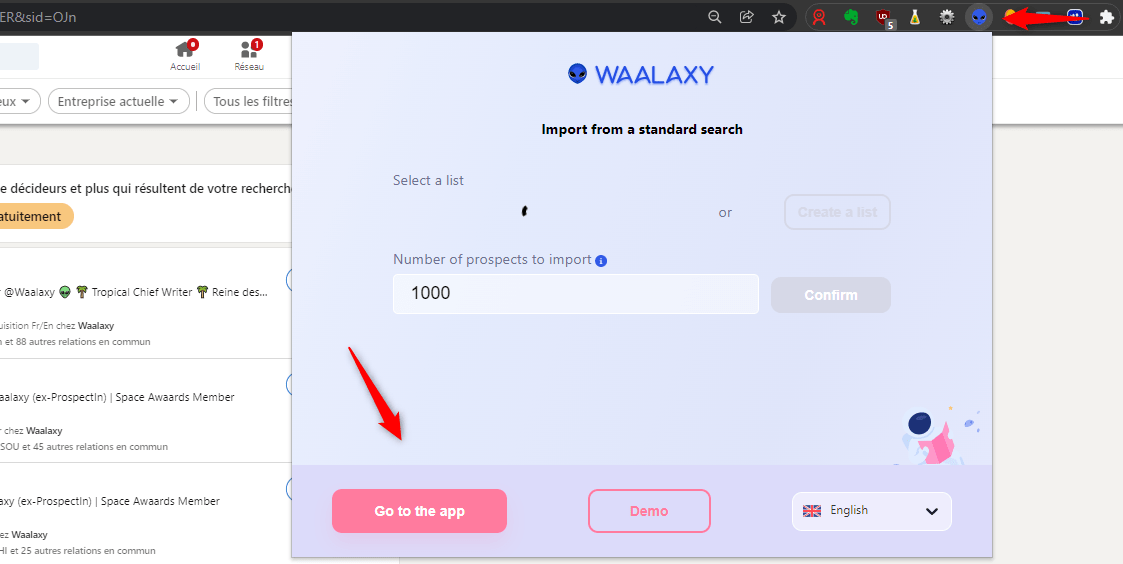
Either you already have Waalaxy, or just download it for free here. Once you’ve fine-tuned your LinkedIn search, just click on the little Waalaxy icon, then click “Import from search”.
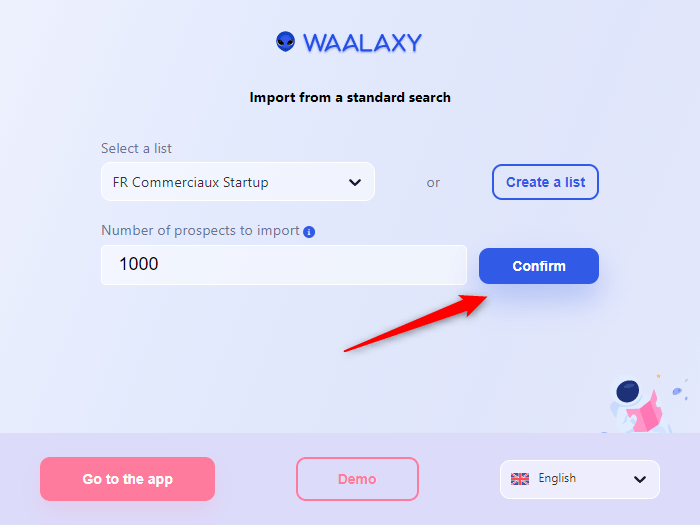
Once that’s done, simply launch a prospecting campaign with a personalized message.
- Click on campaign > create a campaign.
- Choose the sequence that matches your strategy,
- Validate and click on “add leads”,
- There, choose the list you just downloaded in your CRM,
- Write your custom message or messages, and launch. 🚀
20 free prospecting message templates. 👀
Conclusion of the article
In this article you have seen how :
- Retrieve the LinkedIn Url of a prospect whose personal email you only have. 💫
- Retrieve the LinkedIn Url of a prospect whose business email you only have. 🤩
- Find data on startups and therefore know about development opportunities before anyone else. 🤙
Don’t hesitate anymore to use APIs to prospect new customers. If you need support, you can contact Kevin, and if you have any question about Waalaxy, there is a chat available on the tool, with real humans who answer your queries with a smile. 🥰
Faq of the article & live
How to clean up a lead search? [Important]
No matter how you did your LinkedIn search, you’re going to end up with prospects that don’t fit your target. You need to re-sort the list.
- Import them into Waalaxy,
- Go to filters, and refine your search again.
For example: you’re only looking for Project Managers and you want to remove all “Project Assistants” from your list.
- You go to filters > “occupation” > type in “assistant”, validate.
There the list of people who are “assistant” will come out in your file, you just need to create a Blacklist in which you will put all the prospects that do not match your target. 🎯
Remember that knowing how to prospect = Contacting the right person, at the right time.
Why blacklist the prospects you are not interested in?
In Waalaxy, you can either delete or blacklist prospects that don’t fit your target. If you decide to delete them, they might slip back into your Waalaxy CRM when you do your next research.
But with Waalaxy, you have an anti-duplicate security. So if the person is blacklisted, they stay in your CRM, it is not possible to download their profile again.
What if the data on LinkedIn is not up to date?
The strength of LinkedIn is that people update their own data in real time. When you’re looking for profiles that are minimally qualified, they better update their position, because it’s their professional tool.
There is no way today to know if the data is up to date, but from experience, a large majority is.