- How to do a good search on LinkedIn?
- Do you necessarily need Sales Navigator to find leads on LinkedIn?
- How to use Sales Navigator on LinkedIn?
- How to use Sales Navigator for free on LinkedIn?
- LinkedIn Targeting: How to target profiles based on a list of companies?
- How to use filters with ProspectIn
- How to automate the import of prospects using Triggers
How to do a good search on LinkedIn?
You may have already noticed this, but the results in a Linkedin search are not always entirely relevant. The reason? The search algorithm is not very efficient. In this article, we will tell you how to master the LinkedIn search feature.🔍
LinkedIn is a gold mine. But, you need to learn little tricks in order to take full advantage of its potential. Especially when it comes to the search.
Basically, LinkedIn wants you to pay for its Sales Navigator tool, which gives you access to results with much better granularity. And despite its high price (€59 / month excl. Tax), we’re with them on this one – it’s a good tool. 👍 That being said, LinkedIn’s search is the database of prospects from which many build their campaigns, and therefore high-quality results are still needed. So, here are some best practices you should follow for better results. 🎯
Don’t use LinkedIn’s main “keyword” search bar
I recommend that you do not search for a keyword using the main search bar. Above all, do not use the main search bar. Really, don’t use the main search bar… No, but seriously. Do not use the main search bar! There is NO reason to use the main search bar.

Suppose you want to find people in “Marketing” positions. Use the “Title” filter to search for the word “Marketing” or “Marketer”. What if you want to target people that are working in the marketing industry? Use the “Industry” filter to search for the word “Marketing and Advertising”. The only reason to use the main search bar is if you are looking for a specific profile and you know their name. Otherwise, there are other filters. Let’s say you type “fitness” into the main search bar, you will get:
- Results with job titles that contain “fitness”. In general, this is what we are looking for.
- Profiles in companies that contain the word “fitness”: this could be relevant.
- Profiles where one of their skills is listed fitness: not that relevant.
- Profiles whose previous company contains the word “fitness”: less relevant.
- Profiles who have “fitness” listed as an interest.
- And finally, profiles in which the word “fitness” simply appears on their profile!
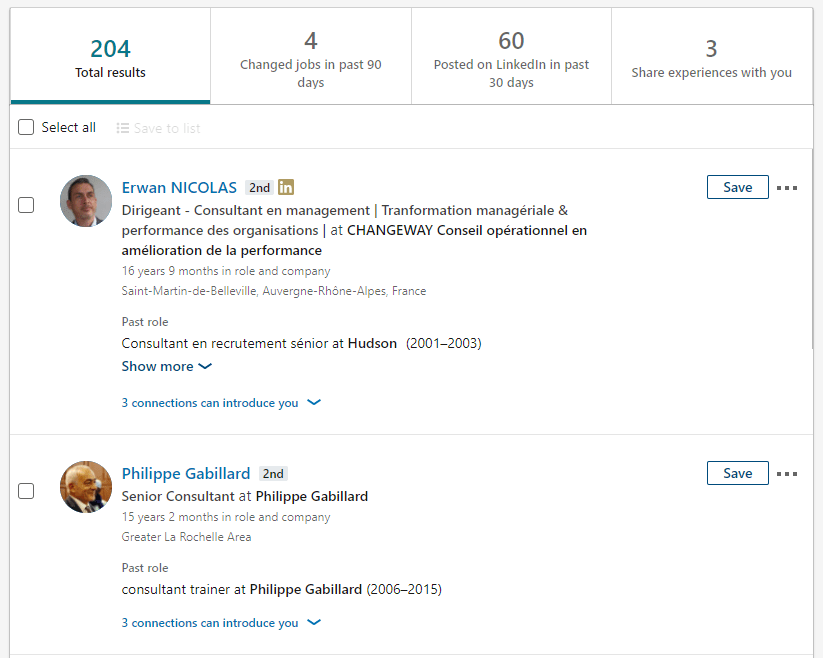
For example, if I search for the word “fitness”, I get this result on the 20th page:
![]()
It’s safe to safe that this profile does not correspond to what I am searching for!
Use “title” to qualify your prospect
Obviously, there are other alternatives to the main search bar. Most of the time, if we are looking to prospect, the aspects that would be of interest to us would be:
- What the person does.
- The industry.
- The company.
- The size of his business.
- The prospect’s seniority.
- Their geographic positioning.
- If the prospect is in a decision-making position.
The size of the company, the seniority of the prospect and their status as a decision-maker are only accessible with the Sales Navigator search function. Therefore, we’re not gonna look into that in this part of the guide. Regardless, the title is much more useful when targeting prospects. In my opinion, it is even the best qualification tool that you can use in a LinkedIn search
. 
It often replaces the main search bar which gives too imprecise of a result. And it becomes particularly powerful when using Boolean operators.
Using Boolean operators
For some, Boolean operators are nothing short of wizardry. No doubt about it, they are incredibly effective, yet relatively straightforward to use. A Boolean operator allows you to combine different elements or specify what you’re looking for in a search field using a keyword. The keyword itself but also the field “Title”, “First name”, “Last name”, “School” and “Company”) thanks to a linking word or a special character. Here are some Boolean operators in use:
Use quotation marks
If you are looking for a specific expression. For example “Growth Hacker” in the title field. Not using the quotation marks may produce results with only “Growth” or worse only “Hacker”. By adding the quotation marks, LinkedIn will only display people whose job title exclusively contains “Growth Hacker”. If you had to keep only one, it would be this one.
Try the “NOT” exclusions
For me, this is one of the most powerful Boolean operator as it allows you to eliminate irrelevant results in your search. Say you are looking for prospects in marketing, so you type “Marketing” in the title field. Browsing the search results you may come across “Freelance Marketing”, which may not be what you’re targeting. By specifying “Marketing NOT Freelance”, the search will delete the profiles containing “Freelance” in their title. You can obviously add as many “NOT” elements as you want to refine your search. If you use ProspectIn, it is always possible to refine you search afterward – thanks to the campaign filters. “Search filters by keywords – Contains/Does not contain”.
Discover the “OR” and “AND” inclusions
I’m talking about them under the same section as they essentially go together. When you understand how “NOT” works, “OR” and “AND” are much the same. These operators allow you to associate items. Are you looking for people who did a master’s at “Harvard University”? Take the “School” field and add “Master AND Harvard”. Another example. You are looking for people who work at “Tesla” or “Toyota” or “Renault”. In the “Company” field, add “Tesla OR Toyota OR Renault”.
What about the brackets?
It’s like math (a distant memory perhaps). Brackets are used to make combinations with Boolean operators. For example : (marketing NOT freelance) OR (chief marketing officer OR CMO) => “marketing” and not “freelance” or “chief marketing officer” or “CMO”
Do not exceed 1000 search results
In case you didn’t know, LinkedIn doesn’t give you access to more than 1,000 standard search results. Even if there are millions! It would be too easy. In actuality this is for your benefit, as it allows you to get better leads by pushing you to reduce the size of your searches and get better granularity in your campaigns.
Find companies in your targeted industry
A slightly different, but very effective approach. Suppose you want to sell a product to recruiters or job-seekers. You can search for “recruiters”. You will get quite a few interesting results. But what if you want to sell to recruitment agencies? That complicates things. You should know that in almost every business sector, there are websites that bring together companies in the industry. In this case, you can search for “Recruitment firms” on Google. By doing a little digging, we find a site that lists more than 400 recruitment agencies around the world. They even allow you to choose by business sector! Once this list is obtained, all you need to do is copy/paste it in the “Companies” filter to qualify your prospects and start your prospecting! This is only an example, but it is applicable to almost all sectors. Of course you can also use the company search bar.
Search by region to personalize your LinkedIn search
This tip is straightforward, yet effective. When you get thousands of inaccessible results in a search (by typing “Marketers” for example), you can simply refine your search by entering a region in the Location filter. When creating campaigns on ProspectIn, this allows for highly personalized campaigns:
- Marketers Pittsburgh.
- Marketers Denver.
- Marketers Oakland.
So the invitation note for your prospects in the campaign Marketers Denver might look something like this: “I saw that you were in marketing around Denver. Your profile seems interesting! .” Etc
Other: Groups
It is not possible to filter by a specific group on LinkedIn’s Standard Search. However, groups are an almost infinite and highly qualified source of prospects. People gather around a topic or mutual interest. Isn’t that great?
Find groups that are relevant to you. To give you an example: I search for Groups with the keyword “recruiters”. I get groups from around the world, with lots of members.
In this case, you can ask to join several of them, but know that they will not systematically accept you. Also be careful, as you cannot join an unlimited number of groups or have unlimited pending requests – LinkedIn blocks you at around 20. Once you’ve joined, all you have to do is have a look at the the list of members and export your group into ProspectIn. Now, you know how to master the LinkedIn search feature ! 😁
Ok, where are we now? You were practicing a perfect search on LinkedIn, right?
The advice we provide you with, we developed it by doing our own tests and search.
It’s naturally that we wanted to tell you about the Sales Navigator and our best practices to use it well.
If you’re thinking about getting the Sales Navigator, or if you already have it, let us be your guide:
Do you necessarily need Sales Navigator to find leads on LinkedIn?
When you start getting interested in LinkedIn prospecting, one of the first questions that’ll arise is whether or not you should sign up for LinkedIn’s Sales Navigator plan. Let’s talk about the pro’s and cons. 😜
What is Sales Navigator?
Sales Navigator is one of LinkedIn’s premium subscription plans, along with Recruiter Lite and Business Plus and Job Seeker subscription plans. You will be billed $79.99 per month in the case of a monthly subscription and $64.99 per month in the case of an annual subscription. 🤪 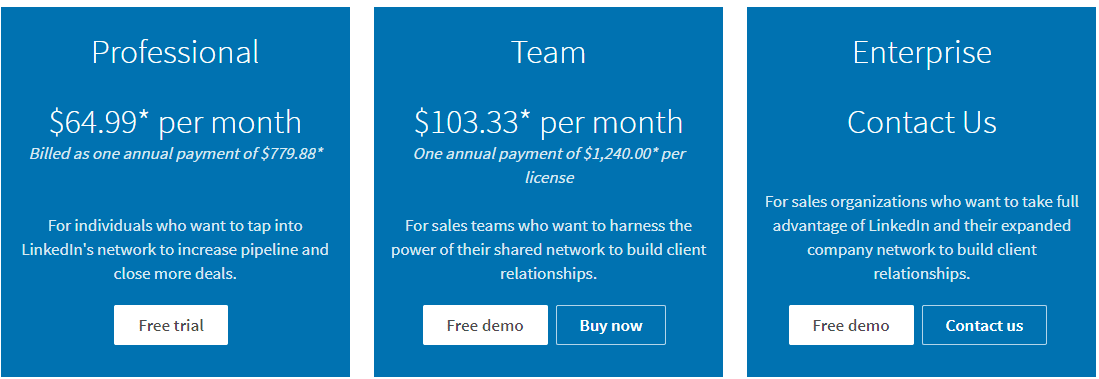
As its name suggests, Sales Navigator is a product designed for sales people, looking to sell goods or services. Sales Navigator is essentially a search engine for LinkedIn. However it is much more powerful and precise than the “standard” search engine, with access to more filters to categorize your searches. It also also includes some additional features such as the prospect tag and the ability to send a specified number of InMails per month. Although not essential, these features can be useful – especially Inmails, if you’re in the situation where you only have a very small number of potential prospects.
What is the point of taking a Sales Navigator subscription?
An improved search engine? Is that all? Yes, that’s all. But that’s all that matters. Being able to categorize your prospects with precision means making sure you start your prospecting on solid ground. It’s essential. This is what will allow you to target the people you wanted to target, to compare your prospecting campaigns with each other, and to personalize your campaigns. In addition to offering a high level of depth thanks to:
- Company workforce size filters,
- The number of years of experience,
- Seniority in the current position and in the current company,
- As well as the hierarchical level;
Sales Navigator allows you to search for members of a specific group, even if you are not in that group, a great feature for performing interest-based searches. An additional benefit of Sales Navigator is that it can display up to 2,500 search results (100 pages of 25 results) compared to only 1,000 for the standard search function (100 pages of 10 results). Of course, you will still have to think about categorizing your searches in order to access all the results. Finally, when you use ProspectIn’s Enterprise plan, the purchase of a single Sales Navigator subscription is enough to supply all your accounts with prospects, so it very much mitigates the cost 🔥
Standard LinkedIn search bar? Too basic.
LinkedIn’s standard search function has a number of filters that may look useful at first glance. But, as you can imagine, LinkedIn has no interest in making its standard search bar 10/10.
Its goal is to make you switch to a paid plan when you want to perform a more complete search. If you want to search for a former classmate or former manager by searching for their surname + first name, the standard search function will do its job, but if you want to do more, it’s simply not gonna cut it…
In addition to not offering all filters, search results from LinkedIn’s standard search bar could be downright distorted. For example, if you search for “IT Director”, the results will include both “Director” and people working in “IT”. Here is what we found on the 1st page when we entered the words “IT Director”, and utilized Boolean operators.

I’ll let you guess how relevant our results were on page 70 or 80… If you want to ensure maximum accuracy in your search results, you won’t go far with the standard search feature. ❌
On the other hand, if your goal is simply to grow your network, or you’re not too keen on the quality of your searches, the standard search function may be adequate for you. Although we recommend you go for a Sales Navigator plan, it is still possible to have very impressive prospecting results using ProspectIn and the standard search bar on LinkedIn.
Sales Navigator: pros and cons
Good reasons to use LinkedIn’s standard search bar
- You are new to LinkedIn and simply looking to grow your network,
- Your target audience is broad and the criteria of basic filters allows you to get relevant results,
- You are broke,
- You only use one LinkedIn account.
Good reasons to use Sales Navigator
- You already have a network of more than 250 connections,
- You want to be able to segment your personas in a fine and precise way,
- You want to optimize your prospecting and get access to categories of prospects otherwise unavailable,
- You use multiple accounts.
How to use Sales Navigator on LinkedIn?
Sales Navigator. Quite an expensive toolbut of unmatched power in the BtoB acquisition market. It’s simple yet very much comprehensive. 
Here is how to use Sales Navigator
This part complements an the earlier one on How to master the LinkedIn standard search feature. The 6 principles mentioned in this first part are totally valid for Sales Navigator. So don’t worry, I’m not going to repeat myself here. Rather, I’m simply going to suggest some other filters that you could use.
Target the decision-makers
It is one of the most effective filters on Sales Navigator: the seniority level. I don’t know how the LinkedIn algorithm determines this information, but it is very effective. When you want to sell, it is rarely to a junior member of the company (and if this is the case, it is always possible to filter by “young graduate”).

It is not a filter that is used alone, but rather in combination with other filters. If you are looking for people in marketing, add the hierarchical level you want to target, and you’ll get much better search results.
Focusing on length at a company
Another interesting and complementary indicator is the length of time in a company or in xxx position. If the prospect has been there for less than a year, it’s unlikely they’ll be able to buy a service or product that you offer. Of course the exception is if the prospect is the founder/the co-founder. In which case, the length of time they’ve been at the company is still interesting to know.

Use company size
This is one of the most useful filters on Sales Navigator. A product/market fit or a targeted campaign is often defined by a specific company size (we do not sell the same product/service in the same way to S&P500 companies and to SMEs).

Here, you can target from “Independent” to “more than 10,000 employees”. A great way to categorize your campaigns and create specific landing pages for each group. That way you tell a story perfectly adapted to each prospect.
Group filter
I already spoke about this in the Standard Search guide part 👆, but thanks to Sales Navigator, you don’t have to join a group. You can target prospects who belong to one or more groups. And this is very very powerful.
Posted on LinkedIn in the last 30 days
Want to contact only people who are active on LinkedIn? This can be a very useful ! You only contact prospects who published in the last 30 days and who are therefore active.
Using exclusion
As with the Standard search, it is possible to use Boolean operators. But it is also possible to use exclude keywords in specific filters, and not just the Standard search field. For example, you can add a “France” region filter and exclude prospects in “France” by clickingon the filter.

Now you know exactly how to use Sales Navigator! 🚀
I know what you have in mind: “it would still be nice to have the Sales Navigator, but it’s quiet expensive.” We know that, because when we launched ProspectIn, we made the same observation.
We weren’t rolling in dough, but we wanted to use the tool’s features to boost our performance.
It’s a bit like if you apply for a job in a company and you never get hired because they ask you for 10 years of experience. You think, “to get the experience, someone has to hire me at some point.”
It’s the axact same thing. To generate lead and therefore revenue, you are asked to invest in an expensive product before you have the money to finance it. 😂
At ProspectIn, we like to break the code. So we looked for a solution to take advantage of the Sales Navigator for free. And you know what? We found it. 😉

How to use Sales Navigator for free on LinkedIn?
Yes, LinkedIn’s goal is to get you to buy a paid subscription plan! Find out how to use Sales Navigator for free. 🤠
How ProspectIn can help you use Sales Navigator for free
1st step: the free trial
We are actually going to take advantage of Sales Navigator‘s 30 days free trial. The advantage of the trial is that it’s non-binding. To sign up to this offer you will need to enter your credit card information, but don’t worry, you will not be charged if you stop your subscription before the end of the one-month trial period.
2nd step: profile extraction to ProspectIn
Now that you have access to Sales Navigator, the idea is to build your prospect base for the next few months. You will carry out your search via Sales Navigator, and export the corresponding profiles to ProspectIn.
With ProspectIn, there is no limit to the number of prospects that you can export to your CRM. Also, contrary to a popular belief, to importing thousands of profiles a day into ProspectIn poses no risk to your LinkedIn account. However, it is important to remember the Sales Navigator search only displays the first 2,500 results of a search. So if your search returns more than 2,500 results, you will not be able to export all of the prospects. In this case, you will need to split your search into several small searches.
3rd step: prospecting with ProspectIn
ProspectIn allows you to send between 80 and 100 connection requests per day. If you set up ProspectIn to send actions 5 days a week, this makes 450 connection requests sent per week on average (90 x 5). By exporting 25,000 prospects to ProspectIn, you have a whole year of prospecting in front of you!
Once you have targeted and exported your prospect base for the next few months, you can cancel your Sales Navigator subscription. You will not be billed by LinkedIn if you cancel within 30 days, and your ProspectIn actions will be carried out normally, even if you no longer have access to the Sales Navigator.
Note: Although this technique is very useful, it’s important to keep in mind that there is the possibility that the status of some prospects may have changed between the export period and the prospecting period. Indeed, the more you move forward in time, the more chance there is of a prospect having changed their position or business sector. Therefore they might no longer be an appropriate prospect for the prospecting campaign.
One way to get around this is to create a fake LinkedIn account to benefit from a new trial period of Sales Navigator and repeat the operation to get up-to-date info.
Once the prospects are exported to the fake account, all you have to do is use ProspectIn’s CSV export feature.
Then you will just have to re-import these prospects into your real account- the one you use for prospecting.
There you go! You’re welcome 😜
You now have all the keys in hand to decide whether or not Sales Navigator has seduced you and whether or not you want to use the free trial.
And if you are always interested in innovations and development, let me introduce you to the next part 🤩.
You’ll love this section, specially designed for the apprentice growth hacker in you. All you need is a few tools and a secret method ✨.
That’s just what I’m about to reveal to you….
LinkedIn Targeting: How to target profiles based on a list of companies?
Looking for a little hack? 😜 You’re in luck! Some time ago, we discovered via la Missive (a newsletter containing articles on growth hacking), a great hack on LinkedIn – targeting company profiles . Essentially, finding the profiles that you are seeking, based on a list of companies.
The trick looks easy on paper, but in reality, you gotta know how to outwit the system, as the feature is not native on LinkedIn. On LinkedIn Sales Navigator, you can prospect and identify user profiles, or identify company pages in your search, but you can’t put the two together. However, there is a trick that can be done in two steps to allow you to target company profiles on LinkedIn. 😉
How do I combine the two searches on LinkedIn?
- On Sales Navigator, filter a search by accounts and add the necessary filters:
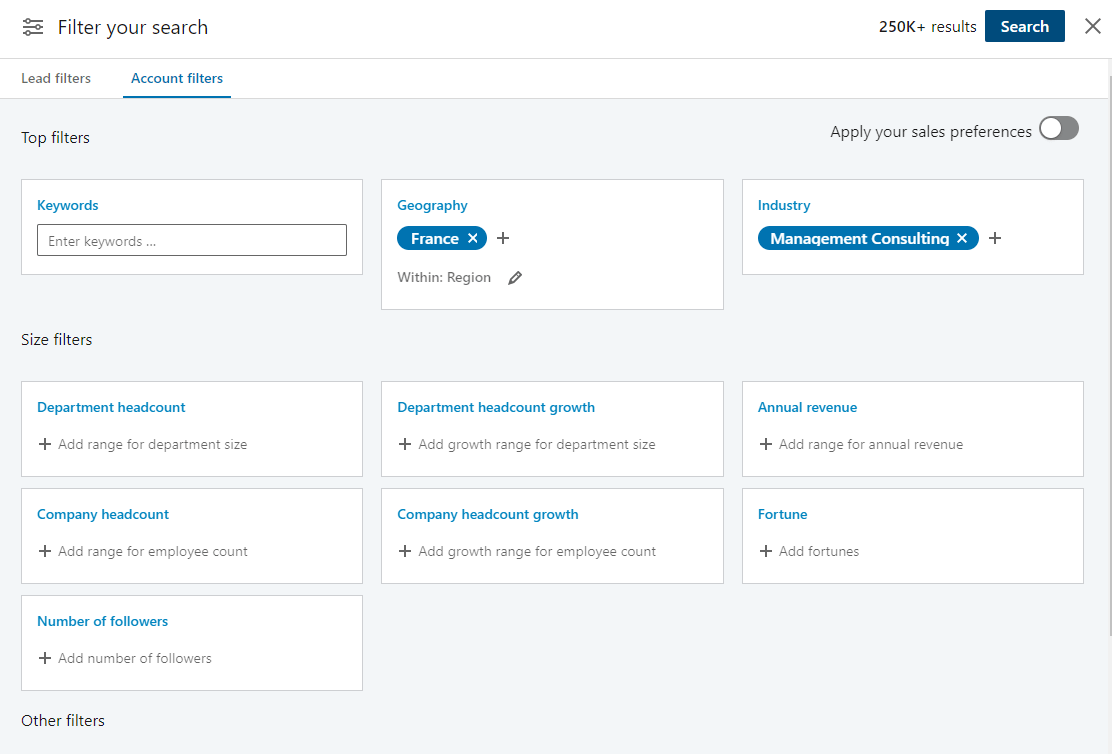
2. Now start the search. Then click on “Select all” and finally, “Save to list”.
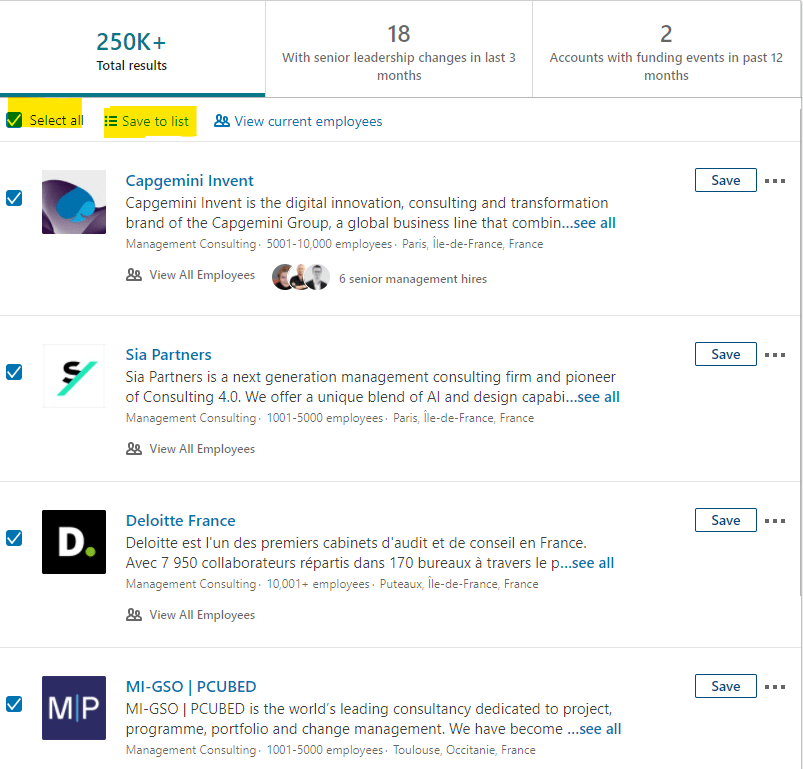
3. Give the list a name:
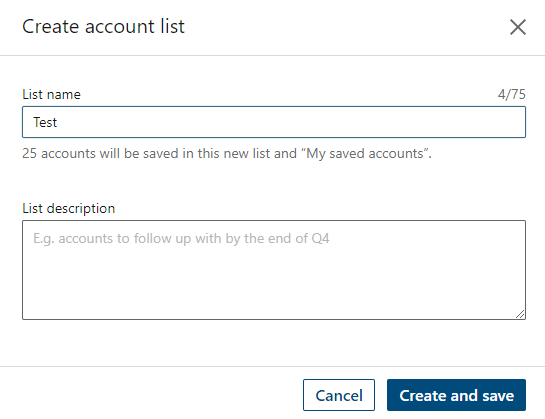
4. Ta-dah! You get a list of qualified profiles based on the companies you have targeted. Repeat these steps for each page!
5. Now open a new filtered search. This time by “Lead results”. Then, in “Custom List” add the list you just created!
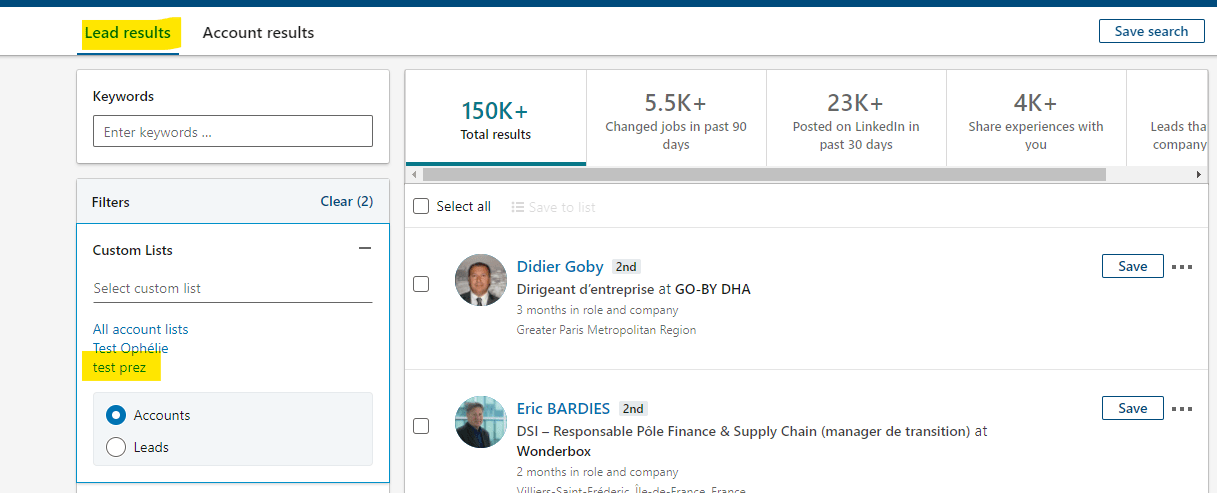
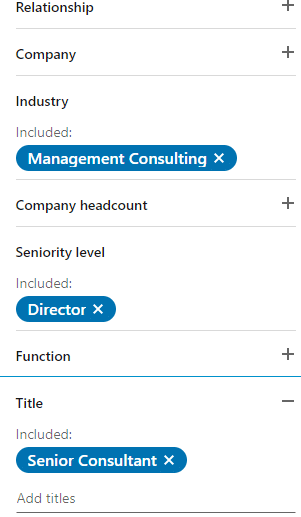
6. Add the filters that you want:
7. That’s it! The results that appear will only be people related to the targeted companies:
Congratulations Padawan, you have all the power in your hands to find your future customers on LinkedIn.
Allow yourself a break, go stretch a little, and come back wide awake for the rest of the adventure. 🎢
This time I’ll take you to a secret land, where only members of the tribe can go. I’m delighted to accompany your first steps on ProspectIn’s
abundant fields.

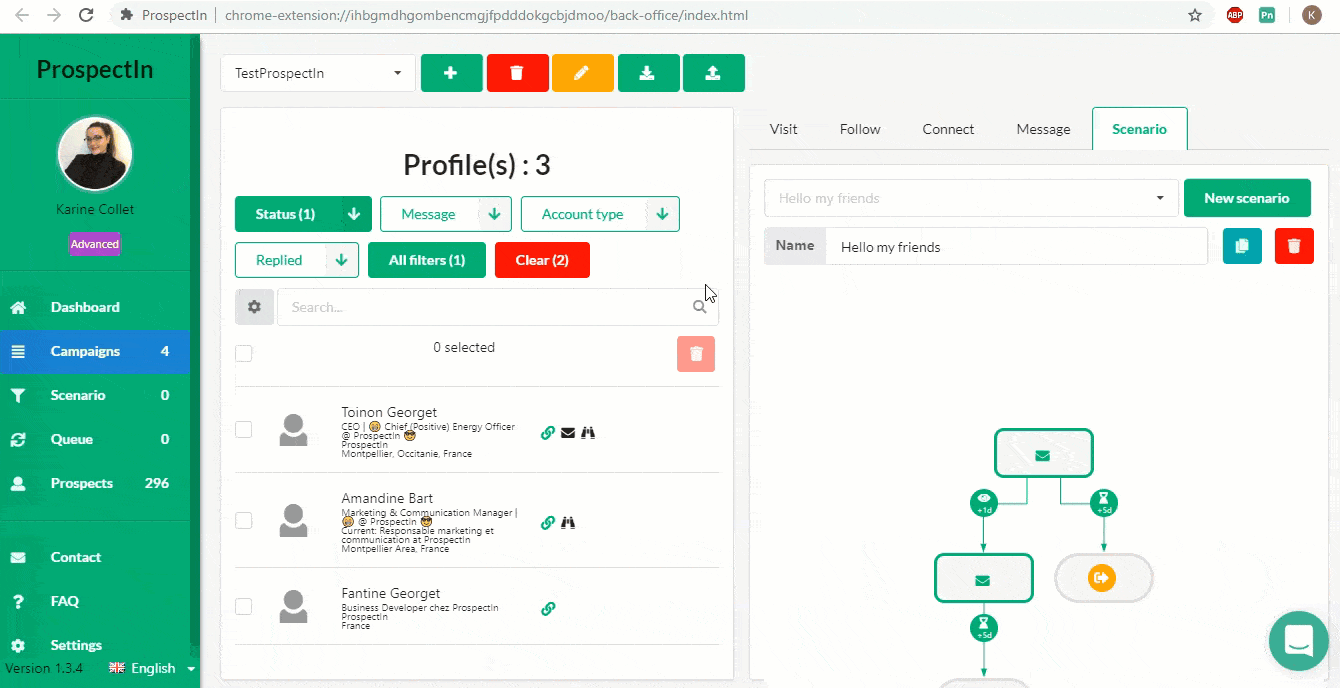
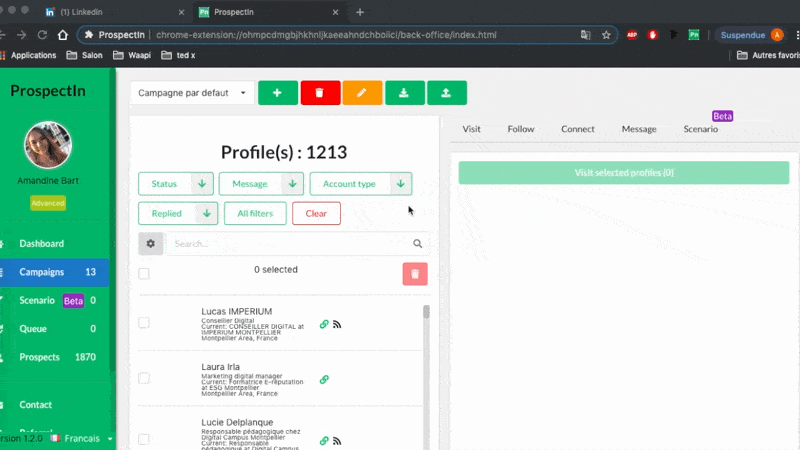
How to use filters with ProspectIn
In this brief article, we will go over the different filters that you can use with ProspectIn. From basic filters to the most advanced filters, including keyword filters. You will master everything 😉
Basic filters
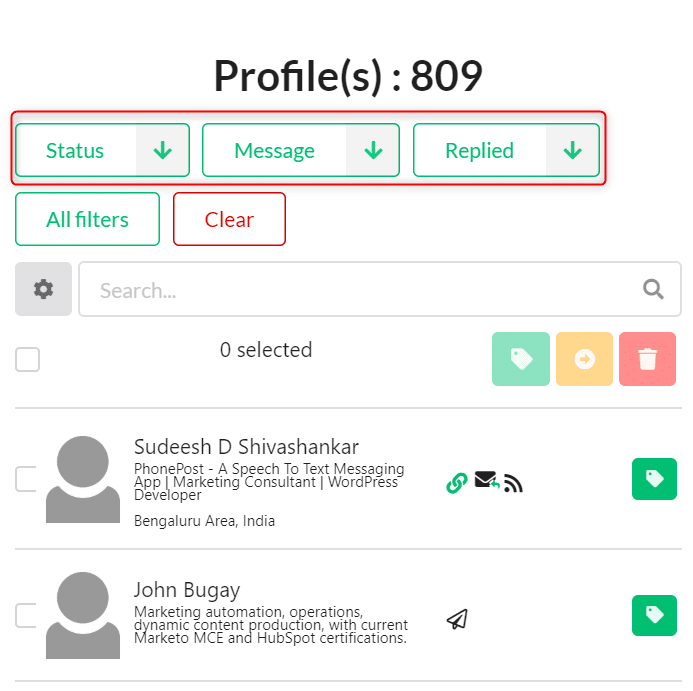
The basic filters are quick to access. They are as follows:
- Status (connected, not connected, pending)
To send a connection request, the prospect’s status must be “not connected”. To send a message, the prospect’s status must be “connected”. If the prospect’s status is “pending”, you can neither send them a connection request (you have already sent him one, which is awaiting acceptance) nor send them a message, since you are not yet connected.
- Message (message sent, no message sent)
This filter allows you to view prospects who have already received a message via ProspectIn and those who have never received a message via ProspectIn. Please note: these are only messages sent with ProspectIn. We do not collect information on the messages you manually send on LinkedIn.
- Replied (Has replied, hasn’t replied)
This filter allows you to distinguish the prospects who sent you a message from those who have never sent you a message. Be careful, as once again, these are only the messages received after the prospect was exported into ProspectIn. We do not retrieve conversations that took place on LinkedIn before the prospect was exported. So if you export a prospect with whom you have already spoken with on LinkedIn, it will appear on ProspectIn as “no message sent”.
Advanced filters
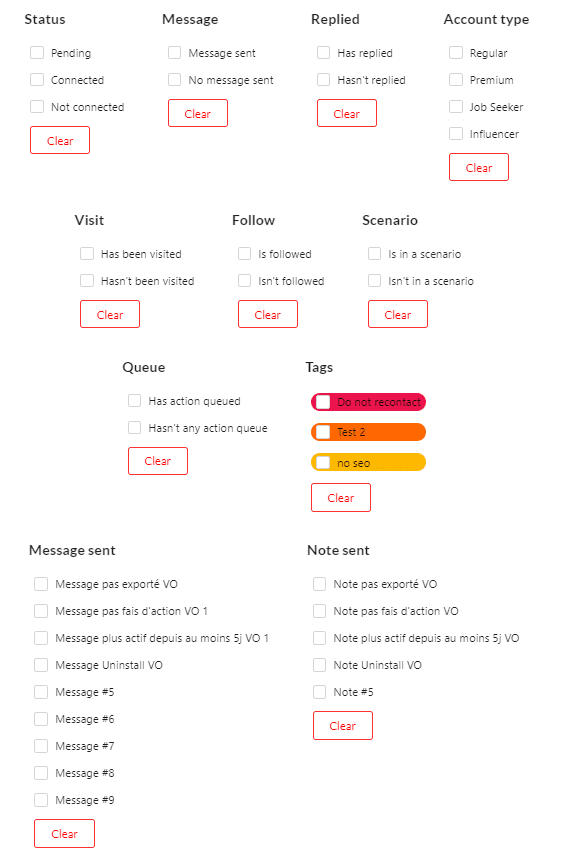
- Account type (Classic, Premium, Job Seeker, Influencer)
- Visit (has been visited, has not been visited)
Much like the “message” and “replied” filter, we do not retrieve information prior to export, so these are only visits made with ProspectIn.
- Follow (is followed, is not followed)
- Scenario (is in a scenario, is not in a scenario)
As a reminder: if a prospect is in a scenario, you cannot send an action (visit/follow/connection/message) to this prospect.
- Queue (Has an action in the queue, has no action in the queue)
- Message sent: allows you to display only prospects who have received a certain message
- Note sent: allows you to display only prospects who have received a certain note
- Tags: allows you to select prospects based on their tags
The filter system is an “AND” system and not an “OR” system. For example, if you select the filters “is connected” and “Premium”, the result will return all the prospects with whom you are connected AND who have a premium LinkedIn account, as opposed to showing you all the prospects with which you are connected with (but don’t have a premium account), and all prospects with a premium LinkedIn account (but you are not connected with).
Search filters by keywords
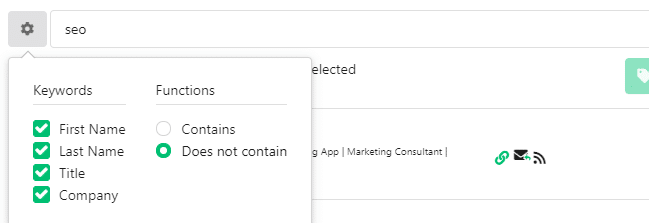
Finally, with ProspectIn, it is possible to filter by keywords. This filter allows you to refine your LinkedIn searches so as to get more relevant results.
It’s very simple to use. You enter a keyword in the search bar, then you select the section of the profile you want the the keyword to be in (first name, last name, title or company). Finally, you choose the function (“contains” or “does not contain”).
If you check all the boxes under “keywords” (as in the screenshot above), the system will search for the keyword in all of these sections/elements.
If you want to select only the people who have the word “marketing” in their title, you just have to enter the keyword “marketing” in the search bar and then select the keyword “title” and the option “contains”
Keyword filters are a great way to sort prospects after export. Especially for users who don’t have a Sales Navigator subscription, seeing as LinkedIn’s standard search function can be very imprecise. Using the search by keyword feature in ProspectIn makes it possible to attain better quality results.
There you go, you now know everything about filters. Do not hesitate to contact us if you have other ideas related to filters that you’d like us to implement.😃
Have you downloaded your first prospects in your CRM ProspectIn?
I’m just as excited as you are to move on to setting up an approach strategy together. 👨❤️👨
Speaking of strategy, I have something to show you before launching your LinkedIn campaigns. Keep your ProspectIn CRM open. Let me tell you about my favorite buddies: the 🤩 triggers.

How to automate the import of prospects using Triggers
But you can’t shake the feeling, that there must be more. You REALLY want to create a sales machine that takes care of everything; from importing leads, to sending messages, setting up campaigns, and scenarios. In this article, I explain how to use Triggers to automate the import of your prospects, and more. Just follow this guide. 😉
What are Triggers?
A little reminder never hurts: A Trigger is a ProspectIn feature that performs an action (output) according to another (input), and certain conditions (conditions). This feature allow you to automate the import of your prospects, let’s see how: 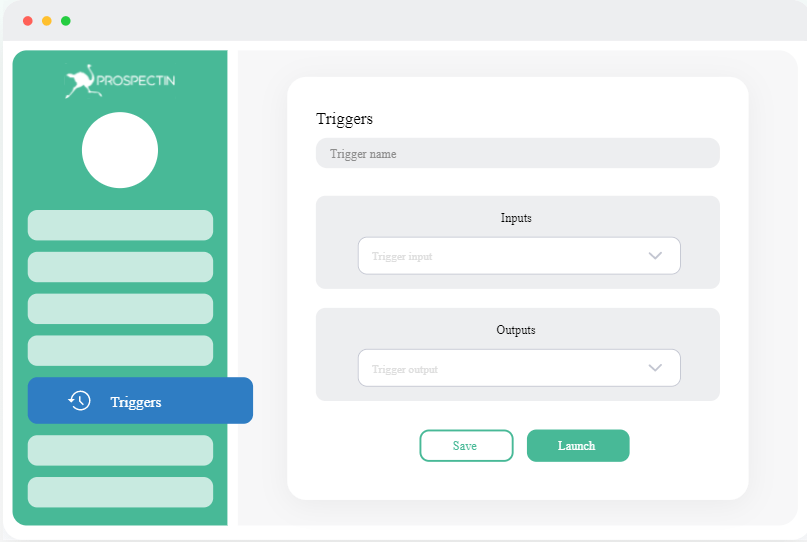
Let’s say you want to automatically accept connection requests on LinkedIn, and then send a welcome message. Then you would set up a Trigger as follows:
- Input: a connection request has been received,
- Output: accept the request and send a message,
- Condition: connection request without note.
There are a number of Triggers you can set up. Some allow you to automatically populate your prospecting campaigns. It is these triggers that we will be having a look at today 😉
Create a prospecting campaign using hashtags
We will start by creating an infinite prospecting campaign, with the trigger “New xxx post with a #”. This Trigger will allow you to target all people who post with a certain hashtag. You can export these people and integrate them in a prospecting Scenario, in an automated fashion In other words, without having to lift a finger. It’s beautiful, isn’t it? 😎 I will show you step-by-step how to set up this Trigger.
Step 1: Automatic export of people that post with #growth
- Log in to ProspectIn,
- Go to the Trigger page,
- Click on “create”
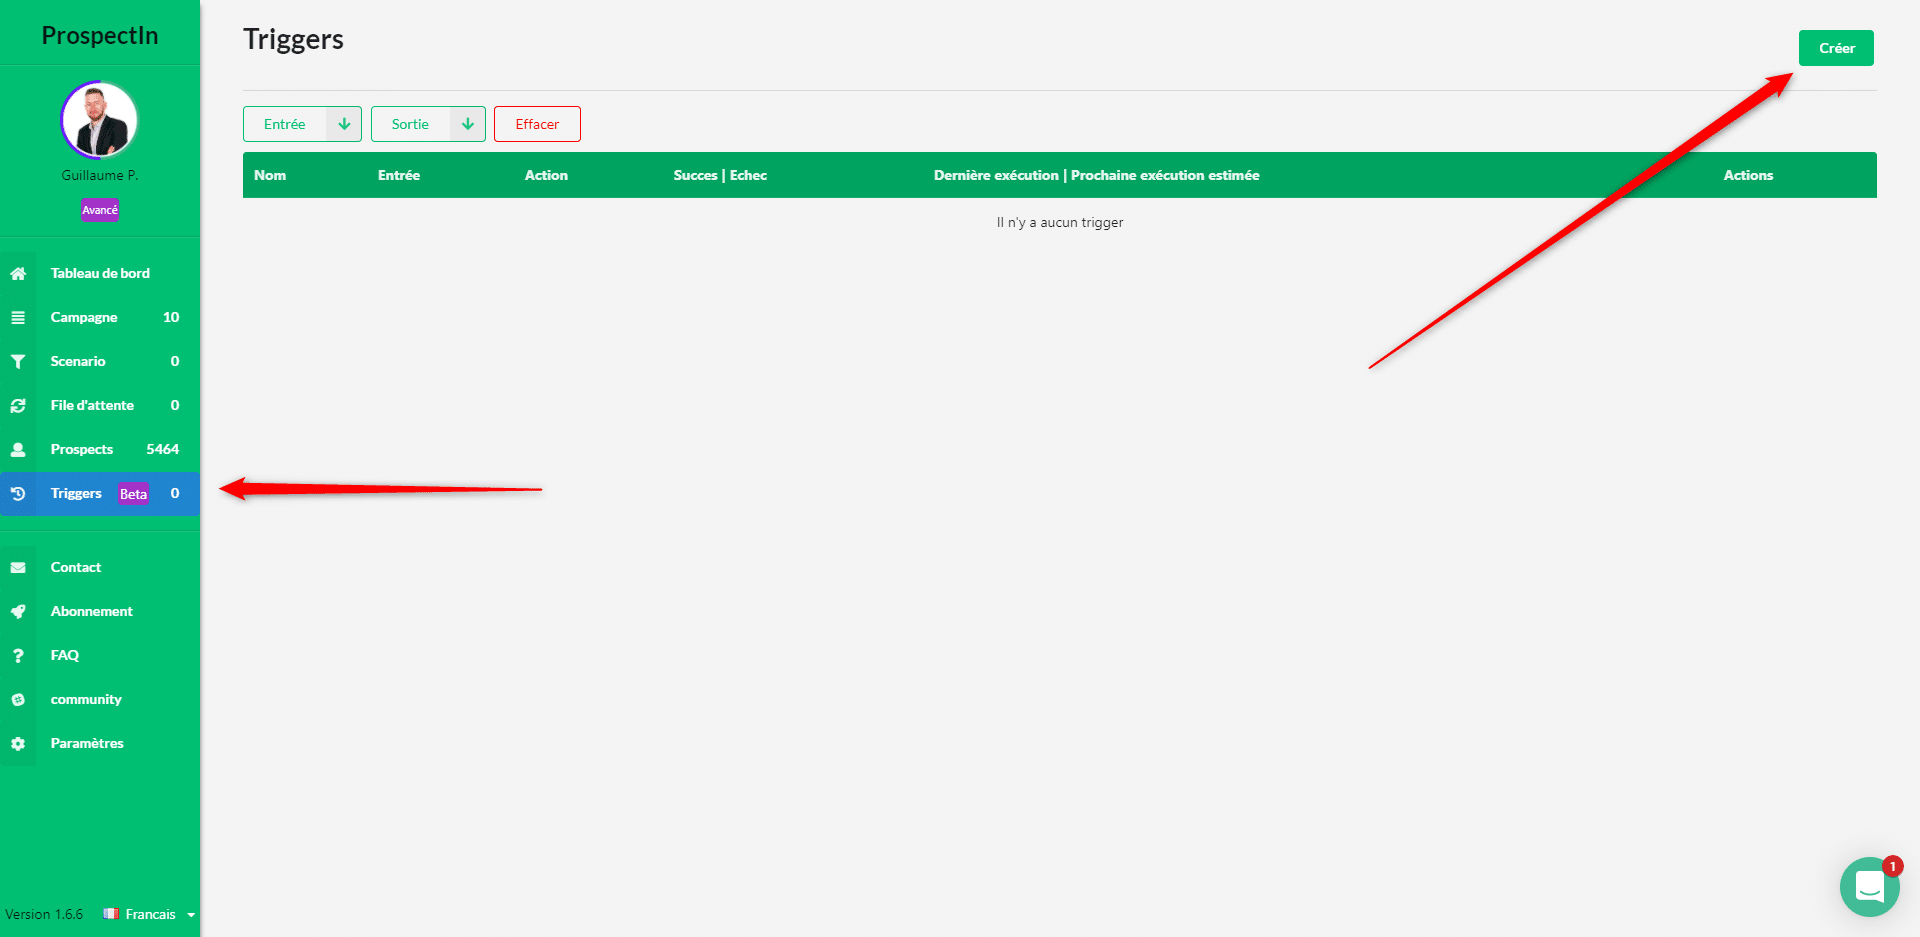
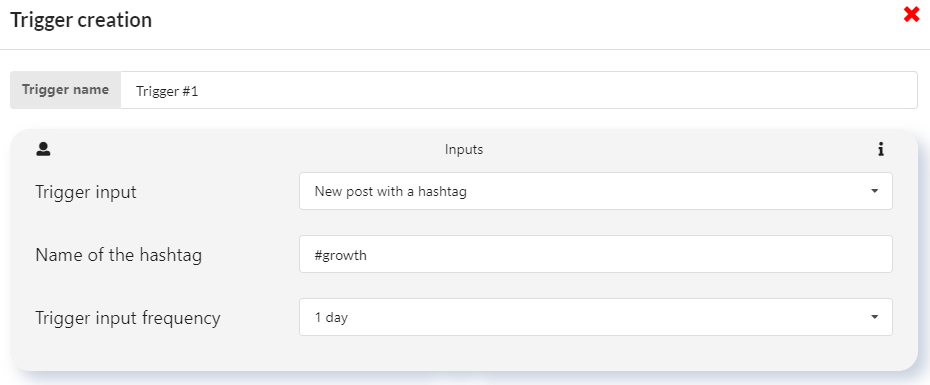
Give a name to your Trigger, then:
- In the field “Trigger input” choose “New post with a hashtag”,
- In the field “Name of the hashtag” choose “#growth”,
- In the field “Trigger input frequency” choose “1 day”.
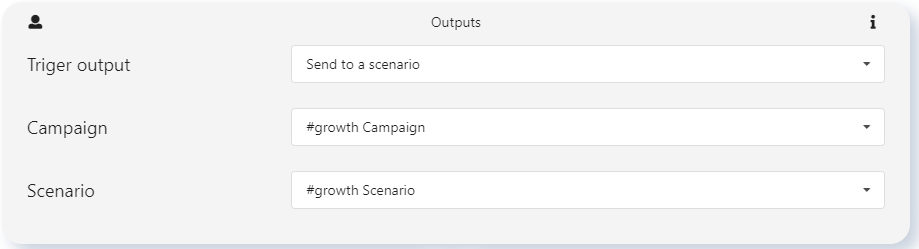
Step 2: Sending leads to a Scenario
Create the campaign in which you want prospects to be automatically exported, and then set up the Scenario in which you want to send these prospects. Then:
- In the field “Trigger output”, choose “Send to a Scenario”,
- In the field “Campaign” choose “#growth Campaign”,
- In the field “Scenario” choose “#growth Scenario”.
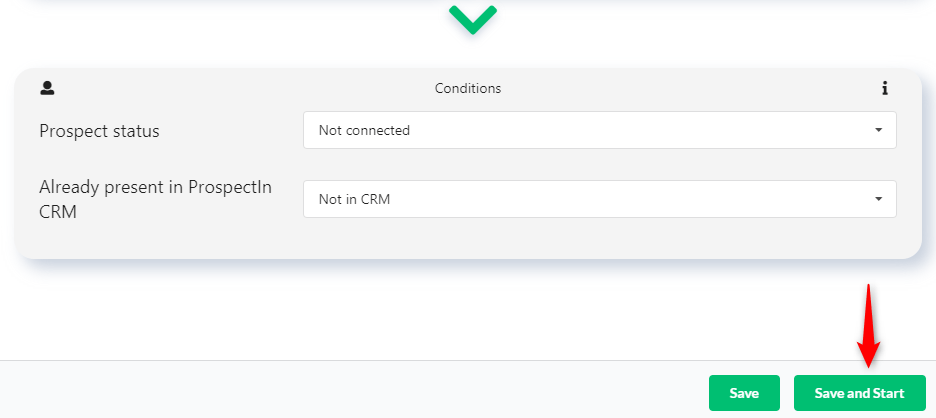
Step 3: Validate the conditions and start the Trigger
Let’s say you only want to contact people with whom you are not already connected, and those who are not already present in your CRM:
- In the field “Prospect status” choose “Not connected”,
- In the field “Already present in ProspectIn CRM” choose “Not in CRM”.
- Click on “Save and Start”.
- Your Trigger is set up and active!
 From now on, ProspectIn will automatically export all the people who post on LinkedIn with the #growth and send these prospects in the Scenario you have previously defined. There you go! You have now automated the import of your prospects as well as the sending of actions 😜 You will no longer need to manually export prospects yourself as new prospects will be added to your queue, every day, without your intervention. You can of course change the content of LinkedIn invitation notes as well as the messages, even after you have configured your trigger.
Send a connection request to everyone who visits your profile on LinkedIn
Thanks to the “My profile has been visited” Trigger, you can automatically connect with all the people who visit your profile on LinkedIn. Create a campaign where everyone who visits your profile will be automatically exported. Then create a connection request note that will automatically be sent to those people (you can also choose to not send a note by simply leaving the note field blank).
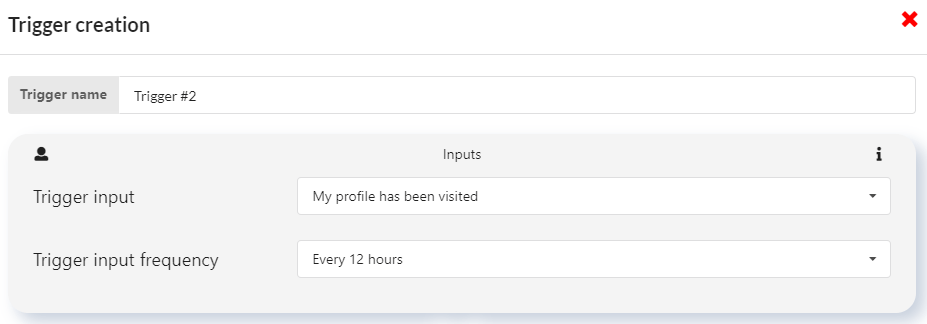
Step 1
- In the field “Trigger input” choose “My profile has been visited”,
- In the field “Trigger input frequency” choose “Every 12 hours”.
Step 2
- In the field “Trigger output”, choose “Send connection request”,
- In the field “Campaign” choose “Visit campaign”,
- In the field “Note”, choose “Connection after visit”.

Step 3
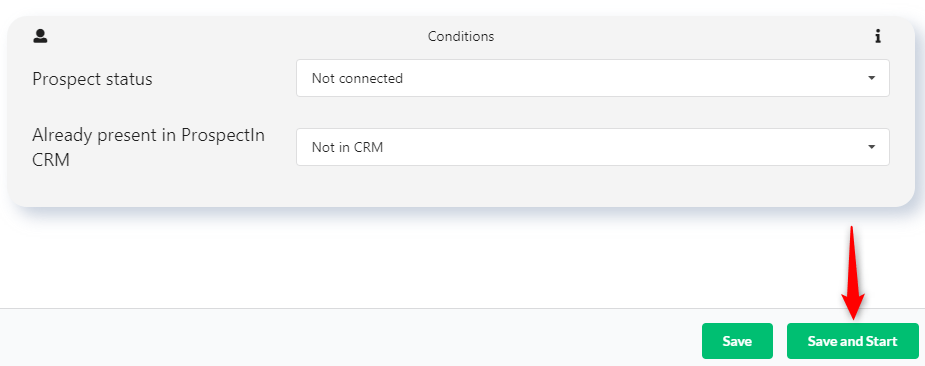
- In the field “Prospect status” choose “Not connected”,
- In the field “Already present in ProspectIn CRM” choose “Not in CRM”.
- Click on “Save and Start”.
 Well done, you will now automatically send a connection request with a pre-established note. Why not try a simple, “I see you have visited my profile. Let’s get in touch”, to people who visit your profile. This will allow you to maximize your acceptance rate and grow your account at a crazy speed. 😜
Send a message to people who comment on your LinkedIn post
It can be useful to automatically contact people who comment on your LinkedIn post. Especially if you use the “Comment to get my White Paper” technique. 😉 Start by creating a campaign in which everyone who will comment on your post will be exported. Then create a connection request note that includes a link to your White Paper on Google Drive. Then follow these steps:
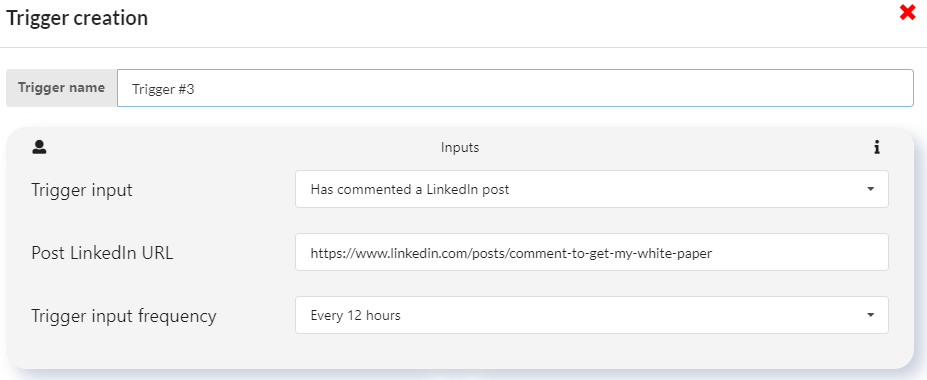
Step 1
- In the field “Trigger input” choose “has commented a LinkedIn post”,
- In the field “LinkedIn post URL”, paste the URL of your LinkedIn post,
- In the field “Trigger input frequency” choose “Every 12 hours”.
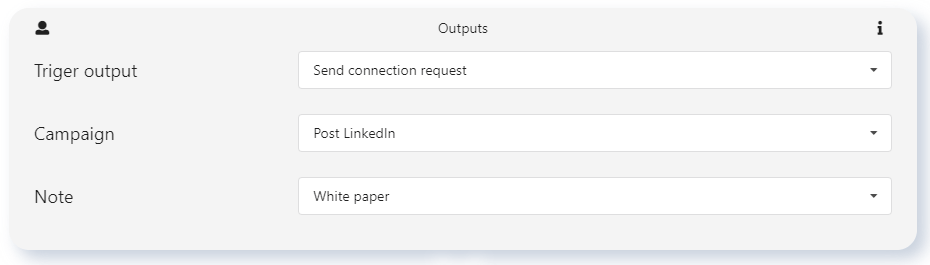
Step 2
- In the field “Trigger output”, choose “Send connection request”,
- In the field “Campaign” choose “Post LinkedIn”,
- In the field “Note” choose “White Paper”.
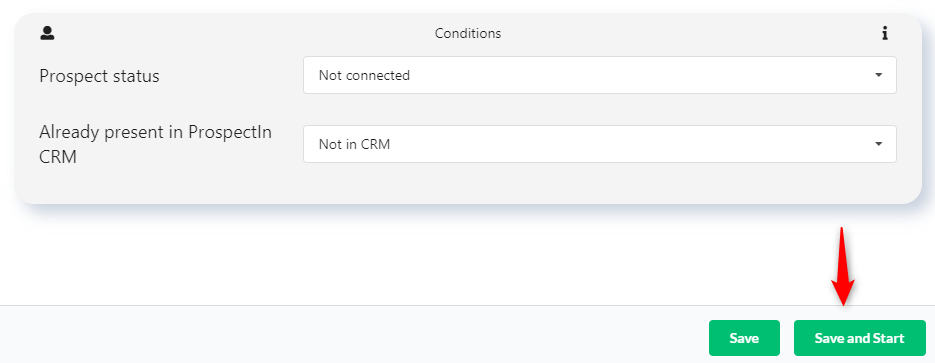
Step 3
- In the field “Prospect status” choose “Not connected”
- In the field “Already present ProspectIn CRM” choose “Not in CRM”.
 And that’s all for this Trigger.
Once the prospect accepts your connection request, they’ll be able to click the link. Being able to automatically send your White Paper via your connection request note to everyone who comments on your LinkedIn post ensures you don’t forget anyone.
Not to mention it’s a huge time-saver. Now that you know how to automate the import of your prospects, it’s your turn! 🔥

You’ve just learned more in a few lines than you would ever have learned in a LinkedIn Expert training. 😆
And, it’s not over yet, as we now move on to the next part of the adventure. In this part, we will focus on the messages you will send to your prospects to turn them into customers. 🎯